Showing posts with label party. Show all posts

Saturday, 17 February 2018

The Best Millionaire's Shortbread, Ever!

This delicious and indulgent recipe for millionaire's shortbread is one my grandma used to make, so it's been tried and tested over three generations and is still a family favourite. It takes a while to make, but it's definitely worth it for a special occasion or gift.
For the shortbread base
  • 200g/8oz block butter
  • 200g/8 oz caster sugar
  • 300g/12 oz SR flour
  • 3-5 tbsp. milk
For the caramel
  • 200g/8oz butter
  • 200g/8oz soft brown sugar
  • 2 tbsp. golden syrup
  • 2 x 400g/1lb tins of condensed milk
  • a good pinch of sea salt
To top
  • 300g milk chocolate
  • 50g white chocolate (optional)
Grease and line a non-stick baking tray.
Pre-heat the oven to 170C/160C Fan/325F/Gas 3

Using a food processor, rub the butter into the flour and sugar, until you have the consistency of fine breadcrumbs. Slowly, add a little milk at a time, until the dough just comes together into a ball.

Press firmly into the baking tray, using the back or a fork or spoon.

Bake for around 30 minutes or until golden brown and firm to the touch. Remove from the oven and allow to cool in the tray.

Meanwhile, make the caramel...

Melt the butter, sugar and syrup together over a low heat, until the sugar has dissolved.
Add the condensed milk and salt. Slowly, bring up to a simmer, stirring slowly but regularly with a wooden spoon, so that the caramel doesn't burn on the bottom of the pan.
Continue to simmer for around 10-15 minutes, until the caramel has turned a deep golden brown and has thickened. You may get little, dark bits of caramel floating around, but this doesn't affect the flavour!

Pour the hot caramel over the shortbread base, smooth out and allow to cool.

When the caramel is cool, melt the chocolate and pour over. Spread gently with a palette knife or the back of a spoon.

Finally drizzle with melted, white chocolate and feather using a skewer or toothpick, if liked.

When almost set, cut into pieces, using a sharp knife.
Allow to cool completely before removing from the tin.

Makes 20 large or 40 small pieces.
Will keep in an airtight container for several days. Pin It

Sunday, 1 November 2015

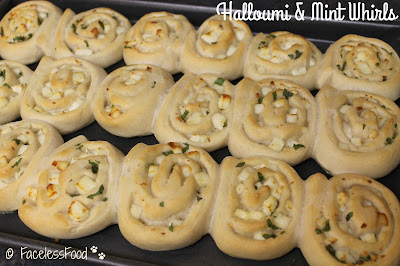
Halloumi & Mint Bread Whirls

Halloumi & Mint bread rolls
The recipe for these tasty halloumi bread rolls was inspired by one I tried in a Greek restaurant in Sydney, Australia. I don't know the actual recipe used, so I adapted my standard bread recipe and tried out a few variations.

When making a large loaf with raw halloumi, I ended up with a 'soggy bottom'! I found that I needed to cook the cheese first, to remove the excess moisture, and then had to cool it before adding to the dough.
So, I tried adapting my pizza whirl recipe instead, and it worked a treat using raw halloumi, as the moisture could evaporate.

For the bread base
  • 1 cup cold water
  • 3 cups strong white bread flour 
  • 1 tbsp olive oil
  • 1 sachet fast-action dried yeast
  • 1 tsp sugar
  • ½ tsp salt
For the filling
  • 200g halloumi, finely diced
  • ½ cup chopped fresh mint, or around 2-3 tsp dried mint
  • 2 tbsp olive oil
Put all of the dry bread ingredients in a bowl (or bread maker) add the wet ingredients.
Mix well until you have a smooth dough (on dough setting in bread maker).
Add a little more flour if the dough is too sticky.
Cover the bowl and allow to rise in a warm place for 30-60 minutes.

Dust a large board or clean table with a little flour.
Roll the dough into a rectangle, approx 25cm x 40cm. 
Sprinkle the halloumi and mint over, leaving a border at the front and sides.
Roll the dough lengthwise, as tightly as you can (like a Swiss roll).
Making sure the dough roll is seam-side down on the board, cut slices approximately 1.5cm thick.
Place on a greased baking sheet, with a little room to expand.
Drizzle with the olive oil.

 Cooking With Herbs
Cover loosely with cling-film or a clean tea towel and allow to rise for a further 30 minutes.
Meanwhile, preheat the oven to 200C/190C Fan/Gas 6 .

Bake for around 10-15 minutes, or until well-risen and golden.
Place onto a wire rack to cool.
Serve warm, with dips, as part of a meze, or instead of a sandwich in a packed lunch.

I'm linking this post to November's Cooking With Herbs challenge

Pin It

Saturday, 21 June 2014

Cinnamon Sugar Mini Muffin Doughnuts

Cinnamon Sugar Mini Muffin Doughnuts
When I saw Michelle from Utterly Scrummy's recipe for these delicious-looking, mini muffin-doughnuts (which are obviously not Duffins!), I just had to make them. They're really simple to make, and taste even better then they look! They have the taste and texture of those mini supermarket doughnuts.

I made a few minor changes to the recipe as follows...

  • I halved the recipe (to make 24) and replaced the cinnamon in the cake mixture with vanilla extract. 
  • To coat the muffins, I mixed 2 tsp of cinnamon with 6 tbsp sugar. 
  • I melted around 4 tbsp butter and after dipping a couple and seeing how much butter each muffin absorbed, I decided to just dip the 'muffin tops' into the butter, but still roll the whole cakes in the cinnamon sugar.

 Bookmarked RecipesI froze half of the batch and took a few out to defrost as and when anyone fancied one. They are best served warm and I found that a 10-15 second blast in the microwave did the job, without affecting the taste or texture.

My next challenge is to make a vegan version, so watch this space!

I'm adding this post to this month's Bookmarked Recipes over on Tinned Tomatoes.

Pin It

Saturday, 25 January 2014

Vegan Pizza Whirls

vegan pizza whirls
During Veganuary, I've been experimenting with various vegan alternatives in my cooking. This pizza whirl/pinwheel recipe is one I've adapted from a favourite family recipe, which is great for kids' lunchboxes and parties. I usually use Mozzarella in them, so decided to test out and review a dairy-free Mozzarella-style cheese. There isn't a lot of choice in my local area, when it comes to buying vegan cheeses, so I bought Cheezly - Mozzarella style from my local Holland & Barrett store.  

I was surprised that on opening the packet, it actually smelled quite cheesy (kind of like cheese-flavoured crisps)! It had a slightly grey appearance and was quite soft, but it grated well. I wasn't too keen on the taste/texture of it raw, but once cooked, it gave the pizza whirls a mild, cheesy flavour and was a good alternative to dairy cheese. 

Makes around 16

For the pizza base
  • 1 cup water
  • 3 cups strong white bread flour 
  • 1 tbsp olive oil
  • 1 tsp fast-action dried yeast
  • 1 tsp sugar
  • ½ tsp salt
For the filling
  • 1 bell pepper diced
  • 1 onion, finely diced
  • 50g/2oz sun-dried tomatoes in oil, chopped
  • 1 clove of garlic, crushed
  • 1 tsp dried oregano (or use 1 tbsp fresh basil)
  • 4 tbsp tomato puree
  • 100g/4oz vegan mozzarella-style cheese, grated
  • 2-3 tbsp of the oil from the sun-dried tomatoes/olive oil
  • black pepper to taste
Put all the dry bread ingredients in a bowl (or bread maker) add the wet ingredients.
Mix well until you have a smooth dough (on dough setting in bread maker).
Add a little more flour if the dough is too sticky.
Cover the bowl and allow to rise in a warm place for 30-60 minutes.

Meanwhile, heat the oil in a pan and saute the onion, pepper and garlic gently for a few minutes. Add the sun-dried tomatoes, oregano and black pepper. Allow to cool.

Roll the dough into a large rectangle.
Spread with the tomato puree and top with the vegetable mixture. 
Sprinkle the grated 'cheese' over.
Roll the dough lengthwise, as tightly as you can (like a Swiss roll).
Making sure the dough roll is seam-side down on the board, cut into 1"/2.5cm slices using a sharp knife.
Place the rolls on a greased baking sheet, spaced about 1"/2.5cm apart.
Cover loosely with cling-film and allow to rise for a further 30-45 minutes.
Meanwhile, preheat the oven to 200C/190C Fan/Gas 6 .

Bake for around 10-15 minutes, or until well-risen and golden.
Turn out onto a wire rack to cool.

Suitable for freezing.

Alternatives: Use any of your favourite pizza toppings (try sweetcorn, olives, roasted vegatables, vegan pepperoni etc.) but do include the oil, as the vegan cheese dries out as it cooks, unlike dairy-cheese.

Integrity Statement
I bought the Cheezly myself and was not asked to review it. I did not receive payment, and the views expressed are genuinely those of myself and my family.
Pin It

Friday, 13 December 2013

Champagne Cocktails

a glass of Champagne cocktail
©
Here are three easy-to-make (and easy to drink!) Champagne cocktails that Mr O and I enjoy for special occasions such as Christmas. They can all be made with Cava or any other dry sparkling wine for a cheaper alternative.

Classic Champagne Cocktail 
Serves approx 16 people 

This is family favourite cocktail, which has been passed down to me by my dad. The recipe was a closely guarded secret, until recently, but I persuaded him to let me have the recipe and share it on my blog. It tastes delicious and is easy to drink too much of
  • 1 part/100ml/ ⅓ cup Cognac or Brandy (the cheap stuff is fine!) 
  • 3 parts/300ml/1 cup Cointreau/Triple Sec or any other orange liqueur 
  • 6 parts/600ml/2 cups good quality orange juice
  • Angostura Bitters (optional)
  • Chilled Champagne/Cava 
I serve this when entertaining friends and family, so I make the base up in advance with the brandy, orange liqueur, orange juice and around 10 shakes of bitters in a litre jug - this makes enough for around 16 glasses, using 2 bottles of Champagne/Cava). If you want to make an individual cocktail, use a desert-spoon (10ml) for each part/measure. 

Make the base mixture up and stir well
Pour ⅓ of a glass each. 
Top up each glass with Champagne and enjoy!

Alternatives: The base itself also makes a delicious cocktail served on the rocks.
Try a Granita Champagne Cocktail  in the summer - make the base up as before and freeze in a plastic tub over night (it won't set hard due to the alcohol content). Break up roughly with a fork and fill ½ a Champagne glass each. 
Top up with very well chilled Champagne or Cava.

Bucks Fizz:
  • Chilled Champagne/Cava 
  • Good quality orange juice 
Pour ⅓ to ½ of a glass of orange juice into a Champagne glass, top up with Champagne.
Non alcoholic/virgin version: Mix lemonade/sparkling water & good quality orange juice.

Kir Royale

  • Creme de Cassis (blackcurrant liqueur -  use any other berry liqueur as an alternative)) 
  • Chilled Champagne/Cava 
Pour 1 tbsp of Cassis into the bottom of a Champagne glass. Top up with chilled Champagne and serve.
Non alcoholic/virgin version: Mix lemonade/sparkling water & high-juice blackcurrant cordial.

How to open and pour Champagne
These tips may seem obvious, however I thought they were worth mentioning for those who rarely drink sparkling wines...
  • Make sure that the sparkling wine has been chilled for at least a few hours before opening. 
  • Carefully remove the foil and wire cage, without shaking the bottle.
  • Place a clean tea towel over the bottle. 
  • Grip the bottle under the cloth with one hand, whilst gently twisting and lifting the cork with the other hand over the cloth, until the cork pops. 
  • Leave for a minute before pouring to allow the bubbles to subside.
  • Tip the glass at a slight angle and pour the bottle slowly, to avoid any spillage!
Pin It

Thursday, 21 November 2013

Mint Chocolate Dragon Cake

Mint chocolate dragon cake
This cake was made as an entry to a competition on Mumsnet, which sadly didn't win, but I thought it was too good, not to blog! Miss Kahonie came up with the design for the cake after being inspired by a similar one in Kids' Party Ideas (which used After Eights for the spines), and helped me to make and decorate it.

Before anyone else mentions it, this is the exception to the rule about not eating anything with a face!!!

For the cake
First we made a 3-egg chocolate sponge cake and baked it in the top half of my giant cupcake tin. You could also bake this in a greased and cocoa-dusted heat-proof bowl.
  • 150g/6oz butter/spread
  • 150g/6oz sugar
  • 3 medium eggs
  • 150g/6oz SR flour
  • 50g/2oz cocoa powder
  • ½ tsp baking powder
Cream the butter and sugar, beat in the eggs then stir in the remaining ingredients.
Pour into a well greased tin/bowl which has been sprinkled with a little sieved cocoa.
Bake for around an hour in a pre-heated oven at 150C/140C Fan/Gas 2/300F
Allow to cool in the tin/bowl for about 10 minutes before turning out.
Slice in half once cold.

For the icing
We then crumb-coated and iced the cake with peppermint butter-icing, and added fondant icing details.

  • 100g/4oz butter/spread, softened
  • 250g/10oz icing sugar
  • 1-2 tsp peppermint extract
  • green food colouring
  • 2-4 tbsp boiling water
  • 500g/1lb pack of fondant icing
  • 1 bag of chocolate pebbles, giant chocolate buttons or similar
Cream the icing sugar and butter together, adding enough boiling water to make a soft, spreadable icing. Add the flavouring to taste and enough food colouring to get a good, strong, green colour.

Spread a couple of tablespoonfuls of the icing on one half of the cake and sandwich the two halves together. Crumb coat the whole cake (spread thinly with about half of the remaining icing and chill to set). Rough-ice the cake with the remaining butter icing, making peaks in the icing to look a little like dragon scales!

Colour ¾ of a block of fondant icing with food colouring (the gel/paste type is best) and divide into 4 pieces:
  • Roll one piece into a long sausage shape for the tail.
  • Make 2 flattened circles for the legs.
  • Remove a little of the icing from the last piece and make the triangular point for the tail plus an ear and an eyebrow; make a flattened oval for the head from the rest of this piece, making one end of the oval more narrow, for the snout.
Push the legs and head into place onto the butter icing.
Attach the tail to the back of the cake and wrap around the front of the cake over the legs.
Add the ear and eyebrow to the head, sticking down with a little water if needed.

Using the end of a teaspoon or icing nozzle, make semi-circular imprints into the fondant icing to represent more scales.

On white card, draw and cut out: a puff of smoke, 2 wings, an eye and some sharp teeth. Poke these into the icing in the appropriate places! 

Finally, poke the chocolate sweets into the icing along the dragon's back and tail for the spines.
Pin It

Thursday, 7 November 2013

Cheddar Cheese Fondue

©
It might be a little retro for some, but the Onykahonie household love a cheese fondue; in fact we love anything cheesy, including Eurovision,  X Factor and Abba! 

In this recipe, I added a British twists by swapping the traditional Emmental cheese for Cheddar, as I find the combination of Gruyère and Emmental is just too cheesy, even for a cheese lover like me! I also used dry British cider instead of wine and I prefer the flavour with the Cheddar...

Serves 2-4 - double this recipe to share with more people
  • 1 clove of garlic
  • 225 ml/1 cup dry/hard cider (or dry white wine) 
  • 150g/6oz medium or mature Cheddar cheese, grated
  • 150g/6oz vegetarian Gruyère cheese, grated
  • 2 tsp cornflour
  • 1 tbsp apple brandy/kirsch (optional)
  • A little grated nutmeg
  • toasted ciabatta/pitta, bread-sticks, crudites, potato wedges, breaded mushrooms, onion rings etc, for dipping
Cut the clove of garlic in half and rub around the inside of the pan/fondue pan.
Mix the brandy/kirsch or a little of the cider/wine with the cornflour, in a cup.
Heat the cider/wine (add the halved garlic clove too, if you like) in the pan until warm.

Remove from the heat and stir in the cornflour mixture and season with nutmeg.
Return to the heat and bring to the boil, stirring regularly. 
As soon as the mixture starts to bubble, add the cheese a little at a time, whisking all the time, until the cheese has melted and you have a smooth mixture.

Keep warm and serve with baked/toasted chunks of ciabatta, crudites, bread-sticks etc.


©
Alternative: For a quick and easy cheese fondue without all the faff, just take a whole Camembert, remove any plastic packaging and wrap in a layer of grease-proof paper (or original wrapping) and foil.

Bake for 20 minutes at 180C/170C Fan/Gas4/350F or on the barbecue. 

When melted, score around the top and remove the 'skin'.


To flavour the cheese, score little cuts into the top of the cheese before cooking and insert slices of garlic and/or springs of rosemary. Remove these before serving.

Pin It

Friday, 21 June 2013

No-Bake Mini Desserts

No-Bake Mini Desserts
If you're hosting a bbq, party or buffet and catering for a large number of people, make up a batch of these really simple mini-puddings in advance and refrigerate until needed.

You can buy packs of mini plastic shot 'glasses' from pound stores and supermarkets.

Serves 10 (1 of each dessert per person) - double or treble the recipe to feed more!

For the basic mix
  • 250g/10 oz lighter/reduced fat mascarpone 
  • 200ml/8fl oz double cream
  • 2 tbsp icing sugar
Lightly whip the cream.
Add the remaining ingredients and lightly whisk together.
Divide between two bowls...

Tiramisu
  • 50g/2 oz amaretti or chocolate chip biscuits/cookies, roughly crushed
  • 1 tsp coffee granules dissolved in 2 tbsp boiling water, allowed to cool and mixed with 1 tbsp Amaretto or Tia Maria
  • 1 tbsp Bailey's liqueur
  • Crushed chocolate flake/chocolate chips/drinking chocolate powder to top
Evenly divide the crushed biscuits between 10 small shot glasses.
Drizzle around 1 tsp of the cold coffee/liqueur mixture over the biscuits in each glass.
Mix the Bailey's into one half of the cream cheese mixture.
Using a teaspoon, carefully spoon the mixture into each glass.
Top with crushed chocolate flake/chocolate chips or drinking chocolate powder.
Chill until needed.

Alternative:  For an alcohol-free version, swap the liqueurs for cold strong coffee.

Deconstructed Strawberry Shortcake
  • 50g/2 oz shortbread biscuits, roughly crushed
  • 100g/4oz ripe strawberries, half diced finely, half sliced
  • ½ tsp vanilla extract
Mix the vanilla extract into the remaining half of the cream cheese mixture.
Lightly fold in the diced strawberries and crushed biscuits.
Using a teaspoon, carefully spoon the mixture into 10 small shot glasses.
Top with the sliced strawberries.
Chill until needed.

Alternative: Swap the shortbread biscuits for crushed meringue to make Eton Mess.

Not suitable for freezing. Eat within 24 hours of making.

Pin It

Saturday, 22 December 2012

Mini Halloumi Tarts

mini halloumi tarts in a mini muffin pan
©
Here's my next Christmas canapé recipe. These little halloumi tarts can be baked in advance and frozen until needed. Defrost for a couple of hours then warm up before eating...et voilà!

Makes approx 24 mini tarts.
  • 8oz/200g halloumi cheese grated
  • 4 fl oz/100ml Greek yogurt
  • 1 medium egg
  • ½ tsp dried oregano plus 1 tsp chopped, fresh dill 
  • 10oz/250g (½ pack) ready-made shortcrust pastry
Preheat the oven to 190C/180C Fan/Gas 5/375F.
Mix the grated halloumi with the yogurt, egg and herbs.
Roll out the pastry on a floured board, to around the thickness of a one pound coin (about 3-4 mm or a 16th of an inch).
Lightly grease a 24 hole mini muffin pan.
Cut out 24x3.5"/9 cm circles...you may need to re-roll the pastry scraps for the final few!
Pop the pastry circles into the pan and press down (I used the end of my rolling pin for this, but you can buy this nifty little gadget from Amazon which is purpose made for the job!)
Generously fill each pastry case with the cheese mixture. 
Bake for 15-20 minutes or until golden brown.
Remove from the pan. Serve straight away or cool and freeze until needed.

Top tip: Grate the halloumi with a food processor or use a hand grater and chop up any bits that don't make it through the grater!
Pin It

Tuesday, 11 December 2012

Savoury Puff Pastry Tartlets

©
I'm testing out a few Christmas buffet and canapé recipes at the moment. These little bite-sized tartlets can be filled with your choice of vegetarian or vegan fillings. I have added a few suggestions below, but you can use pretty much anything you fancy.
  • 1 block of ready-made puff pastry
  • Your choice of fillings
Grease a tartlet/mini muffin/bun tin and preheat the oven to 220C/200C Fan/425F/Gas7.
Roll out the puff pastry until it is fairly thin. Using a cutter just bigger than the top of your tartlet or bun tin (holes wells indents...what do you call them?), cut out circles of the pastry, as close together as possible, so that you don't waste too much pastry. 
Pop the pastry circles into your tin and press down in the centre to make space for the fillings.
Fill and bake for 10-15 minutes, or until well risen and golden brown. Only add a little filling to each tartlet as the pastry will rise quite a lot. 
When cooked, remove from the tin and serve hot or warm.

I filled mine with 3 different combinations:
  • Greek (pictured left) - chopped olives, roasted red pepper and sundried tomatoes. Top with a little feta cheese and a sprinkle of dried oregano.
  • Roasted piri piri vegetables (pictured centre - vegan) - finely chop some bell pepper, courgette, mushroom and onion and fry in a drop of olive oil for around 5 minutes. Remove from the heat and stir in 2 tbsp piri piri sauce. 
  • Roasted squash and goat's cheese (pictured right) - cube the squash and roast with some ground fennel seeds for about 15 minutes. Top with a little goat's cheese.
Suitable for freezing

If you wish to make these in advance, slightly under-cook them (so the pastry is firm but still pale). Cool and freeze. Defrost and reheat at 180C/170C Fan/350F/Gas4 for around 5 minutes.

Other ideas include: chopped tomato, basil & mozzarella, blue cheese & mushroom, roasted vegetables & pesto, garlic mushrooms, refried beans and salsa etc. Just remember to cook raw vegetables lightly first, to remove some of their juices, otherwise your tartlets will have soggy bottoms!
If you want to make mini quiches or add sweet fillings (including chutneys), use shortcrust pastry instead, as puff pastry will not hold these fillings well. 
Pin It

Thursday, 14 June 2012

Nachos with Vegetable Salsa

Now this might not sound like much of a recipe, but it's a good way of making a quick snack or light meal out of left-over vegetables and store cupboard ingredients. For a healthier version, use the refried beans and salsa mixture to fill tortilla wraps.

Serves 4 as a main course or 8 as a starter/snack

  • 1 bag of lightly salted or unsalted tortilla chips
  • 1 can of mild refried beans
  • 1 carton/jar of mild tomato salsa (around 1 cup)
  • 1 small onion , finely diced
  • 1-2 bell peppers, finely diced
  • A few mushrooms, finely diced
  • 1 tsp mild chilli powder
  • 100g mozzarella or cheddar cheese, grated (or vegan melting cheese)
Pre-heat the oven to 180C/170C Fan/Gas 3
Tip the bag of tortilla chips onto a baking tray.
Using a spoon, dollop the refried beans over the chips - spread out a little if you can without breaking too many of the chips! 
Fry the onion in a drop of olive oil until softened, then add the chilli powder, bell peppers and mushrooms and cook for a further couple of minutes.
Add around 1 cup of salsa to the pan and stir in.
Simmer for 5 minutes.
Remove from the heat. Taste and add more chilli powder if needed.
Pour the salsa mixture over the tortilla chips and sprinkle the grated cheese over the top.
Cook for 10-15 minutes, until the cheese is bubbling.

Serve with salad.


Alternatives:
If you don't have any refried beans, use a drained tin of baked beans instead and add these to the salsa mixture.
Pin It

Wednesday, 30 May 2012

Vanilla Giant Cupcake

© A cake fit for the Queen (well almost!)
We recently had a Jubilee celebration at work and my contribution was a giant cupcake.. they loved it! This recipe was adapted from my giant chocolate cupcake recipe using the Wilton/Lakeland giant cupcake tin. As I made a Jubilee cake, I decided to colour a third of the mixture blue and a third red (although it turned out pink!) using a little food colouring. 

Serves 20

  • 250g/10oz butter/dairy-free spread
  • 250g/10oz sugar
  • 5 medium eggs
  • 250g/12oz SR flour
  • 5 tbsp milk/water
  • 1 level tsp baking powder
©
Pre heat the oven to 160C/150C Fan/Gas 3.Grease the cupcake tin and sprinkle with a little sieved flour.
Cream the butter and sugar and beat in 3 of the eggs.
Add the flour, baking powder, milk, and remaining eggs and mix until just combined.
Spoon half of the mixture into each side of the cupcake pan.

Bake for 50-60 minutes, or until the cake has risen and is firm to the touch (in the centre).  If the cake is browning too quickly, turn the oven down by 10C.
Once cooked, leave to cool in the pan for 5 minutes and then turn out onto a wire rack to cool fully. Trim a little of the top of the cakes with a sharp knife (once cold) if needed.
©
To cover the base in fondant icing
Roll out some fondant icing on a board sprinkled with icing sugar, into an approximately 25cm/10" circle - I use a non-stick pastry mat.
Spread a little of the butter cream (recipe below) onto the base and sides of the cupcake bottom...it doesn't need to look neat!
Place the cupcake base into the centre of the fondant and gently ease the fondant up around the sides and over the top of the cake (there should be enough icing to overlap the top slightly.) Press into each groove of the base with your fingers or the back of a teaspoon.
Top the base with a good dollop of butter cream (and some jam if you want to) before placing the top section on.

Icing the top of the cake

I've found that the butter cream doesn't stick to the cake very well if you pipe it straight on, so I crumb-coat it first (roughly spread a little butter icing all over the top section using a palette knife), and chill the cake for about half an hour, before piping the remaining icing on.
Pipe around the join between the two cakes.
Once iced, decorate with sprinkles etc. while the icing is still soft.

Vanilla Butter Cream/Frosting
  • 150g/6oz softened butter/dairy-free spread
  • 350g/14oz icing sugar
  • 2 tsp vanilla extract
  • 1-2 tbsp boiling water, if needed
Cream the butter and icing sugar.
Add the vanilla and just enough boiling water, if needed, to make a soft, spreadable butter cream.

Alternatives: 
The 5 egg mixture I use doesn't quite fill the tin. You can make an even bigger cake in the same tin, by upping the ingredients to 300g/12oz butter/sugar, 350g/14oz flour and 6 eggs. Keep the amount of the remaining ingredients the same.

If fondant icing the base sounds too tricky (I'll admit it did take me two attempts), then just tie a ribbon around, or make a paper cupcake holder to cover the base.

You could also spread the butter icing onto the top of the cake if you aren't confident at piping.

Pin It

Saturday, 21 January 2012

Chewy Chocolate Chip & Walnut Cookies (Vegan)

©
These chocolate chip cookies are made using an old family recipe which I've veganised by swapping the egg for a tablespoon of syrup. This affects the texture, but in a good way - as it changes them from firm and biscuity to soft and chewy! They're really quick and easy to make and taste pretty much like the ones you buy in the shops.

Makes 20

  • 200g/8oz SR flour
  • 150g/6oz soft brown sugar
  • 125g/5oz dairy-free spread
  • 50g/2oz dairy-free chocolate chips
  • 50g/2oz chopped walnuts or pecans
  • 1 tbsp golden syrup
  • 1 tsp vanilla extract
Heat oven to 190C/180C Fan/Gas 5.
Rub the spread into the flour (or blend in the food processor).
Mix in the sugar, syrup and vanilla.
Stir in the chocolate chips and walnuts.
Divide the dough into about 20 pieces and roll into balls, using your hands.
Place well spaced apart (they will spread!) on greased baking trays, and flatten slightly.
Bake for 10-12 minutes, until golden.
Cool for a few minutes on the tray so that they firm up a little and then remove and place on a wire rack to cool completely.

Suitable for freezing.

Alternatives: Swap the chocolate chips and walnuts for chopped dried fruit, glacé cherries, stem ginger etc.
Pin It

Friday, 30 December 2011

Cider Punch

This is a family punch recipe that we always make up for large gatherings, such as New Year's Eve. At first it's quite sweet and fruity, but as people add to it through the evening, it tends to get slightly more intoxicating!

  • 600 ml/ 1 pint pure orange juice
  • 1 litre/1 ¾ pints sweet or dry sparkling cider (hard cider - US)
  • 150 ml/10 tbsp sweet sherry, fruit liqueur or brandy
  • 1 orange sliced
Mix all ingredients together in a jug or bowl.
Serve chilled.

Alternative: To make a warm wassail-style punch, add a good pinch of mixed spice/cinnamon and warm (do not boil) before serving.
Pin It

Monday, 5 December 2011

Vegetarian & vegan buffet ideas

Here are some of our favourite vegetarian and vegan buffet/meze/canape ideas which are ideal for parties and picnics (for mums who don't shop at Iceland!)
If catering for large numbers, I generally make up some batches of buffet foods in advance and freeze them. I also make various fresh salads and dips as needed, either the day before or on the day.

All recipes are, of course, vegetarian, so I have marked vegan recipes with (v) and those which can have a vegan option as (vo).

Make in advance and freeze:
Halloumi and double potato cakes
Halloumi tarts
Courgette and potato quiches
Falafels (vo)
Spinach and cheese pies
Cheese scones
Glamorgan sausages (or use this mixture in puff pastry to make sausage rolls)
Chorizo-type sausages (as above)
Nut roast sausage rolls (v)
Scone-base pizzas
Cheese muffins
Garlic bread/dough balls/pizza (vo)
Spinach, pepper and Goat's cheese quiche
Savoury puff pastry tartlets (vo)
Quorn kebabs (vo)

Make  fresh:
Hummus (v)
Tzatziki
Aubergine and feta dip (vo)
Pasta salad (vo)
Pesto and antipasti tart (vo)
Squash, lentil and sweet potato salad (vo)
Vegan salads (v)
Bulghar wheat salad (vo)
Marinated olives (v)
Guacamole (v)
Mushroom bruschetta (v)
Dakos (vo)
Veggie frittata/tortilla
Roasted vegetable salad
Green salad
Rice salad
Greek salad on a stick - a chunk of cucumber, a piece of feta, half a cherry tomato and an olive on a cocktail stick
Potato salad
Jacket potatoes/Potato wedges/Home made chips

Add a few store cupboard standbys:
Veggie cocktail sausages on sticks 
Cheese and pineapple on sticks
Crisps
Crackers
Bread sticks
Bread/wraps

Dessert ideas:
Oreo truffles
Tiffin (v)
Chocolate hazelnut truffles (v)
Mini whoopie pies
Mini desserts
Fresh fruit salad

Drinks:
Cider Punch
Champagne cocktails

Pin It

Thursday, 1 December 2011

Oreo Truffles

©
As it's the 1st of December, I thought I'd start adding some more Christmas-inspired recipes to my blog (here are some of last years' recipes).

This recipe was given to me by a work colleague who generously brought some of these delicious morsels into work to help raise money for Children in Need. I'd never tried them before, but after googling, it seems that Oreo truffles are very popular, especially in the US. They're easy enough for children (or inexperienced cooks) to make, but taste quite wonderful!

These truffles would make a great dessert canape for parties (double the recipe) and I think they'd be a great Christmas gift, the only problem being is that they need to be kept refrigerated due to the mascarpone cheese in them.

Makes about 20
  • 1½ packets (200g/8oz) Oreos (or other biscuits*)
  • 100g/4oz mascarpone or other mild-tasting cream cheese
  • 150g/6oz plain, milk or white chocolate
Put the biscuits in the food processor and blend into crumbs (or put in a plastic bag and crush with a rolling pin).
Add the cream cheese and blend again to make a firm mixture (add a little more cheese if needed).
Refrigerate for 30-60 minutes, to allow the mixture to firm up.
Roll into small balls using your hands and then chill in the freezer for 10-15 minutes.
Melt the chocolate and dip each Oreo ball into the chocolate to cover.
Remove with a fork and drain off the excess chocolate.
Place on greaseproof paper, decorate with sprinkles if wanted and chill until set.

Will keep in the fridge for up to a week.

Alternatives: Add a few drops of flavouring essence to the biscuit mixture such as vanilla, mint, orange, coffee etc.

Oreos may not strictly vegetarian as they may contain non-vegetarian whey...try using other biscuits to make different flavoured truffles (e.g. amaretti, chocolate-chip cookies, shortbread etc) - adjust the amount of mascarpone used to make a firm mixture.

Pin It

Sunday, 30 October 2011

Gingersnap Biscuits/Cookies (vegan)

Gingersnap Biscuits/Cookies
These ginger-snap biscuits are really quick to make in the food processor. Younger kids will love rolling out the dough and decorating the finished cookies, while older children will be able to make these with minimal supervision.
  • 300g/12oz SR flour
  • 100g/4oz dairy-free spread/butter
  • 100g/4 oz soft brown sugar
  • 2 tbsp golden syrup
  • 2 tbsp black treacle/molasses
  • 2-3 tsp ground ginger
  • 1 tsp bicarbonate of soda
  • 2-4 tbsp cold water/milk
Heat oven to 190C/180C Fan/375F/Gas 5.

Blend the spread/butter into the flour.
Add the remaining ingredients (except the water) and blend well. 
Add just enough water to form a firm dough.
Chill the dough for about 20 minutes before rolling out.

Roll out the dough on a floured board and cut out shapes with a cookie cutter.
Place the shapes on a greased baking sheet. Re-roll any scraps to make extra biscuits.
Bake for around 12 minutes, or until golden brown.
Allow to cool on the tray for a minute or so, before transferring onto a wire rack to cool.

Decorate with glacé icing when cool (optional).

Suitable for freezing.

Alternatives: Decorate the cookies accordingly for any occasion - we made ours for Halloween, but you could use different shaped cutters and different coloured icing for birthday parties and Christmas.

Pin It

LinkWithin

Related Posts Plugin for WordPress, Blogger...