Showing posts with label buffet. Show all posts

Sunday, 2 December 2018

Pizza Muffins or...Puffins (plus an update)

© Pizza Muffins (Puffins) 
It's been a while, I know. So I feel I owe any regular readers (if there are any left) an explanation.  If the truth be told, I've fallen out of love with blogging for a few reasons:
  • Competitiveness - I used to read a lot of other blogs and felt my posts and images needed to look as good. That takes time. A lot of time. 
  • Inspiration -  lack of!
  • Kids growing up - one is at uni and the other is at college and will go to uni next year. That means that we have fewer family meals together.
  • Work - working full time leaves less time for blogging. When I started blogging, I was working part-time.
  • Health - I've not been too well lately. No sympathy needed, but again, this has reduced the time and energy I've had available.
Anyway, let's get on with the recipe....no fancy photos. Sorry (not sorry!)

This is a bit of a rehash of an old recipe of mine, but I really enjoyed coming up with a new idea, and the family enjoyed eating the results. Basically, they're mini pizzas cooked in a muffin pan. 
  • 1 quantity bread dough
  • tomato puree or tapenade
  • chunks of firm cheese (feta, Cheddar, Manchego etc.)
  • topping: olives, pepper chopped into chunks, thin slices of mushroom, vegetarian pepperoni etc.
  • dried oregano/mixed herbs or fresh, chopped basil
Make up the bread dough and leave to prove.

Pre-heat oven to 200 C fan/220 C/Gas 7/425 F
Cut the dough into 24 small pieces and roll into rough ball shapes using your hands.
Pop each dough ball into a section of a well oiled muffin tin.
Leave to prove in a warm place for a further 10-15 minutes.

Oil the end of a small rolling pin or similar blunt implement! You could also use a knuckle.
Poke a dent/well into each dough ball but be careful not to go through the bottom of the dough.
Fill with around  ½ tsp of tomato puree or tapenade and your other toppings. 
Sprinkle with dried or fresh herbs.

© Garlic Bread Muffins
Bake in a hot oven for 8-12 minutes, or until golden brown. Cool on a wire rack.
Suitable for freezing.

Variation: Garlic dough ball puffins - fill the well of each dough ball with ½ tsp garlic butter and a sprinkle of grated mozzarella. Bake as above.

Vegan option: Fill as above and use vegan cheese or omit the cheese. Drizzle pizzas with a little olive oil.


Pin It

Tuesday, 29 November 2016

Pizza with Aubergine and Two Cheeses

This is a really simple dish which I have tried to recreate, after eating it at a local pizzeria. My version cost a fraction of the restaurant version and almost tasted as good...I just need a pizza oven for Christmas!

Make 2 large pizzas
  • 1 quantity basic pizza dough
  • 2 medium aubergines/eggplants, thinly sliced
  • tomato sauce (or tomato puree)
  • fresh basil and dried oregano
  • 2 balls of mozzarella, drained and chopped
  • 100g/4oz parmesan style cheese, thinly sliced or shaved
  • olive oil
Make the dough and tomato sauce.

Heat 1 tbsp. of olive oil in a large frying pan.
Fry the aubergines in batches on a medium-high heat, adding more oil as needed. The aubergine slices need to be soft and golden brown.

Preheat the oven to its hottest setting.

Roll or stretch the dough to make 2 large pizza bases. Place on greased baking sheets.

Top each base with several tbsp. of tomato sauce, then scatter with the chopped mozzarella and herbs.
Arrange the slices of aubergine and parmesan-style cheese over the top.

Bake in a hot oven for 8-12 minutes, or until the cheese is bubbling and the base is golden brown.

Vegan version: Omit the mozzarella, sprinkle the tomato sauce on each pizza with 2 tbsp. of nutritional yeast flakes. Top with the aubergine and drizzle with a little more olive oil before baking.


Pin It

Sunday, 30 October 2016

Spicy Paneer & Vegetable Spring Rolls

Although spring rolls are normally considered a Chinese delicacy, these Indian-inspired creations are quite different in taste. After eating some of these crispy morsels at a local cafe, I thought I'd have a go at making them myself, whilst watching the Diwali fireworks going off in my neighbourhood.

So long as you can buy ready-made spring roll pastry, they're simple enough for kids or any novice cook to prepare, but look quite impressive.
  • 2 cups (around 225g/9oz) paneer, crumbled or grated
  • 1 cup each of frozen or tinned petits pois and sweetcorn
  • 1 tsp freshly-grated ginger
  • 1 crushed clove of garlic 
  • 1 green chilli, finely chopped
  • 1 tbsp fresh, chopped coriander
  • 1 tsp garam masala
  • ½ tsp cumin seeds
  • ½ tsp fennel seeds
  • ½ tsp chat masala (optional, but worth using if you can find it)
  • 10 sheets of spring roll pastry
  • vegetable oil, for frying
First make a flour/water paste using 1 tsp flour to 1 tbsp water (this is your 'glue' for the pastry).

Mix all of the filling ingredients together in a large bowl.
Take one spring roll sheet and place a heaped tablespoon of mixture by one corner (see photos above).
Spread a little of the paste along the opposite two edges.
Fold the bottom corner of pastry over the filling and roll once.
Fold in each side of the wrapper and roll towards the far corner (like a burrito).
Repeat until all of the filling has been used up.

Heat a good glug of vegetable oil in a large frying pan, on a medium-high heat. Shallow fry the spring rolls in two batches, cooking for 2-3 minutes on each side. Drain well on kitchen roll and keep warm in the oven.
Alternatively, brush generously with vegetable oil and bake in the oven at 190C/180C Fan/Gas 5/375F for 10 to 15 minutes, turning once.

Serve hot or warm with salad and your favourite chutneys/pickles, or try my Indian restaurant style mint sauce and onion salad.
To make this into a main meal, simply serve with rice and dhal.
Meat Free Mondays

Vegan variation: swap the paneer for 2 cups of mashed potato.
Filling variations: to make the paneer filling go further, add two cups of mashed potato and double the spice quantities.
Swap the peas and sweetcorn for cooked chickpeas (chana) if you prefer.  

Suitable for freezing. Batch cook in advance and freeze if you are cooking for large numbers over Diwali, Eid, Christmas or any other celebrations!

I'm adding this post to the Meat Free Mondays linky at Tinned Tomatoes.

Pin It

Tuesday, 28 June 2016

Tear 'n' Share Garlic Bread

Tear 'n' Share Garlic Bread
This garlic flat bread is really cheap and easy to make. It's great to share at buffets, parties and barbecues and can be easily adapted include your favourite toppings. I've included a vegan version, for anyone who prefers a dairy-free option.

For the dough
  • 1 cup cold water
  • 3 cups strong white bread flour
  • 1 sachet fast action dried yeast
  • 1 tsp salt
  • 2 tbsp olive oil, plus extra for drizzling
For the topping
  •  4 tbsp butter or dairy-free spread, softened
  • 1 tbsp fresh, chopped herbs (I used rosemary, oregano and parsley) 
  • 2 cloves of garlic, crushed
  • 4 tbsp grated Parmesan-style hard cheese (omit for vegan version)
  • A little coarse sea salt (optional)
If you have a bread maker add all of the dough ingredients to the pan and set on the dough setting.
If you don't have a bread maker, mix all the ingredients (except the oil and water) in a large bowl. Add the water gradually until you have a soft but not sticky dough. Cover and leave to rise in a warm place for 45-60 minutes, until doubled in size.
After the dough has risen, divide into 2.
Stretch or roll the dough into two large, flat ovals and place on greased baking trays.
Brush a little more oil over the dough and sprinkle with a good pinch of coarse sea salt.
Using a pizza wheel, cut parallel lines across the dough, leaving a 1-2 cm border to hold the dough together (see picture)
Leave to rise for a further 20-30 minutes.

Meanwhile, make the garlic butter by mixing the butter, garlic and herbs together - reserve this for later.
Bake in a preheated oven at 220C/200C fan/Gas 7/425F for 10 minutes, or until golden brown.
Removed from the oven and spread half of the softened garlic butter across each flat bread. Sprinkle with the cheese, if using.
Return to the oven for a further 2-3 minutes.
Allow to cool for 5 minutes before removing from the tray and serving.
If freezing or re-heating later in the day, remove from the tray and cool on a wire rack.

Best served warm.

Suitable for freezing. 

Top tip: If you prefer to use fresh yeast, swap the dried yeast for around 15g/½ oz fresh yeast . Increase the flour to 3½ cups.

credit crunch munch
I'm entering this recipe to this month's Credit Crunch Munch , hosted by Tasty Appetite and founded by Fab Food 4 All and Fuss Free Flavours.


Pin It

Sunday, 20 March 2016

Hummus - Middle-Eastern Chickpea Dip

I am a little ashamed to admit that I've never made traditional hummus, using dried chickpeas before. Having made this version for my blog, I've been converted! It really does taste better (and is far cheaper) than making it with tinned pulses. Yes, it takes longer to make,but you can make a large batch and freeze in small portions to make it even more economical.

Serves 8 as a starter or meze dish
  • 1 cup dried chickpeas (garbanzo beans), soaked over night with a good pinch of bicarbonate of soda
  • a large pinch of salt
  • juice of 1 lemon (plus the zest for a more lemony flavour)
  • 4 tbsp tahini
  • 2-4 cloves of garlic, crushed
  • 1 tsp ground cumin
  • 2 tbsp olive oil
  • 6-8 tbsp cooking liquid, or more if needed
  • paprika and a glug of extra virgin olive oil to garnish
Drain the soaked chickpeas and put in large pan. Cover with boiled water and a pinch of bicarbonate of soda and bring to a simmer. Simmer, in a covered pan, for 1 hour on a low heat.
When tender, drain the pulses, reserving the cooking liquid.

Whilst still warm, place the chickpeas in a blender with all of the remaining ingredients and blend until smooth. Add enough of the reserved cooking liquid to make a smooth, spreadable paste. 
Taste and add more seasoning and/or garlic, if needed.
Spoon into a bowl and chill until needed.
Before serving, drizzle with olive oil and sprinkle with paprika.

Serve with fresh bread, olives and salad.

Suitable for freezing; keeps in the fridge for 2-3 days.

Top tips: Double this recipe to make enough to batch freeze. 
If you don't have the time to make hummus using dried pulses, try my quick and easy recipe instead. You might also like my mixed bean and basil hummus.

Flavour options: Omit the cumin and add some extra ingredients into the blender, along with the chickpeas to make these different variations...
 NCR
  • Red pepper and sweet chilli: Add ½ cup of chopped, roasted red peppers (from a jar) and 1-2 tbsp sweet chilli sauce.
  • Piri piri: Add 1-2 tbsp of your favourite piri piri sauce. 
  • Caramelised onion: Add 2 tbsp of caramelised onion chutney.

I'm entering this recipe to this month's No Croutons Required Challenge, co-hosted by Jacqui at Tinned Tomatoes and Lisa at Lisa's Kitchen

Pin It

Sunday, 3 January 2016

Winter Slaw Salad with Apple, Celery & Cucumber

As, I joined in with Veganuary the past couple of years, but then reverted back to being vegetarian pretty soon afterwards, I thought I'd try something a little different this year. Instead of cutting out eggs and dairy, I thought I'd try reducing them instead (alongside meat substitutes), whilst trying to eat more raw/whole foods, fresh fruit & vegetables and pulses...

This seasonal salad is a great way to get an extra one or two portions of fruit and veg in, if served alongside a carb-based main meal.
  • 1 firm eating apple, cored and sliced
  • ½ cucumber, de-seeded and sliced
  • 2 sticks of celery or ½ bulb fennel sliced
  • 25g/1oz chopped walnuts
  • 1 tbsp mayonnaise or vegan mayo (or vinaigrette made with 1 dsp olive oil mixed with 1 dsp white wine vinegar)
  • A little fresh, chopped dill or parsley
 NCRPrepare the apple and place in acidified water (a bowl of water with 1 tsp lemon juice), whilst you prepare the other ingredients.
Drain the apple and blot dry with kitchen town.
Place all of the ingredients into a bowl and stir in the mayo or dressing.
Refrigerate until needed

.I'm entering this recipe to this month's No Croutons Required Challenge, co-hosted by Jacqui at Tinned Tomatoes and Lisa at Lisa's Kitchen
Pin It

Sunday, 1 November 2015

Halloumi & Mint Bread Whirls

Halloumi & Mint bread rolls
The recipe for these tasty halloumi bread rolls was inspired by one I tried in a Greek restaurant in Sydney, Australia. I don't know the actual recipe used, so I adapted my standard bread recipe and tried out a few variations.

When making a large loaf with raw halloumi, I ended up with a 'soggy bottom'! I found that I needed to cook the cheese first, to remove the excess moisture, and then had to cool it before adding to the dough.
So, I tried adapting my pizza whirl recipe instead, and it worked a treat using raw halloumi, as the moisture could evaporate.

For the bread base
  • 1 cup cold water
  • 3 cups strong white bread flour 
  • 1 tbsp olive oil
  • 1 sachet fast-action dried yeast
  • 1 tsp sugar
  • ½ tsp salt
For the filling
  • 200g halloumi, finely diced
  • ½ cup chopped fresh mint, or around 2-3 tsp dried mint
  • 2 tbsp olive oil
Put all of the dry bread ingredients in a bowl (or bread maker) add the wet ingredients.
Mix well until you have a smooth dough (on dough setting in bread maker).
Add a little more flour if the dough is too sticky.
Cover the bowl and allow to rise in a warm place for 30-60 minutes.

Dust a large board or clean table with a little flour.
Roll the dough into a rectangle, approx 25cm x 40cm. 
Sprinkle the halloumi and mint over, leaving a border at the front and sides.
Roll the dough lengthwise, as tightly as you can (like a Swiss roll).
Making sure the dough roll is seam-side down on the board, cut slices approximately 1.5cm thick.
Place on a greased baking sheet, with a little room to expand.
Drizzle with the olive oil.

 Cooking With Herbs
Cover loosely with cling-film or a clean tea towel and allow to rise for a further 30 minutes.
Meanwhile, preheat the oven to 200C/190C Fan/Gas 6 .

Bake for around 10-15 minutes, or until well-risen and golden.
Place onto a wire rack to cool.
Serve warm, with dips, as part of a meze, or instead of a sandwich in a packed lunch.

I'm linking this post to November's Cooking With Herbs challenge

Pin It

Sunday, 12 October 2014

Peanut & Tamarind Falafels for National Curry Week

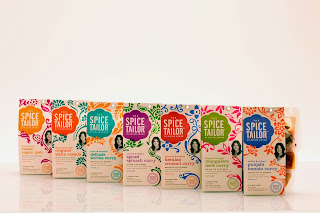
 The Spice Tailor sauce range
 The Spice Tailor chutni rangeAs you may have realised, my family all love Indian food. So we were excited to find out that Anjum Anand's The Spice Tailor range has now been extended to include a delicious array of curry sauces plus a tasty selection of chutnis. I've been testing out the whole range on my family over the past couple of weeks and they've been really impressed how tasty and authentic the sauces are. I've also loved how quick and easy they are to use.

I've been experimenting with different variations of falafels lately and decided to come up with an Indian-inspired version for National Curry Week, using The Spice Tailor products. I used two varieties from the new chutni range, which are a delicious addition to almost any Asian meal, either as a condiment or as an ingredient.

Makes 12
  • 1 tin of chickpeas, drained
  • 5 tbsp Spice Tailor peanut & tamarind chutni
  • 1 large clove of garlic, crushed
  • 1-2 tsp chilli paste/ hot chilli sauce
  • 1-2 slices of wholemeal bread, made into breadcrumbs
Peanut & Tamarind Falafels

Put all of the ingredients, except the breadcrumbs, into a food processor and blend for a minute or so. Scrape the ingredients down from the sides of the bowl and repeat until you have a fairly smooth mixture.
Add just enough breadcrumbs to form a fairly stiff, but not dry, mixture.
Roll into 12 balls and flatten slightly.
Chill in the fridge for around half an hour.

Heat 2 tbsp of vegetable oil in a large frying pan, on a medium heat.
Cook the falafels for around 4-5 minutes on each side until lightly browned.

Wrap in a chapatti with salad and your favourite dip, sauce or chutney; I served mine with onion salad and mint sauce:

Onion salad
  • 1 tsp Spice Tailor mint leaf chutni
  • 1 small onion, halved and very finely sliced
  • 1" cucumber, halved, deseeded and finely sliced
Indian mint sauce
  • 1 tbsp Spice Tailor mint leaf chutni
  • ½ cup natural or vegan plain yogurt
  • a pinch of sugar, optional
The Spice Tailor range is available from most major UK supermarkets and online.
I received a selection of complimentary products from The Spice Tailor to review and to use in recipe development. All views expressed are my own and those of my family.
Pin It

Saturday, 6 September 2014

Dakos - Greek Bruschetta

Dakos - Greek bruschetta
We recently came back from a lovely holiday in the Chania region of Crete. As always, I've come home wanting to re-create some of the dishes we have eaten on holiday. The first one being dakos/ntakos or Greek bruschetta. This simple starter is traditionally made with barley rusks, but I swapped them for Krisprolls which have a similar texture and are more readily available. You could also use any good, crusty bread such as ciabatta.

The Cretans make these with Greek mizithra cheese, which is a whey cheese generally made from goat's or sheep's milk. I used a soft goat's cheese for the closest taste and texture, but you could use ricotta or crumbled feta instead.
  • 1 pack of dakos rusks or Krisprolls
  • 2 ripe beef tomatoes, quartered (or de-seeded vine tomatoes)
  • 1 large clove of garlic
  • ½ tsp Greek oregano
  • 2 tbsp extra virgin olive oil
  • 150g soft goat's cheese
  • A handful of Greek olives
Briefly blitz together the tomatoes, garlic and oil in a blender for a few seconds (it should be slightly chunky like a salsa). Season to taste.
Spoon the mixture over the rusks/Krisprolls and top with crumbled goat's cheese and an olive. Sprinkle with dried oregano.
Refrigerate for up to 2 hours before serving.

Vegan option: Swap the cheese for a vegan Greek olive paste (check ingredients for anchovies).


Pin It

Saturday, 21 June 2014

Cinnamon Sugar Mini Muffin Doughnuts

Cinnamon Sugar Mini Muffin Doughnuts
When I saw Michelle from Utterly Scrummy's recipe for these delicious-looking, mini muffin-doughnuts (which are obviously not Duffins!), I just had to make them. They're really simple to make, and taste even better then they look! They have the taste and texture of those mini supermarket doughnuts.

I made a few minor changes to the recipe as follows...

  • I halved the recipe (to make 24) and replaced the cinnamon in the cake mixture with vanilla extract. 
  • To coat the muffins, I mixed 2 tsp of cinnamon with 6 tbsp sugar. 
  • I melted around 4 tbsp butter and after dipping a couple and seeing how much butter each muffin absorbed, I decided to just dip the 'muffin tops' into the butter, but still roll the whole cakes in the cinnamon sugar.

 Bookmarked RecipesI froze half of the batch and took a few out to defrost as and when anyone fancied one. They are best served warm and I found that a 10-15 second blast in the microwave did the job, without affecting the taste or texture.

My next challenge is to make a vegan version, so watch this space!

I'm adding this post to this month's Bookmarked Recipes over on Tinned Tomatoes.

Pin It

Thursday, 7 November 2013

Cheddar Cheese Fondue

©
It might be a little retro for some, but the Onykahonie household love a cheese fondue; in fact we love anything cheesy, including Eurovision,  X Factor and Abba! 

In this recipe, I added a British twists by swapping the traditional Emmental cheese for Cheddar, as I find the combination of Gruyère and Emmental is just too cheesy, even for a cheese lover like me! I also used dry British cider instead of wine and I prefer the flavour with the Cheddar...

Serves 2-4 - double this recipe to share with more people
  • 1 clove of garlic
  • 225 ml/1 cup dry/hard cider (or dry white wine) 
  • 150g/6oz medium or mature Cheddar cheese, grated
  • 150g/6oz vegetarian Gruyère cheese, grated
  • 2 tsp cornflour
  • 1 tbsp apple brandy/kirsch (optional)
  • A little grated nutmeg
  • toasted ciabatta/pitta, bread-sticks, crudites, potato wedges, breaded mushrooms, onion rings etc, for dipping
Cut the clove of garlic in half and rub around the inside of the pan/fondue pan.
Mix the brandy/kirsch or a little of the cider/wine with the cornflour, in a cup.
Heat the cider/wine (add the halved garlic clove too, if you like) in the pan until warm.

Remove from the heat and stir in the cornflour mixture and season with nutmeg.
Return to the heat and bring to the boil, stirring regularly. 
As soon as the mixture starts to bubble, add the cheese a little at a time, whisking all the time, until the cheese has melted and you have a smooth mixture.

Keep warm and serve with baked/toasted chunks of ciabatta, crudites, bread-sticks etc.


©
Alternative: For a quick and easy cheese fondue without all the faff, just take a whole Camembert, remove any plastic packaging and wrap in a layer of grease-proof paper (or original wrapping) and foil.

Bake for 20 minutes at 180C/170C Fan/Gas4/350F or on the barbecue. 

When melted, score around the top and remove the 'skin'.


To flavour the cheese, score little cuts into the top of the cheese before cooking and insert slices of garlic and/or springs of rosemary. Remove these before serving.

Pin It

Friday, 21 June 2013

No-Bake Mini Desserts

No-Bake Mini Desserts
If you're hosting a bbq, party or buffet and catering for a large number of people, make up a batch of these really simple mini-puddings in advance and refrigerate until needed.

You can buy packs of mini plastic shot 'glasses' from pound stores and supermarkets.

Serves 10 (1 of each dessert per person) - double or treble the recipe to feed more!

For the basic mix
  • 250g/10 oz lighter/reduced fat mascarpone 
  • 200ml/8fl oz double cream
  • 2 tbsp icing sugar
Lightly whip the cream.
Add the remaining ingredients and lightly whisk together.
Divide between two bowls...

Tiramisu
  • 50g/2 oz amaretti or chocolate chip biscuits/cookies, roughly crushed
  • 1 tsp coffee granules dissolved in 2 tbsp boiling water, allowed to cool and mixed with 1 tbsp Amaretto or Tia Maria
  • 1 tbsp Bailey's liqueur
  • Crushed chocolate flake/chocolate chips/drinking chocolate powder to top
Evenly divide the crushed biscuits between 10 small shot glasses.
Drizzle around 1 tsp of the cold coffee/liqueur mixture over the biscuits in each glass.
Mix the Bailey's into one half of the cream cheese mixture.
Using a teaspoon, carefully spoon the mixture into each glass.
Top with crushed chocolate flake/chocolate chips or drinking chocolate powder.
Chill until needed.

Alternative:  For an alcohol-free version, swap the liqueurs for cold strong coffee.

Deconstructed Strawberry Shortcake
  • 50g/2 oz shortbread biscuits, roughly crushed
  • 100g/4oz ripe strawberries, half diced finely, half sliced
  • ½ tsp vanilla extract
Mix the vanilla extract into the remaining half of the cream cheese mixture.
Lightly fold in the diced strawberries and crushed biscuits.
Using a teaspoon, carefully spoon the mixture into 10 small shot glasses.
Top with the sliced strawberries.
Chill until needed.

Alternative: Swap the shortbread biscuits for crushed meringue to make Eton Mess.

Not suitable for freezing. Eat within 24 hours of making.

Pin It

Friday, 19 April 2013

Guacamole and Guacziki

guacamole served in an avocado skin

As a family, we've only recently discovered the delights of guacamole and until now have been buying the ready made tubs. As Morrisons had packs of 4 avocados for £1 this week (that's the same price as 1 tub!), so Miss K and I thought we'd buy some and make our own.

Most authentic recipes seem to include chopped onion, but as neither of the girls like raw onion, we replaced it with garlic.

For the guacamole
  • 1 ripe avocado
  • 1 ripe tomato, deseeded and diced
  • 1 small clove of garlic, crushed (or some finely chopped onion)
  • 2 tbsp lime juice
  • A little chopped jalapeño chilli, to taste
  • A little chopped coriander, to taste 
Cut the avocado in half by scoring around lengthwise with a sharp knife.
Twist to separate the two halves.
Scoop the avocado flesh out into a bowl with a spoon, removing the stone as you do so.
Retain the skins and drizzle with half of the lime juice. Wrap and refrigerate until needed.

Add the remaining lime juice to the avocado flesh and mash roughly with a fork.
Add the other ingredients and stir in.
Cover and refrigerate until needed (for a couple of hours at the most, as it will discolor). Serve in the avocado skins.


a bowl of guacziki dip

For the guacziki

I decided to experiment with one of the remaining avocados and came up with guacziki - a kind of vegan tzatziki!
  • 1 ripe avocado
  • 1 chunk of cucumber, deseeded and diced
  • 1 small clove of garlic, crushed
  • 1-2 tbsp lemon juice
  • A dash of hot chilli sauce, to taste
  • A little chopped dill, to taste 
Prepare the avocado as before.
Place in a food processor with the lemon juice, garlic, the scooped out cucumber seeds and seasonings.
Blend until smooth.
Finally, stir in the chopped cucumber.
Cover and refrigerate until needed. 

Top Tip: Pop the avocado stone back into the dip until you are ready to serve. I'm not sure if this really works, but it's supposed to help stop the dip discolouring!

Pin It

Saturday, 22 December 2012

Mini Halloumi Tarts

mini halloumi tarts in a mini muffin pan
©
Here's my next Christmas canapé recipe. These little halloumi tarts can be baked in advance and frozen until needed. Defrost for a couple of hours then warm up before eating...et voilà!

Makes approx 24 mini tarts.
  • 8oz/200g halloumi cheese grated
  • 4 fl oz/100ml Greek yogurt
  • 1 medium egg
  • ½ tsp dried oregano plus 1 tsp chopped, fresh dill 
  • 10oz/250g (½ pack) ready-made shortcrust pastry
Preheat the oven to 190C/180C Fan/Gas 5/375F.
Mix the grated halloumi with the yogurt, egg and herbs.
Roll out the pastry on a floured board, to around the thickness of a one pound coin (about 3-4 mm or a 16th of an inch).
Lightly grease a 24 hole mini muffin pan.
Cut out 24x3.5"/9 cm circles...you may need to re-roll the pastry scraps for the final few!
Pop the pastry circles into the pan and press down (I used the end of my rolling pin for this, but you can buy this nifty little gadget from Amazon which is purpose made for the job!)
Generously fill each pastry case with the cheese mixture. 
Bake for 15-20 minutes or until golden brown.
Remove from the pan. Serve straight away or cool and freeze until needed.

Top tip: Grate the halloumi with a food processor or use a hand grater and chop up any bits that don't make it through the grater!
Pin It

Mini Courgette and Potato Quiches

mini quiches
©
I'm in the midst of baking canapés for Christmas, so I thought I'd share a couple of recipes with you. These little vegetarian quiches can be baked in advance and frozen until needed. Defrost for a couple of hours then warm up before eating...simples!

Makes approx 24 mini quiches.
  • 4oz/100g potato, peeled and grated
  • 4oz/100g courgette (zucchini), grated
  • 1 medium onion, diced finely
  • 4 fl oz/100ml double cream
  • 1 medium egg
  • 2oz/50g vegetarian Parmesan cheese or mature cheddar, grated
  • 1 tsp chopped. fresh basil or parsley
  • black pepper and nutmeg to season 
  • 10oz/250g (½ pack) ready-made shortcrust pastry
Preheat the oven to 190C/180C Fan/Gas 5/375F.
Heat a drop of olive oil in a frying pan and fry the onions for a few minutes until softened.
Add the grated vegetables, herbs and seasonings and cook on a low heat for around 10 minutes. Remove from the heat and allow to cool.
Beat the egg and cream together in a jug.
Stir the grated cheese into the cooked vegetables.

Roll out the pastry on a floured board, to around the thickness of a one pound coin (about 3-4 mm or a 16th of an inch).
Lightly grease a 24 hole mini muffin pan.
Cut out 24x3.5"/9 cm circles...you may need to re-roll the pastry scraps for the final few!
Pop the pastry circles into the pan and press down (I used the end of my rolling pin for this, but you can buy this nifty little gadget from Amazon which is purpose made for the job!)

Add a teaspoonful of the vegetable mixture to each pastry case and top up with the egg and cream mixture. Bake for 15-20 minutes or until golden brown.
Remove from the pan. Serve straight away or cool and freeze until needed.

Pin It

Tuesday, 11 December 2012

Savoury Puff Pastry Tartlets

©
I'm testing out a few Christmas buffet and canapé recipes at the moment. These little bite-sized tartlets can be filled with your choice of vegetarian or vegan fillings. I have added a few suggestions below, but you can use pretty much anything you fancy.
  • 1 block of ready-made puff pastry
  • Your choice of fillings
Grease a tartlet/mini muffin/bun tin and preheat the oven to 220C/200C Fan/425F/Gas7.
Roll out the puff pastry until it is fairly thin. Using a cutter just bigger than the top of your tartlet or bun tin (holes wells indents...what do you call them?), cut out circles of the pastry, as close together as possible, so that you don't waste too much pastry. 
Pop the pastry circles into your tin and press down in the centre to make space for the fillings.
Fill and bake for 10-15 minutes, or until well risen and golden brown. Only add a little filling to each tartlet as the pastry will rise quite a lot. 
When cooked, remove from the tin and serve hot or warm.

I filled mine with 3 different combinations:
  • Greek (pictured left) - chopped olives, roasted red pepper and sundried tomatoes. Top with a little feta cheese and a sprinkle of dried oregano.
  • Roasted piri piri vegetables (pictured centre - vegan) - finely chop some bell pepper, courgette, mushroom and onion and fry in a drop of olive oil for around 5 minutes. Remove from the heat and stir in 2 tbsp piri piri sauce. 
  • Roasted squash and goat's cheese (pictured right) - cube the squash and roast with some ground fennel seeds for about 15 minutes. Top with a little goat's cheese.
Suitable for freezing

If you wish to make these in advance, slightly under-cook them (so the pastry is firm but still pale). Cool and freeze. Defrost and reheat at 180C/170C Fan/350F/Gas4 for around 5 minutes.

Other ideas include: chopped tomato, basil & mozzarella, blue cheese & mushroom, roasted vegetables & pesto, garlic mushrooms, refried beans and salsa etc. Just remember to cook raw vegetables lightly first, to remove some of their juices, otherwise your tartlets will have soggy bottoms!
If you want to make mini quiches or add sweet fillings (including chutneys), use shortcrust pastry instead, as puff pastry will not hold these fillings well. 
Pin It

LinkWithin

Related Posts Plugin for WordPress, Blogger...