Wednesday, 27 March 2013

Hot Cross Buns (Vegan)

4 vegan hot cross buns
©
Inspired by Paul Hollywood's Bread programme, I thought it was about time I blogged another bread recipe.

I've seen a plethora of hot cross bun recipes lately, but very few vegan ones. Traditionally, these seasonal, Easter bread-buns are made with eggs, milk and butter, so I've substituted these ingredients for vegan alternatives. I think you'll agree that they look pretty much like the traditional variety (minus the crosses, of course!).
  • 3 cups strong bread flour
  • 1 cup sweetened almond milk, or similar
  • 4 tbsp soft brown sugar
  • 2 tbsp dairy-free spread
  • 1 sachet fast action yeast
  • 1 cup dried mixed fruit
  • 1-2 tsp ground mixed spice 
  • 1 tsp Orgran No Egg, optional
  • ½ tsp salt
Add all of the ingredients, except the fruit, to the bread maker and set on the dough setting. 
After a few minutes, add the dried fruit and allow the bread maker to run the full dough cycle. (Alternatively, kneed ingredients together in a bowl, until you have a soft, but not, sticky dough.)

Turn the dough out onto a board, but don't add any extra flour.
Kneed the dough for a few minutes and then divide into 8 pieces and roll into balls.
Flatten slightly and place, well apart, on a greased baking sheet.
Allow to prove in a warm place for 45-60 minutes.
Pre-heat the oven to 220C/200C Fan/425F/Gas 7. 

Mix an extra 2 tbsp of strong bread flour with 2 tbsp of cold water to form a paste. Pipe the paste onto the buns (in your preferred design), with a small, plain nozzle. 

Bake for 10 minutes, then reduce the oven temperature to 190C/180C Fan/375F/ Gas 5. Bake for a further 10 minutes, until brown. The cooked buns should sound hollow if you tap on the base.

Mix 2 tbsp of white sugar with 2 tbsp water. Heat in the microwave for 15-30 seconds on high, to form a syrup. Brush the syrup over the warm buns. 
Remove from the baking tray and cool on a wire rack.

Serve warm or toasted for an Easter breakfast. Cut in half and spread with dairy-free spread and/or jam before serving. 

Suitable for freezing.

Pin It

Thursday, 21 March 2013

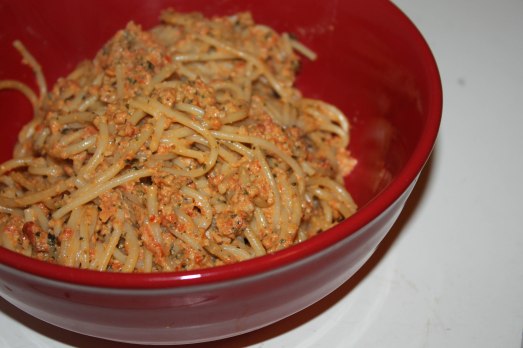
Antipasti Pesto

Bowl of pasta with home made pesto
©
Here's my entry for this month's Pasta Please challenge. Inspired by last month's entries (in particular this one from Jen at Little Birdie) and this month's theme, I thought I'd have a go at making my own pesto; no home made pasta just yet though!
  • 2oz/50g chargrilled peppers in oil, drained and roughly chopped
  • 2oz/50g sundried tomatoes in oil, drained and roughly chopped
  • 4 tbsp oil from the antipasti jar, or olive oil
  • 1 large clove of garlic, crushed
  • 2 tbsp pine nuts
  • 2 tbsp Parmesan-style cheese, grated (omit or substitute for vegan version)
  • A handful of fresh chopped basil
  • 1 tsp chopped red chilli
  • 500g dried pasta
©
Put the chopped peppers, tomatoes and oil in a liquidiser/blender and whizz on a low speed. Stir and blend again. 
Add the pine nuts, cheese, garlic, chilli and basil and blend again until thick and fairly smooth.
Cook the pasta as directed and drain, leaving a little of the cooking water in the pan. Return the pasta to the pan and stir in the pesto to warm through. 
Serve topped with a little more grated cheese or a sprinkle of pine nuts.


This pesto would also work well spread on a pizza base or as a bruschetta topping.

I'm linking this post into the 3rd Pasta Please challenge hosted by Jen at Blue Kitchen Bakes and Jac at Tinned Tomatoes.

Pin It

Friday, 8 March 2013

Grasmere Gingerbread

pieces of Grasmere Gingerbread on a plate

Many years ago, I visited Grasmere on a school trip, and remember spending some of my pocket money on Grasmere gingerbread. We were all given a recipe when we were back at school and made some in Home Economics. If you've never tasted Grasmere gingerbread before, it's like an oaty, ginger shortbread and is easily vegan-ised!

I've lost my original recipe, so I tweaked one from Jane Grigson's English Food. 
  • 6oz/150g SR flour
  • 4oz/100g fine oatmeal (or porridge oats)
  • 6oz/150g soft brown sugar
  • 6oz/150g butter/dairy-free spread
  • 1-2 tsp ground ginger
Pre-heat oven to 180C/170C Fan/Gas 4/350F.
If using porridge oats, whiz in the food processor for a few seconds to make them finer.
Mix all of the dried ingredients together.
Rub in the butter/spread or mix in the food processor - the resulting mixture should be fairly dry and will look something like the Sahara desert - don't worry, it will stick together as it cooks!
Tip the mixture into a well greased baking tray (25x30cm) and press down firmly with the back of a spoon.

Bake for approx. 25-30 minutes or until golden brown.
Remove from the oven and mark into pieces with a sharp knife. 
Allow to cool fully in the tray before removing and breaking up.

Suitable for freezing.
.
Pin It

Monday, 4 March 2013

Pasta Please, Peppers: The round up

Thanks to everyone who entered a recipe in this months' Pasta Please. Having never hosted a linky like this before, I was a little worried that no one would enter! I was impressed by the quality of both the recipes and the photography...I really must start staging my dishes a little more creatively!

Several entries included home made pasta. I've never attempted this before, but feel I really ought to, as I'm sure it tastes much better than shop-bought.


Anyway, here's the round up:


Elizabeth's Kitchen

Seaweed farfalle & pesto with fiery chilli halloumi
I love halloumi, and was really impressed with Elizabeth's home made pasta. She added seaweed to her pesto, which makes this dish really individual and unique. The sliced chillis make the dish look really pretty and give the dish a spicy kick!


Little Birdie
Spinach and walnut pesto pasta with roasted red peppers and sundried tomatoes
Jen created another dish using pesto, but added walnuts and spinach to hers. I love the idea of this recipe and think it's one that would go down really well in my house. It would be a simple one to adapt using ready-made pesto and jarred peppers to create a really speedy but tasty dinner.


Briciole
I was very impressed with Simona's home made chestnut flour gnocchetti and the fact that she even posted a YouTube video to show how to make them. I also loved the sound of the roasted pepper and almond sauce which she served with the pasta.


chestnut flour gnocchetti

We Don't Eat Anything With a Face
This was my entry for the challenge. I really enjoyed  thinking about how I could use as several varieties of pepper in one dish to create a tasty vegan meal. 


Leeks and Limoni
Katharine created a simple, economical, but delicious dish from just two basic ingredients (yes, you guessed them...pasta and peppers!). By slowly cooking the peppers, they become soft and sweet which complements the pasta beautifully.

Ev used a variety of bell peppers plus chilli peppers to make a really colourful dish. I think this would taste just as good cold as a pasta salad as it would hot.


The Taste Space
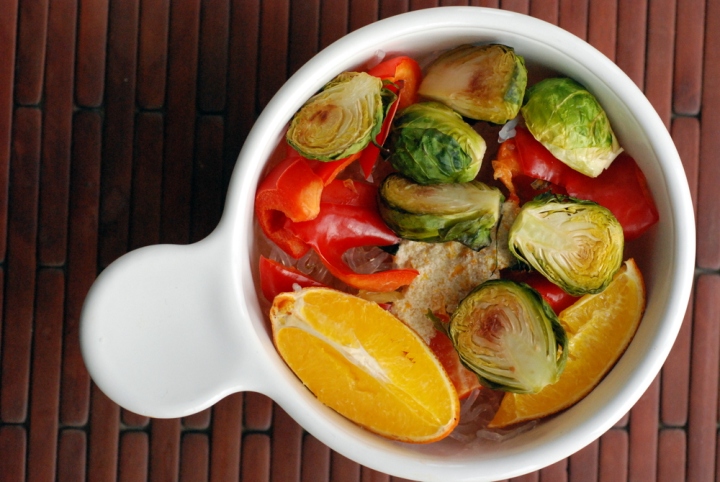
Roasted orange veggie noodle bowl
When I think of pasta, I automatically think of Italian food. Janet thought outside the box though and came up with this Asian-inspired dish, using noodles.

Roasted Orange Veggie Noodle Bowl

Lori's Culinary Creations
Southwest pasta salad
Lori came up with a great pasta salad recipe using store cupboard ingredients (let's hope we get a summer in the UK this year, so we can enjoy some al fresco eating!). She included Bacos, which I hadn't heard of, but apparently you can buy these bacon-style bits from some UK supermarkets.


Green Gourmet Giraffe
Johanna made her own spinach and walnut pesto and stirred it through her pasta. She topped this with roasted red pepper, broccolini and yogurt cheese, which sounds like an amazing flavour combination.


The Law Student's Cookbook
Spaghetti with roasted red pepper pesto
This dish also included a home made pesto to make a simple, tasty meal, perfect for hungry students!

IMG_8657

Tinned Tomatoes
Roast Pepper & Sundried Tomato Pasta Salad with Feta
I love the sound of Jac's colourful combination of anti-pasti, feta cheese and pasta. This is another dish which would taste good hot or cold.


Amuse Your Bouche
I've never thought of putting pasta in a soup before, but Becca's recipe has convinced me that I must try it soon! The addition of red peppers gives this dish a wonderfully rich colour.


I've really enjoyed hosting this round of Pasta Please, but it has opened up my eyes into how much work goes into these things! It's been great to discover new dishes, and better still, some new blogs. Thanks to everyone who entered a recipe.

Next month, the challenge with be hosted by Jen over at Blue Kitchen Bakes and the theme will be home made pesto.

Pin It

Friday, 1 March 2013

Vapiano Italian Restaurant - a review

Vapiano Italian Restaurant
Vapiano is a well-established European restaurant chain, but brand new to the UK, having only two outlets in London so far (one on Great Portland Street and one on Southwark Street/Bankside), so I felt privileged to be invited to sample their menu from a vegetarian view point.
"Vapiano is an innovative European concept serving made-to-order fire roasted pizzas, fresh, house-made pasta and hand tossed gourmet salads...Customers use a 'chip card' to personally order their food or drinks from the bar or from the individual fresh pizza, pasta or salad stations."  
We visited the Southbank restaurant to fit in with a trip to the Tate Modern (which is about five minutes' walk away). I wasn't too sure what to expect, but having viewed the menu online, I was pretty sure that we would all find something we liked. In total, I counted 7 vegetarian pizzas and 11 main course pasta dishes (some contain Parmesan which can be omitted on request), including 4 vegan pasta dishes. Young children are well catered for too, with a selection of pastas and pizzas in child-size portions (and at half the cost of adult meals).

It was lovely to have such a wide range of choice and to see our chosen meals being cooked in front of our very eyes! The great thing about Vapiano, is that everything is prepared as you wait, so if you don't want Parmesan cheese on your pasta, or if you fancy a vegan pizza with some extra mushrooms, you can get exactly what you want. The pizza bases and pasta are both made freshly each day on the premises and are both suitable for vegans; What's more, their prices are exceptional value (especially for London) as all of their main course pizza and pasta dishes cost between  £6.75-£9.75.
"The name Vapiano is from the Italian proverb: Chi va piano va sano e va lontano. This translates as: People with a relaxed attitude, live a long and healthy life."
Vapiano don't accept bookings, so you turn up and sit where there's space; this may mean a short wait in the comfortable bar/lounge area, or may involve sharing a table with other customers. However, we dined at around 2.30pm after the lunch time rush and had no problem in finding a free table all to ourselves. On arrival, each customer is given a chip card so you can all order and pay individually, if required. You take the chip card up to the appropriate counter and swipe it to order your food. The food is then cooked freshly to order...the only downside I can see to this, is that the pasta dishes are prepared faster than the pizzas can cook, so some of you may have your food before others.

A selection of vegetarian dishes from Vapiano Italian Restaurant
Our main course pasta dishes were ready in a few minutes, while Miss Kahonie's pizza took a few minutes longer, however this wasn't a problem for us, as it gave us time to try each other's dishes. The pasta was al dente and each dish tasted distinctly different (not always the case for vegetarian dishes in other Italian restaurants!). The pizza had an authentically thin and crispy base and was generously topped.
We all really enjoyed our meals and Miss Kahonie said that her pizza was one of the best she'd ever tasted.

Although all of the main course portions were very generous, we felt it would be rude to leave without sampling a dessert or two! Unfortunately, the menu is not marked with a 'v' to indicate vegetarian dishes, and we were a little disappointed to find that about half of the desserts contained gelatine. I must admit that the desserts we chose, weren't up to the same standard as the main courses, but were perfectly adequate and at £3 each certainly wouldn't break the bank.

One of the nicest things about the restaurant (apart from the food) was not being rushed by waiting staff. As you order your own food when you're ready to, you can leave a gap between each course and order when ready to, or if you're in a rush, order straight away and have your food on the table in a matter of minutes.

I will certainly be recommending Vapiano to friends and family, and really hope that they'll be opening up a branch near me in the near future!

Integrity Statement
I received free meal for 4 at Vapiano. I did not receive payment, and was not required to write a positive review in return. The views expressed are genuinely those of myself and my family.


Pin It

Sunday, 17 February 2013

Lime and Coriander Quorn Kebabs

Vegetarian kebabs on a plate with salad
© 
This is another old recipe which I have veganised/vegetarianised...the original recipe used sardines. Use Quorn or any other meat-free alternative such as firm tofu or paneer, depending on which you prefer. This dish went down particularly well with the chicken-eating Mr O!

Serves 8 as a starter/4 as a main course
  • 1 pack of Quorn fillets/vegetarian or vegan chicken-style fillets, defrosted if frozen
  • 2 limes (or 1 lemon), juice and zest 
  • 1 tsp ground sweet paprika
  • ½ red chilli, deseeded and very finely chopped or ½ tsp hot chilli sauce
  • 2 tsbp olive oil
  • 1 large clove of garlic, crushed
  • 1 tsp chopped coriander or parsley
Mix the marinade ingredients together in a large bowl.
Cut the vegetarian fillets into large chunks (about 1"/2½cm square)  - I cut each Quorn fillet into 6 pieces.
Add the Quorn pieces to the bowl and turn to coat.
Marinate for a couple of hours in the fridge.
Thread the pieces onto skewers, retaining any marinade (if using wooden skewers, soak them first in water...I forgot to do this, hence the charred ends in the photo!)
Grill or bbq for 10-15 minutes, turning occasionally and basting with the remaining marinade, until cooked through and lightly browned.

Serve with a side salad and a wedge of lemon/lime as a starter, or with rice or a wrap for a more substantial dish.

Not suitable for freezing.

Alternatives: Add whole button mushrooms, sliced courgette, bell peppers and onion to the kebabs. Pin It

Tuesday, 12 February 2013

Grow organic, eat organic - a review and giveaway

Grow Organic, Eat Organic (by Lone Morton, b small publishing) is a lovely little book for budding gardeners. It includes instructions and tips on cultivating easy-to-grow food crops like potatoes, tomatoes and strawberries (plus herbs and flowers) in even the smallest outside spaces. It also has a child-friendly recipe section (almost all vegetarian) which shows children how they can use their home-grown produce in the kitchen.

What I particularly like about this book, is it's introduction to organic gardening methods, the tips on what equipment to use and how important it is to attract 'garden friends' like birds and frogs into the garden to eat pests like slugs and snails, rather than to poison them.

I would say the book is aimed at a KS2 aged children (7-11), although it would also be a nice book for parents to share with younger children, as it has attractive pages beautifully illustrated by Martin Ursell. The book would also be a great resource for primary schools.

Grow Organic, Eat Organic retails at £5.99 (affiliate link).

Integrity Statement
I received a copy of Grow Organic, Eat Organic to review and 1 copy to give away on my blog. I did not receive payment, and the views expressed are genuinely those of myself and my family.

If you would like to win a copy of the book, just use the Rafflecopter entry form below and leave a comment (UK only).
a Rafflecopter giveaway Pin It

Saturday, 9 February 2013

Pasta with Spicy Pepper, Aubergine and Tomato Sauce

©
This is my recipe for this month's Pasta Please challenge...do link up your pasta posts before the end of the month.

The rich pasta sauce for this dish is a cross between a ratatouille and a pepperonata (does that make it peppertouille or maybe ratonata?). I've gone slightly over the top with the pepper theme and have included bell peppers, chilli pepper, paprika and black pepper in the recipe!

Serves 4.
  • 3 bell peppers (pref 1 red, 1 orange/yellow,1 green), sliced
  • 1 aubergine/eggplant, cut in quarters lengthwise and then sliced
  • 1 red onion, sliced
  • 1 large clove of garlic, crushed
  • 1 tin of chopped tomatoes
  • 1 tbsp tomato purée
  • 1 tsp sugar, optional
  • 1 tbsp balsamic or wine vinegar (or a glug of red wine)
  • 1 tsp ground paprika
  • ½ chilli, deesed and finely chopped 
  • A handful of basil leaves, chopped
  • Black pepper to taste
  • Dried pasta of your choice
Heat 2 tbsp olive oil in a large frying pan.
Add the aubergine and cook on a fairly high heat for about 10 minutes until soft and golden brown. Remove from the pan and keep to one side.
Heat a further 1 tbsp of olive oil in the pan. Add the peppers, onion and garlic and sauté gently for about 5 minutes. Add the aubergines back to the pan.
Add all of the remaining ingredients and stir well. 
Put a lid on the pan and allow the sauce to simmer on a low heat for about 20-30 minutes, or until the peppers are soft and you have a thick sauce.

Meanwhile boil your pasta ( I use about 250g/8oz of dried pasta to feed 4), drain and top with the sauce.

Alternative: If you're not a fan of aubergine, swap it for sliced mushrooms or a drained tin of chickpeas.
Add an additional 250ml/1 cup of passata to the sauce and use as a filling for a vegetarian lasagne.

Sauce suitable for freezing.

Pin It

Friday, 8 February 2013

Marinated Olives with Garlic, Chilli & Parsley

bowl of Queen green olivesI generally buy a pot of marinated olives each week. This works out to be quite expensive, as my favourite marinated Queen green olives are generally £2-£3 a tub. So, I thought I'd have a go at marinating plain olives (at about £1 per jar) to see if they would taste as good and save money...they do!
  • 1 jar of your preferred plain or stuffed olives in brine (about 200g/8oz drained weight)
  • 4 tbsp extra virgin olive oil
  • 1 clove of garlic, peeled and sliced
  • 1 tsp fresh, chopped parsley
  • 1 pinch of dried crushed chilli
Drain the olives, blot dry on some kitchen roll.
Mix the marinade ingredients together and pour over the olives.
Allow to marinate over night in an airtight tub.
Will keep for 3-4 days in the fridge.

Top tip: After you've eaten the olives, don't through the marinade away...pour over chopped Mediterranean or root vegetables and roast them.

Other marinade suggestions: Just add the chopped ingredients to olive oil as above - lemon zest and chopped coriander leaves, sun-dried tomatoes and feta (use the oil from the sun-dried tomatoes), chopped basil and garlic, garlic and chopped fresh chilli etc.

Any other marinade ideas? Do let me know in a comment below.
Pin It

Monday, 4 February 2013

Chocolate Microwave Mug Cake (Vegan)

It's a hard job, but someone has to do it... perfect an easy recipe for a vegan microwave mug cake that is! Of course, this took many attempts and I inflicted the varying results on my poor children, not that they complained at the prospect of eating yet another chocolate dessert. 

This is a very economical pudding to make and takes literally 5 minutes to prepare and cook, so it's a great one for kids to make. You can mix the ingredients together in the mug, but I find it easier to mix them in a jug and pour into a mug before cooking.

I adapted this recipe from the standard 4 tbsp non-vegan version (available in various forms on the inter-web) which makes a larger cake. Unfortunately, none of my mugs were big enough to hold the cooked mixture and I ended up with a Vesuvius type eruption in my microwave on one occasion! Half of the standard mixture gave a small cake, which only ¾ filled the mug and looked a little feeble.

This version fits an average 250ml/½ pint mug and serves one teenager/adult or can be split between 2 children.  As you can see, the cooked cake sinks a bit after cooking, but this doesn't affect the flavour. 
  • 3 tbsp self raising flour
  • 3 tbsp soft brown sugar
  • 1 tbsp cocoa powder, sieved
  • 1 level tsp Orgran No Egg (or similar egg replacer) - add this dry to the flour  
  • 3 tbsp/45 ml dairy-free milk (water would probably work too)
  • 2 tbsp vegetable/sunflower oil
  • 1 tbsp peanut butter, vegan chocolate/hazelnut spread (or an extra tbsp of oil)
  • 1 tbsp dairy-free chocolate chips
  • ½ tsp vanilla or coffee extract or a good pinch of ground cinnamon.
Mix all of the dried ingredients together in a jug.
Add all of the liquid ingredients and mix well, making sure there are no pockets of dried ingredients.
Pour batter into a standard mug (it should be no more than half full). 
Microwave on high/full power for 2-2½ minutes or until until firm to the touch - I found that 2 minutes gave a moist, brownie texture and 2½ minutes gave a more traditional sponge cake texture...both tasted good! Watch as it cooks, as it will rise a lot, but don't open the microwave until it has finished rising.
Carefully remove the mug from the microwave using oven gloves...the mug will be HOT!!!
Allow to cool in the mug for about 5 minutes before eating.

Top tips: This cake needs to be eaten warm and does not keep. 
You can easily double the ingredients to make two cakes, but only cook one at a time.

Pin It

Friday, 1 February 2013

Pasta Please: Peppers

I'm very excited to be hosting the 2nd round of Pasta Please as I do like food-related alliteration! This month's theme is peppers, as they're readily available all year round, fairly cheap and really brighten up a pasta dish. You can, of course, choose which type/s of pepper you want to use...that could be bell peppers, pointed peppers, a red pepper pesto or even chilli peppers. The choice is yours!

...Want to join in the challenge?
  • Simply post a pasta dish on your blog by the 28th of the month and:
  • Link to the current host (this page please!) and Tinned Tomatoes: e.g. I'm linking this post into the 2nd Pasta Please challenge hosted by Lisa at We Don't Eat Anything with a Face and Jac at Tinned Tomatoes.
  • Use the Pasta Please image in your post.
  • If you use twitter, please tweet your post to @facelessfood and @tinnedtoms with the #PastaPlease hashtag and we will re-tweet it. 
  • Selected entries will be pinned to the Pasta Please Pinterest board.
Here are the rules:
  • Follow the current theme (that's peppers this month!) when creating your recipe.
  • All entries must be suitable for vegetarians.
  • Other hosts will accept all pasta dishes, unless they specify only vegetarian/vegan etc.
  • One entry per blog.
  • Recipes must be added to the linky by the 28th of each month.
  • If you would like to host Pasta Please, email Jacqueline at tinnedtomatoes@googlemail.com
The February 2013 theme is peppers.
All dishes must be suitable for vegetarians
Pin It

Tuesday, 29 January 2013

Walkers to add real meat flavourings to their crisps!

clip art picture of a bag of crisps
News Flash!
According to the Vegetarian Society, from the beginning of February 2013 Walkers Smoky Bacon and Roast Chicken crisps will no longer be suitable for vegetarians as they will contain real meat flavourings.

Walkers have confirmed this on their Facebook page "...As part of our homegrown range, we are indeed making the move to make our crisps more authentic, and the Smoky Bacon and Roast Chicken flavours will now contain real, farm reared 100% British meat."

This is a real shame as they are obviously well aware of their vegetarian customers' needs, after changing the ingredients of their cheese and onion crisps some time ago (to include vegetarian cheese powder). Whether this is simply a publicity stunt planned by their marketing department to cause public outcry, or whether Walkers think this change in ingredients will increase their profits, I will certainly be contacting them to let them know how I feel, and urge you to do the same.

To contact Walkers about this issue, please phone their consumer careline on 0800 274777, email consumer@walkers.co.uk or write to:

Consumer Services Department
Walkers Snack Foods
FREEPOST LE4 918
Leicester
LE4 5ZY

You can also make your point on their Facebook page and on Twitter.

Read the full story here.


Pin It

Sunday, 20 January 2013

Tarka Dal

bowl of tarka dal
©
This simple tarka dal/dhal recipe is really cheap to make and tastes great as a side dish. Double the recipe for a main meal.

Serves 4
  • ½ cup dried red lentils
  • 1 small onion, diced finely
  • ½ tsp cumin seeds/powder
  • ½ red chilli, de-seeded and chopped finely, optional 
  • ½ tsp turmeric
  • 2 heaped tsp grated fresh ginger
  • 2-4 cloves of garlic, crushed or finely sliced
  • 1 heaped tsp garam masala
  • Salt and black pepper to taste
  • 1 tbsp tomato purée
Place the lentils in a pan with 1½ cups boiling water. 
Bring to the boil and simmer for 20 minutes or until tender, adding a little more water if needed.

In another pan make the tarka by heating 1 tbsp vegetable oil. 
Fry the cumin and onion until golden.
Add the remaining ingredients (except the garam masala) and cook for 2-3 minutes on a low heat.

Add the cooked dal to the tarka and stir in the garam masala. Season to taste.
Cook on a low heat for a further 5 minutes, adding a little more water if needed.

Serve with rice/chapattis and a vegetable curry.

Alternatives: Try using different pulses or a combination of lentils and adjust the cooking time as necessary.

Pin It

Monday, 14 January 2013

Mini Fruit Cakes

If you've got some dried fruit left over from Christmas why not whip up a batch of these mini fruit cakes? They're really quick and easy to make and are the ideal size for a lunchbox treat or after-school snack.
  • 100g/4oz butter, softened
  • 100g/4oz soft brown sugar
  • 125g/5oz SR flour
  • 2 medium eggs
  • 200g/8oz mixed dried fruit
  • 50g/2oz flaked almonds or chopped glace cherries
  • ½ tsp each of cinnamon and mixed spice
  • 2 tbsp milk
Pre-heat the oven to 160 C/150 C Fan/325 F/Gas 3.
Put all of the ingredients into a bowl or food processor and mix well.
Spoon into a well greased muffin tin and flatten the mixture slightly with the back of a spoon.
Bake for around 20-25 minutes, or until firm to the touch.
Turn out and cool on a wire rack.

Suitable for freezing.

Pin It

Tuesday, 8 January 2013

Spiced Parsnip and Carrot Soup

A bowl of Spiced Parsnip and Carrot Soup
©
This warming winter soup is a variation on HFW's parsnip and ginger soup (River Cottage Veg Everyday). I added carrots and cut down on the spices to give a more subtle flavour as favoured by my parsnip-disliking family! This is another useful for using up leftover veg and costs just a few pence per portion...any combination of root vegetables would work well.
  • 1 tbsp vegetable oil or butter
  • 1 large onion or leek
  • 2 medium parsnips, peeled and cored
  • 4 large carrots, peeled
  • 1 medium potato, peeled
  • 1 litre/1¾ pts hot vegetable stock (I used a veg Oxo cube)
  • 1 tsp grated fresh ginger or a good pinch of ground ginger
  • A good pinch of ground cumin
  • Black pepper to taste
  • A little double cream to serve, optional
Roughly chop the vegetables into chunks.
Heat the oil/butter in a large pan.
Add the onions and cook gently for a few minutes.
Add all of the remaining vegetables and cook for a further 2-3 minutes.
Add the spices (if using) and the vegetable stock. 
Bring to the boil and simmer for 20-30 minutes, until the vegetable are tender.
Blend until smooth and then return to the heat for a couple of minutes.
Swirl with a little double cream before serving (optional).

Suitable for freezing


Top Tips: This soup is easily veganised by leaving out the dairy ingredients.
To adapt for babies and toddlers, make using water or a low-salt vegetable boullion. Omit or reduce the spices. Blend, then remove the children's portions. Return to the heat and add the remaining spices. Simmer gently for 5-10 minutes before serving, while the children's portions cool.

This recipe is my entry to Lisa's Kitchen leftover-themed No Croutons Required. 

Pin It

LinkWithin

Related Posts Plugin for WordPress, Blogger...