Sunday, 20 December 2015

Rustic Christmas Pies with Butternut Squash, Sweet Potato and Goat's Cheese - Suma Blogger's Network

These rustic, savoury pies are my vegetarian Christmas Dinner offering this year, and also my last post of the year for the Suma Blogger's Network. Unlike quiches, these individual pies don't involve a custard to hold the roasted vegetables together, and there's no need for pastry cutters or flan dishes to make them look pretty.

They can, of course, be made in advance*, leaving you plenty of time on Christmas Day to prepare all of the other traditional Yuletide trimmings.  I cheated slightly by using time-saving ready-prepared squash, sweet potato and pastry, which bumps the cost up, but you could prepare your own if you are on a budget. Although this recipe serves four, it can easily be adapted to serve one or two, by reducing the ingredients accordingly.

Serves 4
  • 500g/1 lb, 2oz (prepared weight) butternut squash and sweet potato, diced into approx.1-2 cm cubes
  • 1 small red onion, chopped
  • 2-3 tbsp olive oil
  • 1 mild, red chilli, de-seeded and sliced finely (optional)
  • 1 sprig fresh sage, chopped, plus 4 leaves to top the pies
  • 100g/4oz chopped Suma walnuts
  • 50g/2oz dried Suma cranberries
  • 100g/4oz English goat's cheese, sliced into 4 slices
  • 300g/12oz ready made shortcrust pastry**
  • 1 egg, beaten, to glaze (optional)
Preheat the oven to 170C/160C Fan/Gas 3/325F
Drizzle the oil over the chopped squash and sweet potato and roast for 15 minutes.
Remove from the oven, turn and add the diced onion, chopped sage and chilli.
Cook for a further 15 minutes. 
Check if the vegetables are tender and starting to brown. If not, return to the oven for a further 5-10 minutes.
Remove from the oven, mix in the chopped walnuts and cranberries and allow to cool.


Preheat the oven to 200C/190C Fan/Gas 6/400F
Once the roasted vegetables are cool, divide the pastry into 4 and roll out thinly on a floured board to roughly 18cm/7" circles.
Place ¼ of the vegetable mixture into the centre of each circle.
Top with a slice of cheese and a sage leaf.
Fold the edges of the pastry in, to form an open pie.
Brush with beaten egg to glaze (optional), or wrap in grease proof paper and chill until needed.
Place on a greased baking tray and bake for 20-25 minutes until golden brown.

Serve with all the usual Christmas trimmings.
 Suma Blogger's Network*Can be made in advance and chilled or frozen until needed.
**Swap the shortcrust pastry for puff pastry if you prefer it.


Vegan option: Check that your pastry is vegan...most UK brands are. Omit the cheese, or swap for extra chopped nuts, pine nuts, or your preferred cheese substitute.


Integrity Statement
As a member of the Suma Blogger's Network, I will receive a selection of complimentary products from Suma every two months, to use in recipe development, and will blog an original recipe for the Network. 

Pin It

Thursday, 10 December 2015

Panforte di Siena

In case you've never heard of it, panforte is a traditional, festive Italian spiced fruit and nut cake, served with coffee and liqueurs after a meal. After watching Antonio Carluccio make a panforte on TV last Christmas, I knew it was something I'd have to try making myself.

The traditional recipe is easy to veganise as the only animal-derived ingredient is honey. I've also adapted the recipe to make it gluten free, contain less sugar and use easy-to-find UK ingredients. The resulting cake is still deliciously sweet and tastes something like a cross between a fruit and nut energy bar and Christmas cake! Having made it once, I reckon it would actually be pretty easy to make a raw version. 

Serves 16-20
  • 200g/8oz (combined weight) dried figs and/or pitted dates, roughly chopped
  • 50g/2oz each of raisins, sultanas and currants
  • 1 level tsp mixed (pumpkin pie) spice
  • juice and zest of 2 large oranges and 1 lemon
  • 150g/6oz candied fruit, such as glacé cherries, apple, melon, citrus peel etc.
  • 100g/4oz almonds, lightly toasted
  • 100g/4oz walnuts, lightly toasted
  • 4 tbsp agave, date or golden syrup
  • 4 tbsp gluten-free flour
  • 5 tbsp Vin Santo, dessert wine, amaretto or sweet sherry (I used amaretto)
  • Icing sugar to dust
Heat the oven to 150 C/140 C Fan/Gas 2./300 F; grease and line a loose-bottomed 25cm/10" round cake tin, with grease proof paper.

Toast the nuts, cool and then roughly chop or grind coarsely, depending on the texture you prefer.

Chop the figs or dates roughly and put them in a pan with the other dried and candied fruits.
Add the syrup, wine/liqueur, citrus juice, zest and mixed spice.
Stir together and cook gently for about 10 minutes.
Then add the chopped nuts and flour and mix well.

Spoon the mixture into the prepared tin and press down well.
Bake in the oven for 30 minutes.

Take out of the oven and leave to cool in the tin.
When cold, sprinkle generously with sifted icing sugar.
Cut into thin slices to serve.

Stores for up to a month in an airtight container.

Find my other vegetarian Christmas recipes here.

Pin It

Sunday, 1 November 2015

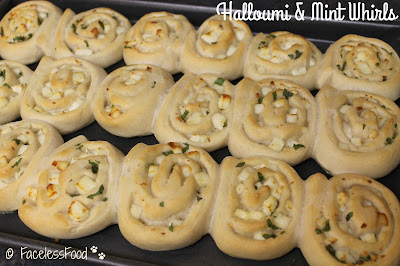
Halloumi & Mint Bread Whirls

Halloumi & Mint bread rolls
The recipe for these tasty halloumi bread rolls was inspired by one I tried in a Greek restaurant in Sydney, Australia. I don't know the actual recipe used, so I adapted my standard bread recipe and tried out a few variations.

When making a large loaf with raw halloumi, I ended up with a 'soggy bottom'! I found that I needed to cook the cheese first, to remove the excess moisture, and then had to cool it before adding to the dough.
So, I tried adapting my pizza whirl recipe instead, and it worked a treat using raw halloumi, as the moisture could evaporate.

For the bread base
  • 1 cup cold water
  • 3 cups strong white bread flour 
  • 1 tbsp olive oil
  • 1 sachet fast-action dried yeast
  • 1 tsp sugar
  • ½ tsp salt
For the filling
  • 200g halloumi, finely diced
  • ½ cup chopped fresh mint, or around 2-3 tsp dried mint
  • 2 tbsp olive oil
Put all of the dry bread ingredients in a bowl (or bread maker) add the wet ingredients.
Mix well until you have a smooth dough (on dough setting in bread maker).
Add a little more flour if the dough is too sticky.
Cover the bowl and allow to rise in a warm place for 30-60 minutes.

Dust a large board or clean table with a little flour.
Roll the dough into a rectangle, approx 25cm x 40cm. 
Sprinkle the halloumi and mint over, leaving a border at the front and sides.
Roll the dough lengthwise, as tightly as you can (like a Swiss roll).
Making sure the dough roll is seam-side down on the board, cut slices approximately 1.5cm thick.
Place on a greased baking sheet, with a little room to expand.
Drizzle with the olive oil.

 Cooking With Herbs
Cover loosely with cling-film or a clean tea towel and allow to rise for a further 30 minutes.
Meanwhile, preheat the oven to 200C/190C Fan/Gas 6 .

Bake for around 10-15 minutes, or until well-risen and golden.
Place onto a wire rack to cool.
Serve warm, with dips, as part of a meze, or instead of a sandwich in a packed lunch.

I'm linking this post to November's Cooking With Herbs challenge

Pin It

Sunday, 18 October 2015

Tuscan Vegetable and Bean Stew - Recipe Feature

Tuscan Vegetable and Bean Stew
To me, the name Cranks is synonymous with great tasting, wholesome vegetarian food. You might not know that their first restaurant and deli opened on London’s Carnaby Street in the swinging 60's; those were the days when people were considered to be cranks if they were vegetarian or vegan! Over 50 year later, the brand is still going strong and have a restaurant, Cranks Kitchen, in Devon, published several recipe books, and have recently launched a new, exclusively vegetarian, sandwich range. As a long standing vegetarian, I was amazed and a little humbled that such a well known vegetarian brand would want me to develop a seasonal recipe for them...

This is my economical and vegan adaptation of the traditional Tuscan stew, Pollo alla Cacciatore (hunter's chicken). I know you don't have to hunt very far to find vegetables and pulses in your local supermarket, but I find they work well with the flavours in this recipe and are hearty enough to make this a warming, winter dish.

If you prefer, you can cook this dish in the oven or slow cooker.

Serves 4:
  • 2 tbsp olive oil
  • 1 medium onion, finely chopped
  • 2 cloves of garlic, finely chopped or crushed 
  • 1 tsp cornflour
  • 200g/8oz chestnut mushrooms, wiped and halved or quartered 
  • 200g/8oz chantenay carrots, peeled or scrubbed and cut in half vertically 
  • 100g/4oz green beans, trimmed and cut into 5cm pieces
  • 1 tin chopped tomatoes (add 1 tbsp tomato purée if you use economy tinned tomatoes)
  • 250ml/1 cup vegan, dry white wine 
  • 1 bay leaf
  • 1 tbsp fresh, chopped parsley
  • 2 sprigs of rosemary
  • black pepper, to taste
  • 1 tin cannellini beans, drained
  • 50g/2oz pitted olives
Heat  the oil in a large saucepan, on a medium heat.
Add the onion and garlic to the pan and cook gently for a few minutes, until softened. 
Remove from the heat and sprinkle in a heaped tsp of cornflour. 
Add all of the remaining ingredients (except for the tinned beans and olives), place back on a medium heat and bring to a gentle simmer, stirring occasionally. 
Simmer for 25-30 minutes with the lid on, until the carrots and green beans are almost tender.
Add the tinned beans and olives to the sauce. 
Simmer with the lid off for a further 5-10 minutes, to allow the sauce to thicken slightly 
Remove the bay leaf and sprigs of rosemary before serving. 

 CranksServe with your choice or rice, pasta, potatoes or rustic, crusty bread.

Alternatives: Swap the wine for a vegetable stock, if preferred.

Sponsored Post
I received payment for recipe development and ingredients, from Cranks. All views expressed are genuine.

Pin It

Tuesday, 6 October 2015

Custard Creams (Gluten-Free & Vegan) - Suma Blogger's Network

My latest recipe for the Suma Blogger's Network is one I have road -tested, by baking the biscuits with 60 five year olds!

Cookery in primary schools is back on the curriculum with the aim of 'instilling a love of cooking'. As I work in a school, I often get asked to come up with recipes or ideas for our food-related activities. We have to be careful with allergens and various other dietary needs, so I came up with this recipe for Custard Creams. I had to make sure the recipe was easy to make, but it also had to be nut and egg-free, so I thought might as well go the whole hog and make it gluten and dairy-free too!

Having not used gluten-free flour before, I found it was made a slightly less-pliable dough, than wheat flour would; therefore you have to handle it more gently. Once cooked, it produced robust, crispy biscuits, which were easy to handle, so were great for the kids to decorate. Taste-wise, the gluten-free flour gave a courser texture to the biscuits, which was slightly gritty.

Makes 8-10 sandwich biscuits

Biscuit dough
  • 100g/4oz margarine/dairy-free spread
  • 150g/6oz gluten-free flour
  • 100g/4oz caster sugar
  • 50g/2 oz gluten-free custard powder
  • 1 tsp vanilla extract
Filling
Preheat the oven to 190C/180C Fan/375F/Gas 5
Cream the spread and sugar together, then beat in the custard powder and vanilla.
Mix in the flour to form a firm dough.
Refrigerate for 15 mins.

Carefully roll the dough out on a lightly floured board, until it is about ½cm thick - if it cracks in places, simply smooth over the dough with your fingers.
Cut out around 16-20 biscuits  with a rectangular cookie cutter (or whatever shape you prefer) and place on a greased baking tray.
Bake for 15 minutes.
Cool on the tray for a few minutes, then remove and place on a wire rack to cool.

When cold, sandwich together with the butter cream...

For the filling
Cream the spread, custard powder and vanilla together.
Slowly beat in the icing sugar, adding 1-2 tsp of boiling water, if needed, to make a thick, spreadable icing .
Spread or pipe the icing onto half of the biscuits.
Sandwich together with the remaining biscuits.

Keep in an airtight box for 2-3 days.
Suitable for freezing. 

Alternatives: 
     Suma Blogger's Network
  • You can make these biscuits with plain wheat flour if preferred; you may need to add a little extra to make a firm cookie dough.
  • If you don't want to sandwich the biscuits together with butter-icing, they can be decorated with glacé icing instead.
  • Make larger biscuits and cook for a few minutes longer, to make gluten-free ice-cream sandwich cookies.
  • Swap the custard powder (in both the cookie dough and icing) for unsweetened cocoa powder to make bourbon biscuits.
Pin It

Sunday, 20 September 2015

The Hungry Student Vegetarian Cookbook: A review and giveaway

The Hungry Student Vegetarian Cookbook
My children are growing up way too quickly; Miss O has finished her GCSEs and has started at 6th form college (she's studying for A Levels in English, History, Drama and Art History, if you're interested!) and Miss K has just started her GCSEs in year 10.
If all goes well with their studies, it won't be long until they leave for university. Like most parents, I worry about how well they'll cope in the big, wide world, despite the fact that they have both helped me with shopping, cooking and household chores since they were little (sometimes reluctantly, sometimes willingly!).

With this in mind, I was glad to be able to review The Hungry Student Vegetarian Cookbook, as it seems like a great book to give to vegetarian teenagers or young adults who can cook more than beans on toast, but aren't quite ready for Ottolenghi. The book contains a wide range of cheap and simple to cook dishes, including breakfasts, lunches, main meals and desserts...plus a few cocktails too!
...The Hungry Student Vegetarian shares more than 200 quick and cheap meat-free recipes that are so tasty, even hardened carnivores will keep turning up for dinner. There are also indispensable tips on budgeting, lunchbox ideas, healthy eating and how to get creative with leftovers. All the recipes in this book are balanced for a healthy vegetarian diet, and they each have an affordability stamp to help with budgeting as well as detailed instructions to make them accessible to even the most novice cook. 
I do have a couple of criticisms of the book; one is that most recipes feed four people, rather than one or two; I can't imagine that my girls are going to find three fellow veggies to share food and cooking with, although this would obviously make their living costs much cheaper. The other thing I noticed was that quite a wide array of herbs, spices and curry pastes are suggested in different recipes. I find curry pastes are pretty expensive and don't keep well compared to whole or ground spices, so I'd suggest investing in the basic spices - cumin, coriander, garam masala, turmeric, cinnamon and paprika - rather than buy curry pastes.

Having said that, I love the handy tips at the start of each section, they really are worth reading and set this book apart from other budget-friendly/student cookbooks.


I set 14 year old Miss K the challenge of cooking one of the recipes from the book by herself. She chose the Cheddar burgers with cucumber salsa. These burgers are mainly made from beans, cheese, carrot and onion, so with the salsa and a bread roll, they are budget-friendly and cover all the food groups. Miss K made them easily and with the use of a burger press, they held together well, were simple to cook and tasted really good.

The Hungry Student Vegetarian Cookbook: More Than 200 Quick and Simple Recipes, Published by Spruce, £7.99, www.octopusbooks.co.uk 

I have two copies of the book to give away. Just tell me your favourite cheap-and-cheerful/student dish in a comment below, using the Rafflecopter widget. UK ONLY. Closes midnight Sunday 27th September.

You can find my own student recipe ideas and tips here.

Integrity Statement
I received a complimentary copy of the book for the purpose of this review and two copies to give away. All views expressed are genuine.

a Rafflecopter giveaway Pin It

Tuesday, 15 September 2015

Toffee Apple Waffles

quick and easy, basic sweet waffle
After trying out my new Sage No-Mess Waffle Maker for a few weeks, I think I've perfected my basic, sweet waffle recipe... 
I've used cup measurements to make these as quick and easy as possible to make. Many waffle recipes I've looked at involve separating the eggs and whisking the egg whites. Not something I have the time to inclination to do when making breakfast waffles! I reckon the addition of a touch of bicarb does the job to make these waffles light and fluffy.

Makes 4 large, sweet waffles
  • 1 cup SR flour
  • ¼ cup caster sugar
  • ¼ cup melted butter, cooled
  • ¾ cup milk
  • 1 large egg, beaten
  • 1 tsp vanilla extract
  • ¼ tsp bicarbonate of soda
For the topping
  • 4 dessert apples, peeled, cored and sliced thickly
  • 1 tsp butter
  • 8 tbsp dulce de leche or caramel sauce
  • ground cinnamon and cream to serve.
To make the waffles
Heat the waffle maker to a medium setting; I used setting 4.

Put the dry ingredients into a bowl.
Mix the liquid ingredients together in a jug.
Pour the wet ingredients into the bowl and mix to combine.
Pour the batter back into the jug.

When the waffle maker is hot, pour around ¼ of the mixture into the centre. 
Gently close the lid and cook until the machine bleeps (or until the waffles are golden brown).
Remove and keep warm in a low oven while you cook the remaining waffles.

For the topping
Heat a large frying pan on a medium heat and grease with the butter. Gently cook the apple slices for about 4-5 minutes minutes on each side - until starting to soften but not breaking up. 
Add the dulche de leche and stir gently to coat the apples and warm through - add a splash of water or cream, for a thinner sauce.
Top the warm waffles with the toffee apple mixture and serve with a dollop of cream and a sprinkle of ground cinnamon

Top tip: If you don't have a waffle maker (why not?!) then you could cook these in a heavy based, non-stick frying pan or griddle.

Topping ideas: Fruit compote and Greek yogurt; Nutella and chopped banana/strawberries; peach Melba (peach, raspberries and vanilla ice cream), fresh fruit salad and maple syrup... 

I'd love to know your favourite waffle toppings, so please feel free to tweet me or leave me a comment below.

Pin It

Wednesday, 9 September 2015

Sage's No-Mess Waffle Maker™ - a review

no-mess waffle maker
I love a kitchen gadget, so couldn't believe my luck when I was asked to try out the new Sage by Heston Blumenthal waffle maker. The No-Mess Waffle Maker™ has non-stick plates, a wrap-around moat to catch (and cook) excess batter and a built-in timer, so it makes waffle-making super-quick and easy. It's also a sturdy and good-looking piece of kit, but is compact enough to fit in the corner of a cupboard, without taking up too much space.

I've tested the waffle maker out in various ways... Obviously the first thing I did was make some sweet, breakfast waffles. Setting 4 was just right for golden-brown, hot, fluffy waffles. My girls and their friends loved them after a sleepover, for a breakfast treat. Then I tried out some posh waffles with a few different toppings, which would be great for impromptu desserts.

Now, I'm not sure I'd pay the RRP of almost £100 for a machine that only made waffles, so I decided to try out some other recipes, which I thought might work; cookies, muffins, omelettes/frittata and even home-made veggie/bean burgers all worked well, so long as they contained egg (I did try a couple of vegan recipes, which didn't hold together so well). I reckon almost anything which cooks from a batter or a dough-like mixture, and sets whilst cooking should work. Don't try burritos or toasted sandwiches though, as I found that molten cheese wasn't the easiest thing to clean out of the waffle plates!

My only real criticism is that there is no implement included to remove the hot waffles from the machine; A pair of plastic tongs would be useful, so that you don't scratch the non-stick coating.

As the machine is so sturdy and versatile, it would make a great gift for any foodie, or even a student starting uni. My teens have found it really easy to use, and have enjoyed coming up with different waffle creations. Look out for my next post, covering some of our favourite waffle-maker recipes and toppings!

The No-Mess Waffle Maker™ RRPs at £99.95 and is available from John Lewis, Amazon and Sage Appliances online.

Integrity Statement
I received a complimentary waffle-maker for the purpose of this review and for recipe development. All views expressed are genuine.

Pin It

Wednesday, 2 September 2015

Puff Pastry Empanadas with Black Beans

Puff Pastry Empanadas with Black Beans
These quick and easy veggie empanadas make an idea starter or tapas dish. They would also work well in kids' lunch-boxes, as an alternative to sandwiches.
Obviously you can make your own pastry if you have time, or use shortcrust pasty if you prefer.

Makes 18-20 small empanadas

  • 1 red onion, finely diced
  • 1 large, or 2 small bell peppers, diced 
  • 1 large clove of garlic, crushed
  • 1 fresh chilli, de-seeded and finely diced, optional
  • 2 tsp ground cumin
  • ½ tsp smoked or plain paprika
  • 1 tin black beans, rinsed and drained
  • 2 tbsp chopped, fresh coriander
  • 100g/4oz Monterey Jack or Cheddar cheese, diced
  • 500g/1lb pack of ready made puff pastry
  • 1 egg, beaten
Gently fry the onion, garlic and bell pepper in a little oil, until soft. Add the herbs and spices, and cook for a further minute. Set to one side to cool.
When cool, stir in the chunks of cheese.

Pre-heat the oven to 220°C/Fan 200°C/Gas Mark 7/425°F

Roll out the pastry as thinly as possible, on a lightly floured board.
Using a large cutter (10-12.5cm/4-5") or small plate/bowl and a sharp knife, cut as many circles from the pastry as you can. Re-roll any scraps of pastry and repeat.

Brush the perimeter of each circle with beaten egg.
Spoon 2 tsp of the filling into the middle of each piece.
Fold the pastry carefully over the filling, to make a semi-circle.
Press firmly to seal, then crimp with a fork, or by folding the edge over in the traditional way (YouTube tutorial here!).
Brush each mini-pasty with beaten egg to glaze.
Bake for 12-15 minutes, or until the pastry has puffed up and turned golden brown.
Remove from the oven and cool on a wire tray.
Eat warm or cold with your favourite dips.

Suitable for freezing. Defrost before re-heating.

Vegan version
Most brands of puff pastry are vegan, so this recipe is easy to veganise. Swap the dairy cheese for your preferred alternative, or omit and add some extra beans or vegetables. Seal the empanadas with a little water and brush lightly with olive oil to glaze.

Top tip: If you don't have time to make empanadas, use the same filling for quesadillas - just pop 2-3 tbsp of the beany mixture onto a tortilla, fold in half and pop in a sandwich press or hot pan for a few minutes to warm through and melt the cheese.

Although I haven't attempted to make my own puff pastry, I'm linking this post to Lisa and Jen's Pastry Challenge, hosted this month at United Cakedom.

Pin It

Sunday, 23 August 2015

Our family holiday to Australia - Part 2: Sydney

...So, after two weeks in Victoria, we travelled to New South Wales with Virgin Australia.

I can only imagine how beautiful the bays of Sydney and the surrounding area must have been for James Cook to have (re)named it after Wales. There are very few similarities now, unless you head out of the city. The botanic gardens and beaches are beautiful and the Sydney opera house and bridge make stunning landmarks, but it's not until you travel for over an hour outside the city, that you get any idea of what Australia might have one looked like.

During our stay in Oz, we've learned about the indigenous aboriginal people, culture, art and traditions ...something the British history books and classes seem to miss out. We've seen some amazing indigenous art in the Art Gallery of NSW and an interesting exhibition on aboriginal culture in the Australian Museum. It was uncomfortable at times to read the stories of stolen land and children taken from their families, but something I feel I must mention.

Anyway, back to the review...we stayed in the suburb of Rozelle; around a 20 minute bus-ride from the centre, and within easy reach of a selection of bars, cafes and restaurants, in neighbouring Balmain. Getting around Sydney was easy enough on the buses and ferries. Like Melbourne, you need to buy a travel pass, called an Opal (based on London's Oyster Card apparently). Of course, we had to visit the harbour bridge and opera house, which are in the heart of the city, near the beautiful botanic gardens. I was surprised to find they were so close together, as they don't appear that way on TV. I had hoped to be in awe of these fantastic structures, as so many of my friends and family have been, but alas, they looked like a pointy building and a big, metal bridge to me!

Food-wise, Sydney was pretty similar to Melbourne, except there seemed to be more European/Middle-Eastern influences and slightly less Asian. Vegetarian and vegan food was plentiful in both restaurants and shops, so we had no shortage of good food to eat. Lunches in cafes and restaurants were full-on meals with ubiquitous avocados and salad, not light snacks and sandwiches, so we often look a picnic out with us, which saved money too. We found that Greek and Middle-Eastern restaurants were the best bet for a vegetarian light lunch or dinner, but these were out in the suburbs, not in the city .
On an Aussie Masterchef theme again, we ate at the trendy Wilhemina's restaurant (fronted by last years' forth-placed contestant Jamie Fleming) and tried some delicious cake and pastries from guest chef, Adriano Zumbo's patisserie.
Towards the end of our holiday, we were craving a good (British-Indian) curry and luckily both the Indian Palace and Manjits in Balmain delivered on taste and price. The only thing lacking was a good naan (maybe they don't have tandoor ovens in Australia), as the naans in both places were small, round, pale affairs, not the big, puffy pillows of bread we get in the UK! They also had puny pappadoms...no idea why that is!

As a city, we found Sydney to be big, brash and busy, so a highlight for us all was the tranquil, and small but perfectly formed, Chinese Garden of Friendship in China Town. You really wouldn't believe you were in the city centre, unless you looked up to see the skyscrapers surrounding it. Another must-do was the stunning coastal walk from Coogee beach to Bondi, which took us around and hour and a half with plenty of photo opportunities. Unfortunately, there were no Bondi Rescue life guards on duty when we got there! Talking of beaches, we also took the ferry from Circular Quay to visit Manly and Watson's Bay. Even in the winter, it was warm enough to have a paddle and a picnic on the beach, which was lovely. It was also well worth travelling out to the vast Blue Mountains to get a taste of real, rural Australia.
After four busy weeks down-under, it was time for another mammoth flight back to the UK with Cathay Pacific. I don't know when or if we''ll ever travel back to Oz, but this was a holiday we'll never forgot. Pin It

Tuesday, 4 August 2015

Our family holiday to Australia - Part 1: Melbourne

If I was an organised blogger, I would have had a couple of posts up my sleeve, scheduled them to publish whilst I was away, and you'd have been none the wiser. As I'm not, I thought I'd better explain where I am ! I don't post many personal anecdotes, so if you're looking for a recipe, feel free to ignore my holiday ramblings ...

My long time followers, if there are any, may remember my rather self-indulgent post about my friend and her family emigrating to Australia. My brother and sister-in-law also emigrated a few years earlier (you see a pattern emerging here?!) so it's been a mission for us to save up enough money for us to visit them all, before the girls left home. As Miss Ony took her GCSEs this year, we thought this summer would be a good time to go; luckily, Mr O's boss was agreeable to him taking an extended holiday.

As we're tied to school holidays, flight prices were never going to be cheap. By initially using flight price-checking websites and then comparing fares for individual airlines, I eventually found suitable, affordable flights with Cathay Pacific - the cheapest were with Malaysian Airlines! Cathay Pacific were great to fly with and had pretty comfortable seats, but it's a long flight no matter how far the seats recline and we were all very happy to finally land in Australia after 27 hours.

So far, we've spent 2 weeks in Melbourne. Despite the chilly winter weather (yes it's winter here - which seemed to come as a shock to some of my friends!!), we've had a great time seeing my friend and her family, plus of course, the sights of Melbourne. We've also eaten some great food...see, this is a kind of a foodie post after all!


We initially stayed at the Pegasus Apart'Hotel at the edge of the CBD for our first week, We decided on this accommodation, partly for the location and price (I got a discount by booking through Expedia), plus they offered free WiFi and had an indoor, heated  pool - great for the teenagers. The apartments were near Queen Victoria Market, which had an amazing deli hall and fruit/veg market, where we bought most of our food for our self-catered breakfasts and lunches. We found out that in winter, there's also a weekly night market every Wednesday - with street food, drink, craft stalls and live entertainment - we wrapped up warmly and enjoyed an evening there.

Luckily, the exchange rates were in our favour! Restaurants in the city varied widely from cafes, budget restaurants (mainly East Asian) and pubs, to expensive steak and hotel/casino restaurants. There were plenty of vegetarian and vegan options available, including several exclusively vegetarian places, but basically, the more expensive the restaurant, the less veggie food was on the menu! We mainly stuck to the budget end of the market and ate some delicious food, including a yummy eggplant parma at the famous Mrs Parmas, but we did splash out one night and ate some beautifully presented, and very tasty Greek-inspired food at Gazi (one of Aussie Masterchef presenter George Calombaris' restaurants).


The public transport system was very easy to navigate, cheap and efficient. All the trams in the CBD are free, which is amazing. If venturing further afield, you need to purchase a MYKI card, which you then top up as needed - like an Oyster card, I'm told.

We've done plenty of the usual touristy things, including visiting the brilliant Melbourne Museum, the beautiful Botanic Gardens, seeing some amazing art by indigenous artists at the National Gallery of Victoria (Australia), a Yarra Valley wine tour and of course we've seen some of the unique, native Australian wildlife including koalas, wombats and kangaroos. 

After a week in the city, we moved out to the seaside resort of St Kilda at the Quest St. Kilda Bayside Apartments, again, we chose these apartments for their price and location (5 minutes walk from the beach and central St Kilda). Unfortunately, their free WiFi, was limited to 250mb per day, which basically equated to a few minutes checking social media - the girls were not impressed, so we ended up purchasing unlimited WiFi.

In the summer, St Kilda must be bustling with tourists and back packers, but in winter it was pretty quiet, although almost all of the restaurants, bars and shops were open. None-the-less, we enjoyed visiting the traditional European cake and chocolate shops, Luna Park, going on beach-side walks and seeing the wild colony of fairy penguins at the end of the pier. Our favourite eating place in St Kilda was the tiny 40 Thieves & Co Middle-Eastern restaurant - great food and friendly service. 


I'm not sure if it's on in the UK yet, but we've been watching Restaurant Revolution (one of the few Australian programmes on free-to-air TV). Some of the contestants have been running a pop-up restaurant in St Kilda, and we've enjoyed watching the queues build each day!

I can't believe how fast our first two weeks have gone. We're now packing for our next adventure in Sydney...

Pin It

Saturday, 11 July 2015

Tear 'n' Share Spiral Pizza

Tear 'n' Share Spiral Pizza
I was inspired to make this alternative pizza, after seeing the idea on Pinterest. My version is somewhere between a tear 'n' share' flat-bread and a pizza; it works well as a picnic food, as you can just pull a chunk off, rather than slicing it up. I topped mine with Manchego cheese, tomatoes, olives and parsley, for a Spanish theme, but you could use mozzarella and basil for an Italian flavour or feta and oregano for a Greek version.

Makes one large pizza
  • 1 portion of basic white bread dough
  • 100g/4oz cheese, chopped into chunks or grated
  • 4 tbsp tomato purée or passata
  • 50g/2oz olives, sliced
  • 50g/2oz sun-dried or fresh, de-seeded tomatoes, chopped
  • Fresh or dried herbs
Make up the dough, by hand or on the dough setting in the bread-maker.
Prove until doubled in size, then cut into 4 pieces.
Roll out each piece into a long 'sausage' about 30cm/1ft long.
Form a large spiral on a large, greased baking sheet, pressing the ends of each 'sausage' together. 
Make sure that there is a gap of around 2cm between each loop of the spiral.
Spread the tomato purée roughly over the dough.
Sprinkle the other toppings over randomly.
Leave to rise for 30 minutes.
Bake in a pre-heated oven at 220C/200C Fan/ Gas 7/425F for 10-15 minutes. or until the cheese and bread are starting to brown.


 Bready, Steady, Go
Suitable for freezing.

Vegan variation: Simply substitute the dairy cheese for your favourite vegan cheese.
Buffet variation: Make mini pizza whirls.

I'm linking this recipe to Bready, Steady Go, hosted by Jen’s Food and Utterly Scrummy Food For Families. 


Pin It

Tuesday, 23 June 2015

Asparagus & Goat's Cheese Quiche: Yapp’s Drinks On Us Challenge

 Yapp Brothers Wines
I'm not usually one to take up bloggers' challenges, but as this one involved wine, it was hard to resist! Yapp Brothers (the wine merchants) were kind enough to send out a bottle of wine and an individually tailored handwritten note to some of their favourite food bloggers in order for us to blog a suitable recipe which would pair well with our carefully-selected wine.

My chosen wine was an organically-produced Bergerac Sec: Domaine de l'Ancienne Cure 2014, which is a blend of Sauvignon Blanc and Semillon grapes and described as being "Very pale and clear with appealing spring blossom scents and a zesty, citrus-edged palate with a whistle-clean finish."

I did a bit of research to see what sort of flavours and ingredients would go with this wine. Amongst the vegetarian ingredients I found listed were: asparagus, young goat's cheeses, salads and herbs, so an idea hatched to make a cheesy quiche and serve it with sautéed new potatoes and a salad for a delicious, summer meal. 

So, was this a good wine pairing? I found that the acidity and citrus flavours of the wine, stood up well to the rich, cheesy taste of quiche, cutting through the creaminess after each mouthful. 

  • 1 pack of ready-made shortcrust pastry (or make your own if you have the time!)
  • 1 bunch of asparagus (approx 250g/8oz before trimming), trimmed and cut into 5-6cm pieces
  • 1 small onion, diced finely
  • 180ml/6 fl oz double cream
  • 2 medium eggs, beaten
  • 125g/5oz soft goat's cheese, chopped into small chunks
  • 25g/1oz hard/mature goat's cheese or vegetarian Parmesan-style cheese, grated 
  • 1 tbsp chopped basil
  • 1 tbsp chopped parsley
  • grated nutmeg and black pepper to season  

Pre-heat the oven to 190 C/180 C Fan/ Gas 5/375 F
Grease a 9-10"/25cm loose-bottom flan, or sandwich cake tin. 

Roll out the pastry to around 0.5cm thick, so that it's about 3cm larger than the circumference of your tin. Cut out a large circle, using the base of the tin as a guide, with a sharp knife.
Line the tin with the pastry, pressing down gently to fit the bottom and sides of the tin. Trim off the excess pastry with a sharp knife.
Prick the base of the pastry case with a fork and bake blind (using baking beans or dried beans) for 12-15 minutes or until it's just starting to colour. Remove from the oven and reduce the heat to 170 C/160 C Fan/ Gas 3/325 F

Empty the baking beans out gently.

Meanwhile, gently fry the onions in a drop of vegetable oil, until softened. 
Add the asparagus to the pan and place on a low heat for 5-7 minutes, or until tender, with the lid on - the moisture will steam the asparagus. Remove from the heat and take the pan lid off to let any excess moisture evaporate.

Mix the eggs and cream together and stir in the cheeses, herbs and seasoning.
Scatter the cooked asparagus and onions over the base of the flan case.
Pour the custard mixture over, ensuring that the vegetables are covered.
Bake for 30-40 minutes, or until the custard has set in the centre and turned golden brown.

Allow to cool in the tin for at least 15 minutes before removing.
Serve with sautéed or boiled new potatoes and a herby salad.

Integrity Statement
I received a complimentary bottle of wine for recipe development. All views expressed are my own.

Pin It

Sunday, 7 June 2015

Indian Restaurant-Style Mint Sauce and Onion Salads

Indian Restaurant-Style Mint Sauce and Onion Salad
I've been trying to re-create the onion salad or chutney that we get with poppadoms in our local Indian/Bangladeshi restaurants. There are two types; one is quite plain with a bit of cucumber and tomato; the other has a sweet and spicy red sauce. The 'secret' ingredient in both recipes is chopped coriander, which complements the mint.

I've previously blogged my mint sauce dip, but thought I'd add it here too.

Each recipe serves 4-6 with poppadoms, bhajis or samosas. They also go well with vegetarian barbecued food.

Red, sweet onion salad
  • 2 medium white onions, diced into approx 1cm pieces
  • 2 tbsp tomato ketchup
  • 2 tbsp mango chutney (sweet or spicy depending on preference)
  • 1 tbsp tomato purée/paste
  • 1 tsp unsweetened mint sauce concentrate (Colemans)
  • 2 tsp chopped fresh or frozen coriander leaves
Chop the onions and separate the layers.
Mix all of the remaining ingredients together and then stir in the raw onions.
Allow to marinate for an hour or so, in the fridge, before serving.

Plain onion salad (Kachumber) 
  • 2 medium white onions, quartered and sliced finely
  • 2.5 cm/1" chunk of cucumber, de-seeded, quartered and sliced finely
  • 1 tomato, de-seeded, quartered and sliced finely
  • ½ tsp dried mint
  • 2 tsp chopped fresh or frozen coriander leaves
  • 2 tsp lemon juice
  • A little red chilli powder, to taste (optional)
Chop the onions and separate the layers.
Mix with all of the remaining ingredients.
Allow to marinate for an hour or so, in the fridge, before serving.

Mint sauce

This is my version of the thin, pourable mint sauce (not the thicker raita), which is normally green and served with poppadoms and onion bhajis. If you want to, you can add a few drops of green food colouring, or a pinch of turmeric to give it some colour, but I don't think it needs it! 
  • 1 cup of plain yogurt or dairy-free yogurt
  • 1 small clove of garlic, crushed
  • 1 tsp caster sugar
  • 1 tsp unsweetened mint sauce concentrate (Colemans)
  • A few dashes of hot chilli sauce
  • 1 tsp chopped fresh or frozen coriander leaves (optional)
Mix all of the ingredients together. Chill until needed.

Top tip: If you can't find mint sauce concentrate, either use ½ tsp of dried mint or 2-3 tsp regular mint sauce, strained through a tea strainer to remove most of the vinegar. Adjust the amount of extra sugar added accordingly.

How to cook poppadoms in the microwave...

Traditionally poppadoms are deep fried in oil, but they taste nearly as good when cooked in the microwave and are much lower in fat. Look in the Asian section of your supermarket for brands of uncooked poppadoms, such as Ruby or Natco, as they are much cheaper and better than the big UK brands. 

 No Croutons RequiredYou can microwave them dry, for a fat-free snack, but they taste better and expand more, when wiped (use a sheet of kitchen towel) or sprayed on both sides with a little vegetable oil before cooking.

West Midland's BloggersMicrowave individually for 30-40 seconds on high (no need to turn).

For a main course try my paneer tikka kebabs with mushroom biryani.

I'm adding these salad recipes to this month's No Croutons Required challenge hosted by Jacqueline at Tinned Tomatoes and to the West Midland's Bloggers linky.
Pin It

LinkWithin

Related Posts Plugin for WordPress, Blogger...