Sunday, 22 December 2013

Carrot, Parsnip and Nut Roast (Vegan)

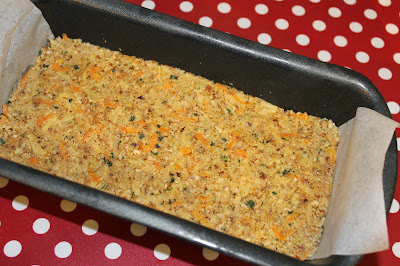
carrot parsnip and nut roast in a loaf tin
©
Here's this year's twist on my traditional Christmas nut roast recipeAs I've seen so many mentions of Delia's Parsnip Roulade this year, I added parsnip, sage and carrot to make a moist and tasty vegan loaf. It takes about 10 minutes to prepare and is very economical - it cost me around £3 to make. 

Serve with all the traditional roast dinner trimmings plus a vegetarian gravy

n.b. I made this loaf yesterday and have frozen it uncooked to defrost and reheat for Christmas dinner (see picture). Once cooked it should be golden brown in colour. 

Serves 4
  • 1 medium onion, peeled and grated
  • 1 tbsp olive oil
  • 1 small parsnip, peeled, cored and grated
  • 1 large carrot, peeled and grated
  • 175g/7oz mixed nuts (I used a mixture of Brazil nuts, almonds, cashews, walnuts and hazelnuts - no peanuts), ground in a food processor
  • 2 slices of wholemeal bread, made into breadcrumbs
  • 150ml (approx) vegetable stock
  • 1 tbsp finely chopped fresh herbs (I used sage and parsley)
Gently fry the onion in 1 tbsp olive oil, until soft. Then add the carrot and parsnip. 
Cook for 5 minutes on a medium heat, until softened, stirring regularly.
Stir in the nuts and breadcrumbs and mix well.
Add the herbs and season to taste.
Add enough stock to make a firm but not dry mixture. Add more breadcrumbs or stock if needed.
Tip mixture into a greased and lined loaf tin and press down with the back of a spoon.
Cover tin with foil  and bake for 40 mins at 180C/170C Fan/350F/Gas 4.
Uncover for the last 10-15 minutes.
Remove from the oven and allow to cool for 5-10 minutes before turning out and slicing. 

vegetarian Christmas dinner with nut roast
©
Refrigerate any left overs and use cold in sandwiches or as a pate.

Suitable for freezing before or after cooking.

Alternative: To make the loaf go further, simply make up an 225g/8oz pack of your preferred vegetarian stuffing mix. Press half of the nut roast mixture into the loaf tin and then spread the stuffing mixture on top. Cover with the remaining nut roast and press down firmly with the back of a spoon. Bake as above, but for an extra 10 minutes.
Pin It

Friday, 13 December 2013

Champagne Cocktails

a glass of Champagne cocktail
©
Here are three easy-to-make (and easy to drink!) Champagne cocktails that Mr O and I enjoy for special occasions such as Christmas. They can all be made with Cava or any other dry sparkling wine for a cheaper alternative.

Classic Champagne Cocktail 
Serves approx 16 people 

This is family favourite cocktail, which has been passed down to me by my dad. The recipe was a closely guarded secret, until recently, but I persuaded him to let me have the recipe and share it on my blog. It tastes delicious and is easy to drink too much of
  • 1 part/100ml/ ⅓ cup Cognac or Brandy (the cheap stuff is fine!) 
  • 3 parts/300ml/1 cup Cointreau/Triple Sec or any other orange liqueur 
  • 6 parts/600ml/2 cups good quality orange juice
  • Angostura Bitters (optional)
  • Chilled Champagne/Cava 
I serve this when entertaining friends and family, so I make the base up in advance with the brandy, orange liqueur, orange juice and around 10 shakes of bitters in a litre jug - this makes enough for around 16 glasses, using 2 bottles of Champagne/Cava). If you want to make an individual cocktail, use a desert-spoon (10ml) for each part/measure. 

Make the base mixture up and stir well
Pour ⅓ of a glass each. 
Top up each glass with Champagne and enjoy!

Alternatives: The base itself also makes a delicious cocktail served on the rocks.
Try a Granita Champagne Cocktail  in the summer - make the base up as before and freeze in a plastic tub over night (it won't set hard due to the alcohol content). Break up roughly with a fork and fill ½ a Champagne glass each. 
Top up with very well chilled Champagne or Cava.

Bucks Fizz:
  • Chilled Champagne/Cava 
  • Good quality orange juice 
Pour ⅓ to ½ of a glass of orange juice into a Champagne glass, top up with Champagne.
Non alcoholic/virgin version: Mix lemonade/sparkling water & good quality orange juice.

Kir Royale

  • Creme de Cassis (blackcurrant liqueur -  use any other berry liqueur as an alternative)) 
  • Chilled Champagne/Cava 
Pour 1 tbsp of Cassis into the bottom of a Champagne glass. Top up with chilled Champagne and serve.
Non alcoholic/virgin version: Mix lemonade/sparkling water & high-juice blackcurrant cordial.

How to open and pour Champagne
These tips may seem obvious, however I thought they were worth mentioning for those who rarely drink sparkling wines...
  • Make sure that the sparkling wine has been chilled for at least a few hours before opening. 
  • Carefully remove the foil and wire cage, without shaking the bottle.
  • Place a clean tea towel over the bottle. 
  • Grip the bottle under the cloth with one hand, whilst gently twisting and lifting the cork with the other hand over the cloth, until the cork pops. 
  • Leave for a minute before pouring to allow the bubbles to subside.
  • Tip the glass at a slight angle and pour the bottle slowly, to avoid any spillage!
Pin It

Monday, 9 December 2013

Roasted Vegetable and Feta Filo Spiral

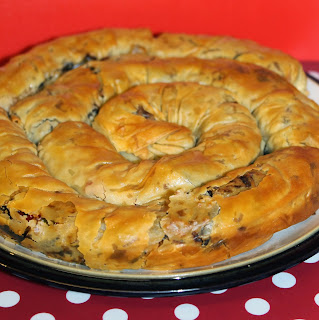
roasted vegetable and filo spiral
©
This tasty filo pie would be ideal for a vegetarian Christmas dinner, as it can be made in advance and reheated on the day and looks quite impressive. It's also tasty cold, if there are any leftovers.

I adapted the recipe from The Greek Vegetarian by Diane Kochilas. The original dish is called Striftopita and is made with pumpkin and seasoned with  mint. My version has a more British flavour as I've added mushrooms and sage, so that it will go with the accompaniments for a traditional roast dinner.

I recently made this dish for a dinner party. Unfortunately, I forgot to take a photo after I'd baked it the first time (I blame the wine!) so it looks rather anaemic in my photo below. As you can see from my second attempt, it looks much better once baked!

Serves 4-6
  • ½ butternut squash, peeled and cubed (approx 450g/1lb in weight before peeling)
  • 2 sweet potatoes, peeled and cubed  (approx 450/1lb in weight before peeling)
  • 100g/4oz chestnut mushrooms, diced
  • 1 medium onion, finely diced
  • 2 tsp fresh sage, finely chopped
  • 100g/4oz feta, crumbled
  • 4 tbsp fine bulgur wheat
  • black pepper to season
  • 1 pack of filo pastry
  • 5 tbsp olive oil
Preheat the oven to 190C/180C Fan/Gas 5/375F.
Drizzle the squash and sweet potato with 2 tbsp olive oil and roast for around 25-30 minutes, turning once or twice, until soft and lightly browned.
Meanwhile, sweat the chopped onion in a pan, with a drop of oil, until soft.
Add the sage and mushrooms to the onion pan and cook for a further 5 minutes. 
Remove the roasted vegetables from the oven and mash the mixture lightly to break up the lumps slightly.
Crumble in the feta, add the bulgur wheat and onion/mushroom mixture and stir well to combine.
Season with black pepper. 

To construct the spiral (see photo, starting bottom left corner)

Lie one sheet of filo pastry horizontally on a large board. Brush with a little oil and fold in half lengthwise.
Spoon 3-4 tbsp of the vegetable mixture in a line along the centre of the pastry to form a rough sausage shape, leaving a 5cm/2" gap at each end.
Brush the 2 long edges of the filo with olive oil.
Fold in the two short edges.
Roll up from one long edge to the other (like a long, thin burrito!) to form a cylindrical roll.
Place the first cylinder around the edge of a greased baking dish. Repeat, placing each roll next to the previous one to form a spiral. Brush with olive oil.
The pie can be covered and refrigerated at the point and cooked the next day.

Bake for 45-60 minutes until golden brown and crisp.
Either serve one roll per person, or cut a wedge-shaped slice each.

Alternatives: Swap the feta for any other white, crumbly cheese such as Cheshire or Wensleydale, if preferred. Vary the vegetables used - for my second attempt, I used fried aubergine and roasted courgette and bell peppers.
You could also roll the stuffing mixture in puff pastry to make vegetarian sausage rolls or use to fill cannelloni.
For a vegan version, omit the feta cheese and replace with toasted pine nuts or chopped walnuts.

Find an amazing range of fantastic veggie Christmas dishes at www.veggiechristmas.org .
Pin It

Friday, 6 December 2013

Iced Cinnamon Rolls

cinnamon rolls
©
We loved eating cinnamon rolls/buns when we were on holiday in America and I've tried to recreate the recipe with varying degrees of success ever since. I'm sure this recipe contains significantly less butter and sugar than the ones we ate in the US, but are my best version yet and taste delicious warm. 

These would be ideal served for Christmas breakfast.

Makes 12

For the dough
  • 3 cups strong plain bread flour
  • 1 egg, beaten
  • milk
  • 1 oz/25g butter, cut into small pieces
  • 1 tbsp soft brown sugar
  • 1 sachet fast action dried yeast
  • ½ tsp salt
For the filling
  • 2 rounded tsp ground cinnamon (add more or less to taste)
  • 2 oz/50g softened butter
  • 2 oz/50g soft brown sugar
  • 1 tsp cornflour/corn starch
For the icing
  • 4oz/100g icing sugar
  • boiling water
Crack the egg into a measuring jug/cup. Top up to the 1 cup mark with milk.
Add all of the dough ingredients to the bread maker pan.
Set on the dough setting and leave to run. 
If you don't have a bread maker, mix the ingredients together in a large bowl and knead for 5 minutes until you have a soft, but not sticky dough. Cover the bowl and leave in a warm place for 1 hour.
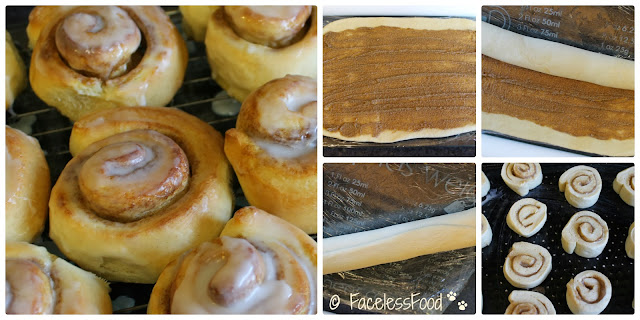
When it has finished proving, tip the dough onto a large board covered with cling-film (don't add any extra flour, the clingfilm will stop it sticking to the board.)
Roll out into a large rectangle.

Mix the filling ingredients together and spread over the dough.
Roll the dough lengthwise, as tightly as you can (like a Swiss roll).
Making sure the dough roll is seam-side down on the board, cut into 1"/2.5cm slices using a sharp knife.
Place the rolls on a greased baking sheet, s
paced about 1"/2.5cm apart.
Cover loosely with cling-film and allow to rise for a further 30-45 minutes.
Meanwhile, preheat the oven to 200C/190C Fan/Gas 6 .

Bake for 10-15 minutes until golden brown.
Remove from the oven and allow to cool for a couple of minutes, before moving to a wire rack.

Mix the icing sugar with enough boiling water to make a runny glacé icing.
Spoon, brush or drizzle over the cinnamon rolls while still hot.
images showing how to make cinnamon rolls in stages

Vegan alternative: For the bread dough, use 1 cup of sweetened almond milk and omit the egg.  Use dairy-free spread instead of butter. Replace the egg with 1oz/25g of ground almonds plus an extra 1 tbsp of dairy-free spread.
For the filling use dairy-free spread instead of butter. 

Suitable for freezing. Defrost and reheat for about 30 seconds in the microwave on a medium setting.
Pin It

Wednesday, 4 December 2013

Barber’s 1833 Vintage Reserve Cheddar - a review plus a recipe for Mini Cheese Soufflés


 Barber's 1833
You may have noticed my penchant for good cheese in some of my other posts, so when Barber's (the people who make the award winning 1833 Vintage Reserve Cheddar) invited me to come along and taste their products at the BBC Good Food Show Live (Winter), I jumped at the chance.

The Barber family have been farming and making cheese at Maryland Farm in Ditcheat, Somerset (near Cheddar) for six generations, since 1833, hence the name of the cheese! Of course, all their cheeses are suitable for vegetarians, but what makes Barber's 1833 different from other Cheddars, is that it's still made from traditional liquid starter cultures rather than dried cultures which most other cheese makers now use. This allows the cheese to develop its unique taste as it matures over a two year period. Apart from Cheddar, Barber's also produce a range of British regional cheeses and butter under the Maryland Farm brand.

Miss Ony came along with me to the show and we were both
very excited to be shown into the press area and be given press passes (even if they did spell her name wrong!). Once in the arena, we headed down to the Barber's stall and met the very welcoming and enthusiastic Giles and Charlie Barber who told us lots about their company, their cheeses and cheese making in general. We then got to taste the cheese. I must admit that I'm already a fan of extra mature/vintage Cheddar, so I didn't take much convincing...but the Barber's 1833 did have that wonderful sweetness combined with creaminess and a strong, full-bodied Cheddar flavour that I love.

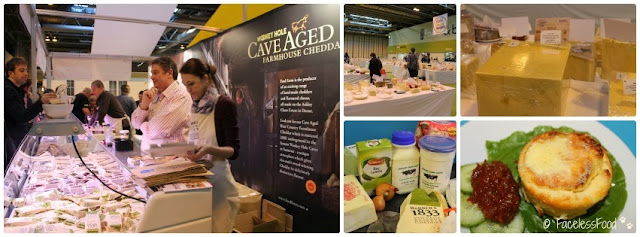
We were also shown around the World Cheese Awards area and have never seen so many weird and wonderful cheeses before! Barber's 1833 won a gold award in the Farmhouse Cheddar category this year, which is impressive once you've seen number of cheeses in competition with it.
 
images from the BBC Good Food ShowAfter having a wander through the show arena, trying out a number of food and drink samples, and purchasing a few Christmas gifts, we headed back to the Barber's stall to pick up our goody bag full of ingredients to make twice baked mini Cheddar soufflés*

Ingredients

  • 225ml/8fl oz milk
  • 1 shallot, finely chopped
  • 1 bay leaf
  • 6 black peppercorns
  • 40g/1½oz butter, plus extra for greasing
  • 40g/1½oz plain flour
  • 125g/4½oz Barber’s 1833 Vintage Reserve Cheddar,
  • grated plus 2 tbsp for sprinkling
  • 3 large eggs, separated
  • 1 tbsp chopped chives
  • Salt and freshly ground black pepper
  • 150ml/5fl oz double cream
  • Salad leaves, to garnish
Method
  1. Preheat the oven to 180°C/Gas 4. Butter 6 individual pudding basins or ramekins.
  2. Place the milk, shallot, bay leaf and peppercorns in a saucepan and bring slowly to the boil. Strain into a jug. Melt the butter in a saucepan, add the flour and cook, stirring for 1-2 minutes. Remove from the heat and gradually stir in the milk. Simmer gently for 2-3 minutes. Add the cheese and stir until melted. Stir in the egg yolks, chives, salt and pepper. Remove from the heat.
  3. Whisk the egg whites until holding soft peaks then fold into the cheese mixture. Divide between the prepared ramekins. Stand the dishes in a roasting tin and pour in boiling water to come two thirds up the sides of the ramekins. Bake for 15-20 minutes until well risen and firm. Leave to cool.
  4. When ready to serve, preheat the oven to 200°C/Gas 6. Run a knife round the sides of the ramekins and turn the soufflés out into an ovenproof dish. Pour over the cream, sprinkle with grated cheese and bake for 10-15 minutes until golden. Serve with salad leaves.


a mini twice baked cheese souffle served with salad and chutney
I've never made a soufflé before, so I followed the recipe to the letter. They worked perfectly and tasted delicious. As they can be make the day before eating and reheated, they would make an ideal starter for Christmas dinner or for a dinner party. 

Barber's 1833 is available online, from the deli counters in good farm shops, and selected Sainsbury's, Waitrose & Morrison's stores.

*Recipe and pack image reproduced with kind permission from Barber's 1833.
Integrity Statement
I received complimentary tickets to the Good Food Show and the ingredients to make the souffles. I did not receive payment, and the views expressed are genuinely those of myself and my family.

Pin It

Sunday, 1 December 2013

Three Festive Gravies for a Vegetarian Christmas Dinner

©
I was asked by one of my Facebook followers to post some gravy recipes suitable for Christmas dinner, so I've come up with three different variations which should suit various vegetarian and vegan options such as nut roast, mushroom Wellington or a meat-free roast turkey substitute e.g. Quorn roast.

Port and Cranberry Gravy
This is a rich, sweet gravy, best served with a robust, savoury dish such as nut roast.
  • 2 rounded tsp original Bisto powder (or any other vegetarian gravy powder/granules)
  • 120ml/½ cup port
  • 2-4 tbsp cranberry jelly (depending on how sweet you like your gravy)
  • 350ml/1½ cup hot vegetable stock or vegetable cooking water
Mix the Bisto with a little cold water, in a pan.
Add the port and cranberry jelly and mix well.
Add the hot, but not boiling vegetable stock (or water that you have boiled the vegetables in).
Bring to the boil stirring occasionally, until the jelly has melted and the sauce has thickened.
Simmer for 5 minutes to reduce the alcohol content!
Add a little more water/stock if you prefer a thinner gravy.

Creamy Mushroom & Tarragon Sauce
This herb-infused, creamy sauce goes well with meat substitutes and is a tasty alternative to a traditional brown gravy. Omit the cream or swap for dairy-free cream for a vegan option.
  • 1 tbsp olive oil
  • 2 shallots, finely sliced
  • 1 clove of garlic, crushed
  • 100g/4oz button mushrooms, finely sliced
  • 150ml/  cup dry white wine 
  • 300ml/1⅓ cups vegetable stock or vegetable cooking water
  • 1 level tbsp corn flour/corn starch
  • 1 tbsp fresh tarragon leaves, finely chopped
  • 5tbsp/100ml double cream (optional)
Heat the oil in a pan. 
Add the shallots and garlic and saute for a few minutes on a medium heat, until soft, but not coloured.
Add the wine and simmer for a couple of minutes - strain through a sieve and retain liquid.
Add the mushrooms and tarragon to the pan and cook gently until most of the moisture has evaporated. 
Remove from the heat.
Season with a little black pepper and stir in the corn flour.
Add the stock and wine slowly to the pan, stirring well and making sure there are no lumps.
Return to the heat and bring to a simmer, stirring regularly, so that the gravy thickens..
Before serving, remove from the heat and stir in the cream, if using.

Cider Gravy
This tasty gravy would go well with savoury pies, mushroom Wellington or anything containing sweeter vegetables such as squash or sweet potato.
  • 1 tbsp vegetable oil
  • 1 small onion finely sliced
  • 1 stick celery, finely sliced
  • 1 level tbsp cornflour/cornstarch
  • 225ml/1 cup dry/hard cider
  • 225ml/1 cup stock made with boiling water and 1 veggie stock cube
  • 1 tsp fresh sage, finely chopped
  • Black pepper
Heat 1 tbsp vegetable oil in a pan. 
Add the onion, sage and celery and saute for a few minutes until soft. 
Remove from the heat and stir in the cornflour.
Slowly stir in the cider and stock, making sure there are no lumps.
Season with a little black pepper.
Return to the heat and bring to a simmer, stirring regularly, so that the gravy thickens.
Serve as it is, or blend or strain before serving if you prefer a smooth gravy.

Pin It

Thursday, 21 November 2013

Mint Chocolate Dragon Cake

Mint chocolate dragon cake
This cake was made as an entry to a competition on Mumsnet, which sadly didn't win, but I thought it was too good, not to blog! Miss Kahonie came up with the design for the cake after being inspired by a similar one in Kids' Party Ideas (which used After Eights for the spines), and helped me to make and decorate it.

Before anyone else mentions it, this is the exception to the rule about not eating anything with a face!!!

For the cake
First we made a 3-egg chocolate sponge cake and baked it in the top half of my giant cupcake tin. You could also bake this in a greased and cocoa-dusted heat-proof bowl.
  • 150g/6oz butter/spread
  • 150g/6oz sugar
  • 3 medium eggs
  • 150g/6oz SR flour
  • 50g/2oz cocoa powder
  • ½ tsp baking powder
Cream the butter and sugar, beat in the eggs then stir in the remaining ingredients.
Pour into a well greased tin/bowl which has been sprinkled with a little sieved cocoa.
Bake for around an hour in a pre-heated oven at 150C/140C Fan/Gas 2/300F
Allow to cool in the tin/bowl for about 10 minutes before turning out.
Slice in half once cold.

For the icing
We then crumb-coated and iced the cake with peppermint butter-icing, and added fondant icing details.

  • 100g/4oz butter/spread, softened
  • 250g/10oz icing sugar
  • 1-2 tsp peppermint extract
  • green food colouring
  • 2-4 tbsp boiling water
  • 500g/1lb pack of fondant icing
  • 1 bag of chocolate pebbles, giant chocolate buttons or similar
Cream the icing sugar and butter together, adding enough boiling water to make a soft, spreadable icing. Add the flavouring to taste and enough food colouring to get a good, strong, green colour.

Spread a couple of tablespoonfuls of the icing on one half of the cake and sandwich the two halves together. Crumb coat the whole cake (spread thinly with about half of the remaining icing and chill to set). Rough-ice the cake with the remaining butter icing, making peaks in the icing to look a little like dragon scales!

Colour ¾ of a block of fondant icing with food colouring (the gel/paste type is best) and divide into 4 pieces:
  • Roll one piece into a long sausage shape for the tail.
  • Make 2 flattened circles for the legs.
  • Remove a little of the icing from the last piece and make the triangular point for the tail plus an ear and an eyebrow; make a flattened oval for the head from the rest of this piece, making one end of the oval more narrow, for the snout.
Push the legs and head into place onto the butter icing.
Attach the tail to the back of the cake and wrap around the front of the cake over the legs.
Add the ear and eyebrow to the head, sticking down with a little water if needed.

Using the end of a teaspoon or icing nozzle, make semi-circular imprints into the fondant icing to represent more scales.

On white card, draw and cut out: a puff of smoke, 2 wings, an eye and some sharp teeth. Poke these into the icing in the appropriate places! 

Finally, poke the chocolate sweets into the icing along the dragon's back and tail for the spines.
Pin It

Monday, 18 November 2013

The Best New Vegetarian Cookbooks: Review & Gift Guide

As Christmas is just around the corner, I thought I'd post a round-up of some of my favourite new(ish) vegetarian cookbooks. I've included books which I think would make great presents for foodie friends or family. So, if you're stuck for gift ideas, take a look...

World Food Cafe: Quick and easy recipes from a vegetarian journey by Chris and Carolyn Caldicott 

This beautifully illustrated book tells a story of a journey through many different countries, bringing the best vegetarian recipes from each region together. Recipes include delicious breakfasts, soups and main courses, with the odd cocktail thrown in! Although the recipes mainly use easy-to-find ingredients, this book may be suited to slightly more adventurous cooks, as a wide range of herbs, spices and condiments are used, which would be expensive to buy if you didn't have any to start with.

"After twenty years of squeezing in trips abroad at the same time as running the World Food Café, Chris and Carolyn Caldicott decided to take a sabbatical so that they could go on longer journeys in search of new recipes. This book brings together the recipes they collected from home kitchens, street stalls, restaurants and roadside cafes, alongside atmospheric photographs and travellers’ tales."

I loved the recipes from the more exotic countries such as Cuba, Bhutan and Laos, as I had very little idea on the cuisines from these regions. This would make an ideal gift as the anecdotes about each country make it a great read and not just a recipe book.

DISCOUNT CODE: To order World Food Cafe: Quick and Easy: Recipes from a Vegetarian Journey pub by Frances Lincoln at the discounted price of £16.00 including p&p* (RRP: £20.00), telephone 01903 828503 or email mailorders@lbsltd.co.uk and quote the offer code APG43. *UK ONLY - Please add £2.50 if ordering from overseas.


The Adventurous Vegetarian: Around the World in 30 Meals by Jane Hughes

Coincidentally, I was sent a copy of this book to review soon after the previous book. Like the World Food Cafe, this book takes the reader on a culinary journey around the world and also includes a narrative about each country's traditional foods. The Adventurous Vegetarian differs by presenting the recipes from each region as a menu, so there is at least one starter, main course and dessert for each country.

It also includes a wide range of recipes which have been adapted from traditional meat-based recipes, such as a vegan recipe for Australian Lamingtons, a Vegetable Rendeng from Malaysia and a Vegetable Oil Down from Grenada. This book contains a large number of vegan recipes, so would be ideal for aspiring vegans, or for those who only eat egg/dairy products occasionally.

"Working with vegetarian groups and societies from around the globe in order to discover their most popular and delicious dishes, this beautifully illustrated book provides the reader not only with tried-and-tested, step-by-step instructions on how to cook up thirty complete meals from thirty different countries across the world but also with a brief history of vegetarianism in that country..."

DISCOUNT CODE: Save £10 off the RRP of The Adventurous Vegetarian by visiting http://shop.newint.org/uk/the-adventurous-vegetarian.html and entering the code VEGGIE at the checkout.

The Vegetarian Pantry: Fresh and modern meat-free recipes by Chloe Cocker and Jane Montgomery

I reviewed this book earlier in the year and have enjoyed cooking a variety of recipes from it. As I mentioned before, this book contains a lovely mix of Mediterranean and Asian inspired vegetarian recipes, which are fairly quick easy to prepare and would go down well with all the family. I particularly like the breakfast section, as not many vegetarian cookbooks seem to include breakfast recipes.

Veggiestan: A Vegetable Lover's Tour of the Middle East by Sally Butcher

I received this book last Christmas and have cooked many different recipes from it throughout the year, as I love Middle Eastern food. The book includes a wide range of breads, meze dishes and main courses, flavoured with fragrant herbs and spices. Each chapter starts with an introduction about the main ingredients, the history of the dishes included and an explanation of the cooking methods used, which is very useful for those who are not familiar with cooking Middle Eastern dishes.

The Great British Bake Off: Learn to Bake by Linda Collister

OK, this book is a bit of a wild card, as it's not specifically a vegetarian cookbook. However, as it mainly features cakes and bake recipes, it is, by it's nature, mainly vegetarian. I've added this book as Miss Kahonie was bought it for her 12th birthday this year, and has successfully baked several recipes unaided...my favourite being the most delicious chocolate brownies I have ever tasted!

While this is not a children's cookbook, its step-by-step recipes with cooking tips and clear illustrations are great for young, inexperienced or novice bakers, who will be able to produce some great results with little time and effort. Those recipes which do include meat (eg: toad in the hole) can be easily adapted for vegetarians, however due to the use of dairy products and/or eggs in most recipes, this isn't a book I would recommend to vegan bakers.

Integrity Statement
I received a copy of the first three books to review, the other two books were gifts which I was not asked to review. I did not receive payment, and the views expressed are genuinely those of myself and my family.


Pin It

Thursday, 7 November 2013

Cheddar Cheese Fondue

©
It might be a little retro for some, but the Onykahonie household love a cheese fondue; in fact we love anything cheesy, including Eurovision,  X Factor and Abba! 

In this recipe, I added a British twists by swapping the traditional Emmental cheese for Cheddar, as I find the combination of Gruyère and Emmental is just too cheesy, even for a cheese lover like me! I also used dry British cider instead of wine and I prefer the flavour with the Cheddar...

Serves 2-4 - double this recipe to share with more people
  • 1 clove of garlic
  • 225 ml/1 cup dry/hard cider (or dry white wine) 
  • 150g/6oz medium or mature Cheddar cheese, grated
  • 150g/6oz vegetarian Gruyère cheese, grated
  • 2 tsp cornflour
  • 1 tbsp apple brandy/kirsch (optional)
  • A little grated nutmeg
  • toasted ciabatta/pitta, bread-sticks, crudites, potato wedges, breaded mushrooms, onion rings etc, for dipping
Cut the clove of garlic in half and rub around the inside of the pan/fondue pan.
Mix the brandy/kirsch or a little of the cider/wine with the cornflour, in a cup.
Heat the cider/wine (add the halved garlic clove too, if you like) in the pan until warm.

Remove from the heat and stir in the cornflour mixture and season with nutmeg.
Return to the heat and bring to the boil, stirring regularly. 
As soon as the mixture starts to bubble, add the cheese a little at a time, whisking all the time, until the cheese has melted and you have a smooth mixture.

Keep warm and serve with baked/toasted chunks of ciabatta, crudites, bread-sticks etc.


©
Alternative: For a quick and easy cheese fondue without all the faff, just take a whole Camembert, remove any plastic packaging and wrap in a layer of grease-proof paper (or original wrapping) and foil.

Bake for 20 minutes at 180C/170C Fan/Gas4/350F or on the barbecue. 

When melted, score around the top and remove the 'skin'.


To flavour the cheese, score little cuts into the top of the cheese before cooking and insert slices of garlic and/or springs of rosemary. Remove these before serving.

Pin It

Friday, 1 November 2013

Cherry & Almond Microwave Fudge

With Christmas looming, I thought I'd blog an old family favourite recipe for traditional fudge, which makes a great homemade gift. I've adapted the cooking method, so it's made in the microwave, but you could make it on the hob in a large pan if you prefer. I would suggest that you have a trial run first as recognising the right consistency and colour can be a bit trial and error, unless you have a sugar thermometer.

Top tips: Do use a LARGE Pyrex (oven-proof glass) bowl for this...a plastic bowl will melt at the temperature the sugar reaches, and the mixture will bubble up a lot as it boils. The glass bowl and fudge mixture will be EXTREMELY HOT, so please do use oven gloves when you take the bowl in an out of the microwave. 
  • 1 tin sweetened condensed milk
  • 8oz/200g caster sugar
  • 4oz/100g butter, softened
  • 2 tbsp golden syrup
  • 1 tsp vanilla extract
  • 1oz/25g flaked almonds
  • 3oz/75g glace cherries, halved
Put the condensed milk, sugar, butter and syrup in an large oven-proof bowl, stir.
Microwave for 2 minutes on medium. Stir and repeat, until the butter has melted and the sugar has dissolved.

Heat on high for approximately 10 minutes, stirring every minute or so, until the mixture changes to a dark golden-brown colour, thickens and starts setting a little at the sides of the bowl (see the middle image below).

If you have a sugar thermometer, you need to reach 120C/235F, alternatively, drop a little of the hot mixture into a cold cup of water. It should form a soft ball.

Remove from the microwave and allow to cool, without stirring for 5 minutes.
Mix in the vanilla and beat with a wooden spoon until you can feel the mixture starting to thicken and set. If you find that the fudge isn't setting at all, reboil for a further couple of minutes.
Add the cherries and almonds and stir in.
Pour into a greased and lined 7"/20cm square tray and smooth out with the back of a spoon. Allow to cool for an hour or so, before marking into pieces. 
Cool fully before removing from the tin.
Store layered between sheets of grease-proof paper, in an air-tight box (in the fridge), until you are ready to bag it up for gifts.

Keeps for 2-3 weeks (if you haven't eaten it all within a couple of days!).

Alternatives: Omit the vanilla, cherries and almonds and change the flavourings to make different fudges: try rum & raisin or coffee & walnut for example. 

To make hot fudge sauce for ice cream or profiteroles, add 125 ml/½ cup of evaporated milk to the above ingredients. Melt as above and then boil the mixture for around 5 minutes, stirring occasionally, until you have a smooth, golden sauce. Add the vanilla but omit the cherries and almonds. Pour into sterilised jam jars, seal and refrigerate for up to 3 weeks. Re-heat to serve.

Pin It

Tuesday, 29 October 2013

Baked Corn on the Cob

©
This isn't a recipe as such, but I thought I'd share the idea, as this was the best corn on the cob I've ever cooked (or eaten!). I think that cooking the corn in its husk and then wrapping in foil, makes it more moist and juicy.
  • 4 sweetcorn cobs in their husks
  • 2 tbsp butter, dairy-free spread or olive oil
  • 1 large clove of garlic, crushed
  • 1 tsp finely chopped fresh rosemary
Strip off the outer layers of the husk, until you get to the thinner, softer layers. 
Peel the inner layers back carefully, so they remain attached to the cob.
Lay each corn cob on a sheet of foil.
Spread or brush the marinade over the corn. 
Wrap the husk layers back over the corn, then wrap tightly in foil.
Bake in a pre-heated oven at 190C/180C Fan/Gas 5/375F (or in the bonfire embers) for 30-40 minutes. Alternatively grill on the barbecue, turning occasionally.


Pin It

Sunday, 27 October 2013

Paneer Jalfrezi

paneer jalfrezi
©
Diwali is around the corner, so I thought I'd cook up something suitably spicy.  Apparently, the jalfrezi has overtaken the tikka masala as Britain's favourite curry, so here's my vegetarian version, made with paneer cheese.

Serves 4 as a side dish
  • 200g/8oz paneer, cut into chunks
  • 1 medium onion, halved and thinly sliced
  • 2 tsp grated fresh ginger plus 2 cloves of crushed garlic (or 1 tbsp garlic and ginger paste)
  • ½ teaspoon turmeric
  • 2 tsp ground cumin
  • 2 tsp coriander powder
  • 2 bell peppers, deseeded and cut into chunks or strips
  • 2-3 fresh chillies; 1 chopped finely and 1-2 sliced lengthwise
  • ½ tin/1 cup chopped tomatoes
  • ½ teaspoon garam masala
  • 1 tbsp vegetable oil
Heat half of the oil in a large frying pan on a medium heat.
Add the paneer and cook for a couple of minutes on each side, until lightly browned.
Remove the cheese and drain on kitchen towel.
Add the rest of the oil to the pan, then add the onions and cook until golden brown. 
Stir in the garlic, ginger, chopped chilli, turmeric, cumin and coriander and cook for a few more minutes.
Throw in the peppers. 
Mix in the chopped tomatoes and sliced chilli.
Cover the pan and simmer for around 15 minutes, stirring occasionally, until the peppers have softened.
Finally add the paneer chunks and garam masala.
Simmer for a further 5 minutes before serving.

Serve with chapattis/rotis and vegetable pakoras.

Suitable for freezing.

Alternatives: If you don't like paneer, you could swap it for chicken-style, meat-free fillets, cut into chunks. Cook as above.
Vegan option: Omit the paneer and substitute with button mushrooms and/or tinned chickpeas. Add these along with the peppers.


Pin It

Saturday, 19 October 2013

Veggie Sausage & Baked Bean Pasta

©
Not only is this meal quick and easy to prepare, it's cheap and filling too, especially if you use store's own economy brands! (I used ASDA's veggie sausages £1.58, baked beans 25p, passata 29p, onion 10p, red peppers 75p, pasta 29p - total to feed 4 people £3.26)

Serves 4, takes 30 minutes to cook.
  • 1-2 vegetarian/vegan sausages per person
  • 1 tin of baked beans (or any other kind of tinned beans)
  • 500ml passata
  • 1 onion, diced
  • 1 clove of garlic, crushed
  • ½ tsp mixed dried herbs or oregano
  • 2 red bell peppers cut into chunks
  • 2 tbsp veggie Worcester sauce (optional)
  • Black pepper to taste
  • 250g dried pasta
Heat a drop of oil in a large pan.
Cook the onion, garlic and peppers for 5 minutes on a medium heat until softened.
Add the passata, Worcester sauce, herbs and pepper and simmer for 20 minutes.
Meanwhile cook the sausages and pasta.
Drain the pasta, chop the sausages into chunks and mix both into the pasta sauce.

Alternatives: For an even quicker meal, use a jar of ready made tomato pasta sauce instead of the onion, garlic and passata. 
Swap the baked beans for any other tinned beans, to reduce the sugar content.
Use any vegetables you need to use up (mushrooms, sweetcorn, courgette etc), rather than the peppers, to make this dish even more economical.

Pin It

Saturday, 12 October 2013

Goat's Cheese and Caramelised Onion Pizza

©
This is my version of my favourite Padana pizza from Pizza Express. I've made a few tweaks, such as substituting spinach for rocket and leaving off the red onions and mozzarella, but I think it compares pretty well to the original and is substantially cheaper!

  • ½ quantity basic bread dough 
  • 1 large onion, finely sliced
  • 1 tbsp soft brown sugar
  • 1 tbsp balsamic vinegar
  • 3 tbsp sun-dried tomato paste
  • 100g/4oz soft goat's cheese, roughly chopped
  • A few fresh basil leaves torn roughly
  • A handful of rocket/arugula leaves 
Make the dough and divide in half once it has proved for an hour or so (use the other half to make another pizza of your choice!)

Meanwhile make the caramelised onions: 
Heat 1 tbsp olive oil in a non-stick frying pan. 
Sweat the onion with the lid on for 5 minutes, on a low heat, until soft.
Remove the pan lid, raise the heat and cook the onion for a further 7-10 minutes, stirring occasionally, until it turns a dark golden brown. 
Turn the heat off and stir in the sugar; then add the vinegar. 
Allow to reduce in the pan until most of the moisture has evaporated.

Flatten out the dough on a greased baking sheet to form a large circle (about 10"-12" in diameter.)
Spread with the sun-dried tomato paste.
Shred a few basil leaves over and top with little piles of the caramelised onions. 
Sprinkle with the goat's cheese.

Bake in a pre-heated oven at 220C/200C Fan/Gas 8/450F for approximately 8-12 minutes.
After 5 minutes, check on the pizza and spread out the goat's cheese slightly. Return to the oven and bake until the pizza base and cheese start to brown.

Remove from the oven and top with a handful of rocket/arugula leaves.

Serve with corn on the cob or salad.
Link up your recipe of the week
Vegan alternative: I found this recipe for tofu/cashew 'goat's cheese' over at Vegan Feast Kitchen, which looks like a good substitute for the dairy cheese. Alternatively try Bute Island Blue Sheese.

I've added this post to Emily's  #recipeoftheweek linky over at A Mummy Too.

Pin It


LinkWithin

Related Posts Plugin for WordPress, Blogger...