Sunday 21 November 2021

Lemon & Lime Marmalade with Gin

Having previously posted a recipe for my quick and easy lemon marmalade, I thought I'd mix it up a bit for my gin-loving friends and make some boozy preserves for their Christmas presents!
  • 5 medium lemons
  • 2 limes
  • 1kg preserving sugar
  • 4½ cups of boiling water
  • 5 tbsp. gin 
See my previous post for marmalade-making tutorial with pictures and tips on sterilising your jam jars.

Wash the fruit. Cut in half and juice into a bowl. Strain the juice to remove the pips.
Cut the skins in half again.

Put the fruit, juice and 1cup of the water into your liquidiser jug/food processor and pulse to chop up the fruit. Do not purée until smooth - you want to be able to see small chunks of peel.

Pour into a large pan and add the remaining water. Simmer for around 30 minutes on a low heat, stirring occasionally, for until the peel has softened and the liquid has reduced by about half.

Add the sugar and stir until dissolved. Then bring up to the boil and boil for 10-20 minutes or until setting point has been reached. You can check the setting point by putting a teaspoonful of the marmalade onto a cold plate. Allow to cool for a few minutes and then push it with your finger. If it wrinkles and looks a bit jellified, it's ready!
Now, stir in the gin.

Remove from the heat and allow to cool for 10 minutes. Stir and then pour (carefully!!) into sterilised jam jars, using a jam funnel or a sterilised Pyrex jug. . 

Add a wax disk to the top of each jar and then seal with the lids. Re-tighten the lids as the jars cool. Store unopened jars in a cool dark cupboard for up to a year.

Variation: Swap the gin for your preferred spirit or liqueur.

Top tip: To remove sticky labels from jam jars, soak in very hot, soapy water first.  Carefully, peel off as much of the label as possible. Remove any sticky residue using nail varnish remover. Wash and sterilise the jars before using.

Pin It

Sunday 2 December 2018

Pizza Muffins or...Puffins (plus an update)

© Pizza Muffins (Puffins) 
It's been a while, I know. So I feel I owe any regular readers (if there are any left) an explanation.  If the truth be told, I've fallen out of love with blogging for a few reasons:
  • Competitiveness - I used to read a lot of other blogs and felt my posts and images needed to look as good. That takes time. A lot of time. 
  • Inspiration -  lack of!
  • Kids growing up - one is at uni and the other is at college and will go to uni next year. That means that we have fewer family meals together.
  • Work - working full time leaves less time for blogging. When I started blogging, I was working part-time.
  • Health - I've not been too well lately. No sympathy needed, but again, this has reduced the time and energy I've had available.
Anyway, let's get on with the recipe....no fancy photos. Sorry (not sorry!)

This is a bit of a rehash of an old recipe of mine, but I really enjoyed coming up with a new idea, and the family enjoyed eating the results. Basically, they're mini pizzas cooked in a muffin pan. 
  • 1 quantity bread dough
  • tomato puree or tapenade
  • chunks of firm cheese (feta, Cheddar, Manchego etc.)
  • topping: olives, pepper chopped into chunks, thin slices of mushroom, vegetarian pepperoni etc.
  • dried oregano/mixed herbs or fresh, chopped basil
Make up the bread dough and leave to prove.

Pre-heat oven to 200 C fan/220 C/Gas 7/425 F
Cut the dough into 24 small pieces and roll into rough ball shapes using your hands.
Pop each dough ball into a section of a well oiled muffin tin.
Leave to prove in a warm place for a further 10-15 minutes.

Oil the end of a small rolling pin or similar blunt implement! You could also use a knuckle.
Poke a dent/well into each dough ball but be careful not to go through the bottom of the dough.
Fill with around  ½ tsp of tomato puree or tapenade and your other toppings. 
Sprinkle with dried or fresh herbs.

© Garlic Bread Muffins
Bake in a hot oven for 8-12 minutes, or until golden brown. Cool on a wire rack.
Suitable for freezing.

Variation: Garlic dough ball puffins - fill the well of each dough ball with ½ tsp garlic butter and a sprinkle of grated mozzarella. Bake as above.

Vegan option: Fill as above and use vegan cheese or omit the cheese. Drizzle pizzas with a little olive oil.


Pin It

Saturday 2 June 2018

Dolmadakia (Dolmades) with Spinach Leaves

I currently have a glut of perpetual spinach growing in  raised beds, in my kitchen garden.The older leaves are much larger and a bit tougher than normal spinach and I was wondering how to use them up in something other than spinach and feta pie. I suddenly had a brainwave to try another Greek dish, dolmadakia; in case you don't know, dolmadakia (little dolmades) are traditionally made with vine leaves.
  • ½ cup risotto rice
  • 1 onion, finely diced
  • 1 large clove of garlic, crushed
  • 1½ cup veg. stock 
  • 1 tbsp tomato puree, optional
  • ½ tsp sugar
  • 2-3 tbsp each of chopped fresh parsley and mint (plus a little dill and oregano if you have them)...the more, the better!
  • 2 tbsp olive oil 
  • Salt and pepper to season
  • Approx .15-20 large spinach leaves (or vine leaves)
  • 2 tbsp lemon juice
Heat 1 tbsp of the oil in a pan and gently saute the onion and garlic for a few minutes until softened.
Add the tomato puree, if using and cook for a further minute or so.

Stir in 1 cup of the stock and bring up to a simmer.
Simmer for 8-10 minutes, stirring occasionally, until the rice is al dente.
Stir the in herbs and sugar and season to taste.

Remove from the heat.

Bring a pan of water to the boil.
Holding the stem of the spinach leaf, dip each one into the pan (carefully!) for a couple of seconds to blanch. Drain on kitchen paper.

Cut the tough stem off the leaf with a sharp knife.
Place a heaped tsp of the rice mixture onto the stem end of the leaf and roll up, like a mini burrito. Place into a well greased dish.

Pour the remaining stock over and drizzle with the lemon juice and olive oil.
Cover tightly with foil and bake for 30-40 minutes at 180C Fan, 200C, Gas 6, 400F.

Remove from the oven and allow to cool for 10 minutes before serving.
Serve as a starter a meze dish.

Find out how to grow perpetual spinach.
Pin It

Tuesday 27 March 2018

Hummus Where The Heart Is - A Review & Give-away

Hummus where the heart is - recipe book
Hummus Where The Heart Is by Dunja Gulin, is a cook-book with a difference, as all the recipes are for, or involve, hummus! The book itself is a cute little number, with a heart shape cut out of the front  cover, which makes it an ideal gift for hummus lovers.

The humble hummus has become an essential item for vegetarians and vegans alike, but the shop bought stuff is not a patch on the homemade variety, not to mention being vastly over packaged and over priced! This book contains an amazing array of cheap, quick and easy to follow hummus recipes, including some using pulses other than chickpeas and others using vegetables to replace the pulses.

Of course, many of Dunja's recipes are still suitable for serving as a dip with breadsticks or slathered on bread(such as onion jam hummus, curry-spiced hummus and a baked aubergine variety), but some of her recipes are meals in their own right rather than just a dip, snack or side dish. Hummus Where the Heart Is also has a chapter on dippers, which covers recipes for focaccia, pittas and sesame grissini. I particularly like the ideas for using up left-over hummus which includes burgers, pizza and stuffed courgettes, but was slightly wary of the hummus dessert and baking recipes! I'll definitely give the fudge cookies a go though.

Hummus Where the Heart Is, Published by Ryland Peters & Small, 13th March 2018, £9.99 Pin It

Saturday 17 February 2018

The Best Millionaire's Shortbread, Ever!

This delicious and indulgent recipe for millionaire's shortbread is one my grandma used to make, so it's been tried and tested over three generations and is still a family favourite. It takes a while to make, but it's definitely worth it for a special occasion or gift.
For the shortbread base
  • 200g/8oz block butter
  • 200g/8 oz caster sugar
  • 300g/12 oz SR flour
  • 3-5 tbsp. milk
For the caramel
  • 200g/8oz butter
  • 200g/8oz soft brown sugar
  • 2 tbsp. golden syrup
  • 2 x 400g/1lb tins of condensed milk
  • a good pinch of sea salt
To top
  • 300g milk chocolate
  • 50g white chocolate (optional)
Grease and line a non-stick baking tray.
Pre-heat the oven to 170C/160C Fan/325F/Gas 3

Using a food processor, rub the butter into the flour and sugar, until you have the consistency of fine breadcrumbs. Slowly, add a little milk at a time, until the dough just comes together into a ball.

Press firmly into the baking tray, using the back or a fork or spoon.

Bake for around 30 minutes or until golden brown and firm to the touch. Remove from the oven and allow to cool in the tray.

Meanwhile, make the caramel...

Melt the butter, sugar and syrup together over a low heat, until the sugar has dissolved.
Add the condensed milk and salt. Slowly, bring up to a simmer, stirring slowly but regularly with a wooden spoon, so that the caramel doesn't burn on the bottom of the pan.
Continue to simmer for around 10-15 minutes, until the caramel has turned a deep golden brown and has thickened. You may get little, dark bits of caramel floating around, but this doesn't affect the flavour!

Pour the hot caramel over the shortbread base, smooth out and allow to cool.

When the caramel is cool, melt the chocolate and pour over. Spread gently with a palette knife or the back of a spoon.

Finally drizzle with melted, white chocolate and feather using a skewer or toothpick, if liked.

When almost set, cut into pieces, using a sharp knife.
Allow to cool completely before removing from the tin.

Makes 20 large or 40 small pieces.
Will keep in an airtight container for several days. Pin It

Wednesday 14 February 2018

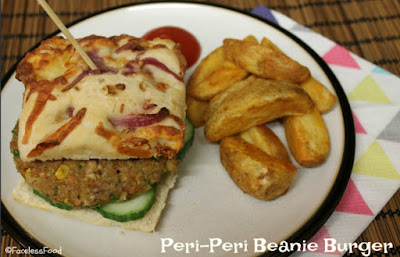
Peri-Peri Beanie Burger

Peri-Peri Beanie Burger
This was my attempt at recreating a Nando's beanie burger for my daughter. Apparently, it didn't taste as good as the Nando's one, but she still enjoyed it.

The recipe is packed full of protein from different sources, so this is a good recipe to fill up growing children and hungry adults alike!

Serves 4-6
  • 1 medium onion, finely chopped
  • 1 large clove of garlic, crushed
  • 1 fresh green chilli, finely chopped
  • ½ cup each of frozen peas and sweetcorn
  • 2 tsp cumin
  • ½ tsp smoked paprika
  • ½ tin chickpeas
  • ½ tin black eyed beans, or other pulses
  • 4 tbsp chopped or coarsely ground pumpkin seeds (or cashew nuts)
  • 1 cup of fresh breadcrumbs (about 2 slices of bread)
  • 1 egg
  • 1 cup mature/sharp Cheddar cheese, grated
  • 1-2 tsp fresh or frozen chopped mixed herbs
  • Peri-peri sauce to serve
Heat 1 tbsp of oil in a pan. Fry the onion, garlic and chilli on a moderate heat for a few minutes, until softened, but not brown. Add the spices and throw in the peas and sweetcorn. Turn off the heat.

Meanwhile blitz the bread in food processor to make the breadcrumbs. Remove and keep to one side.

Add the chickpeas and beans to the food processor and blend roughly.
Add all of the other ingredients (including the onion and pea mixture) and pulse to blend, so that the mixture still has a chunky texture.

Form into 6 large burgers, using your hands or a burger press.

Chill for half an hour to firm up.

Shallow fry for 4-5 minutes each size, or brush generously with oil and bake or barbecue.
Brush with with peri-peri sauce and serve in a bread roll with salad and potato wedges or fries.

Suitable for freezing before or after cooking.

Vegan version: Omit the egg and cheese. Add just enough breadcrumbs to form a firm mixture.
Pin It

Friday 22 September 2017

Super Quick Cosmetic Pouches

I hope you'll excuse this deviation from my usual food-based posts, but I've recently got back into machine sewing and wanted to share my latest creations. They make great gifts, are very cheap to make and take just one afternoon, or a couple of hours to make.
This particular design makes two large and two small purses from just two fat quarters of fabric - so that's a cost of around £2-3 for all four pouches, depending on the price of your material.


The patterns for both pouches are made from a single sheet of A4 paper (folded in half for the smaller one). I hope you can follow my picture tutorial and notes...
  1. For the large pouch, take one sheet of A4 (letter-size) paper. Place a dinner plate at one end, so the edge of the plate is touching one short and two long sides. Draw a curve around the top of the plate.
  2. Fold the paper in half and cut around the curve, then open back out.
  3. Put your two pieces of material together and pin the pattern to them.
  4. Cut around the pattern, then remove.
  5. Place the wrong sides of the material together and pin all around, except for around 7.5cm/3" at one corner (see bottom right photo).
  6. Sew all around (except for the gap) leaving a small seam allowance.
  7. Turn the fabric inside-out and poke the corners out using a chopstick or dowel.
  8. Iron to flatten the seams, being careful to press under the unsewn section.
  9. Fold up to make an open envelope and top stitch close to the edge all the way around, including the unsewn section.
  10. Finally sew on a press stud and press the purse one last time.  
To make the smaller pouch, simply fold a sheet of A4 paper in half lengthwise and use a large mug to make the top curve of the pattern. The larger purse is ideal as a make up bag or pencil case, whereas the smaller one is just the right size for sanitary products! I reckon a teeny one, half the width of the small one would be the perfect size for an asthma inhaler.

If you make these, do let me know how they turn out and post a picture on my Facebook page.

Pin It

Thursday 14 September 2017

Off to University - an Essential Kitchen List for Vegetarian Students

tin of baked beansI started this blog 7 years ago when my older daughter was 11 years old and had just started high school. She's now 18 and off to university. Where have the years gone?

Anyway, as she's going to be self-catering in her halls of residence, I've been helping her buy some essential kitchen equipment (Home Bargains and IKEA are your frugal friends!) and have drafted a basic food shopping list. As I don't know if she'll find anyone to food-share with, I'll be buying many of these items to fill her cupboard in the shared kitchen, so that I know she'll be eating OK for at least the first couple of weeks.

I thought I might as well share the list, in case it helps anyone else. As you can see, most of the items are cheap and cheerful, but nutritionally sound, providing plenty of carbs and protein for hard-working (and partying) students!

From my experience at uni, many years ago, it might also be worth name-labelling any food left in communal areas (such as the fridge and freezer) with a sticker or Sharpie pen, unless you want all and sundry to eat it!

Obviously vegan students can made the necessary changes to their list, but this would mainly be the fridge and freezer items.

You can also find lots of simple recipes and tips for veggie students here.

Not food-related, but if you're off to uni, do make sure you get your meningitis ACWY vaccination before you go.

Equipment
Cupboard
Freezer
Fridge
Medium frying pan
Medium sauce pan
Non-stick baking tray
Small pyrex dish
Plastic spatula/fish slice, serving spoon, potato masher
Small cheese grater
Potato peeler
Garlic crusher
Can opener
Sharp knife
Knife, fork, spoon, teaspoon x2
Dinner plate, side plate, bowl x2
Large glass, small glass x2
Scissors
Biscuit jar/tin
Plastic lidded containers to store food
Kettle (for own room)
Refried beans
Baked beans
Chickpeas
Tinned new potatoes
Tinned beans
Dried lentils
Tomato puree
Tin of soup
Tinned tomatoes/passata
Pasta
Rice
Pizza base mix
Squash
Cereal
Jam/peanut butter/Marmite etc.
Biscuits
Cereal bars
Vegetable/olive oil
Herbs and spices
Tea bags/coffee/hot chocolate
Long life milk individual (for own room)
Wraps
Bread
Veggie bacon
Bean burgers
Veggie sausages
Frozen mixed veg
Cheese
Milk
Butter
Fruit juice
Yogurt
Eggs
Garlic
Fresh fruit
Fresh veg
Pin It

Sunday 3 September 2017

Toffee Apple & Carrot Upside-down Cake - Suma Blogger's Network

Toffee Apple & Carrot Upside-down Cake
We've had a good crop of discovery apples this year, so I've been trying to come up with different ways of using up the windfalls. This fruity upside-down cake, which was inspired by this week's episode of The Great British Bake Off, makes a lovely autumnal recipe for the Suma Blogger's Network and must almost count as a 5-a-day!

Serves 6-8
  • 2-3 dessert apples, peeled, cored and thickly sliced
  • 100g/4oz toffee sauce - I used Cartmel Sticky Toffee Pudding Sauce from Suma
  • 100g/4oz butter
  • 100g/4oz soft brown sugar
  • 2 eggs
  • 150g/6oz SR flour
  • 1 medium-large carrot, grated
  • 50g/2oz raisins or sultanas
  • ½ tsp cinnamon
Pre-heat the oven to 180C/170C Fan/350F/Gas 4.
Grease and line and 8" baking tin.
Spread the toffee sauce over the base of the tin and then cover with a single layer of sliced apples.

Cream the butter and sugar together, then mix in the rest of the ingredients to make a thick mixture.
Carefully top the apples with the cake mixture, being sure to spread the mixture over evenly to cover all the apples.

Bake for 25-30 minutes, until golden brown and firm to the touch.
Allow to cool for 5 minutes in the tin, before turning out, to allow the sauce to soak into the cake.

Serve warm with custard, cream or ice cream.
Pin It

Wednesday 5 July 2017

Courgette, Green Bean and New Potato Salad

It's that time of year again and my home grown courgettes are fruiting in abundance - the yellow variety are doing particularly well.  As I'm not a fan of traditional potato salad, coated in mayonnaise, I devised this recipe instead.

Serves 4-6 as a side dish
  • 200g/8oz baby courgettes/zucchini, sliced
  • 100g/4oz green beans, sliced
  • 500g/1lb new potatoes, halved if large
  • 2 cloves of garlic, unpeeled
  • 2 tbsp olive oil
For the dressing:
  • 2 tbsp. olive oil
  • a good handful of chopped, fresh tarragon or a mixture of any fresh, green herbs you have to hand (parsley, oregano, basil, mint etc)
  • 2 tbsp white wine vinegar or lemon juice
  • 2 heaped tsp coarse grain mustard
  • Himalayan pink salt to taste
Pre-heat the oven to 200 C/190 C Fan/400 F/Gas 6 and heat 2 tbsp. olive oil in a baking tray or dish.

Boil the new potatoes for around 15-20 minutes (until tender), drain, then add to the hot roasting dish. Turn to coat with the oil and sprinkle with salt to taste.
After 5 minutes in the oven, add the sliced courgettes and garlic. Roast for  a further 10 minutes, or until beginning to turn a golden brown.

Meanwhile, boil the green beans for 8-10 minutes, or until al dente.
Drain and set aside.

Once the potatoes and courgettes are nicely browned, add the green beans to the baking dish and roast for a further 3-5 minutes.

Remove from the oven and allow to cool slightly.

Make the dressing by blending or mixing the crushed, roasted garlic, oil, herbs, vinegar and mustard.
Pour over the warm vegetables and turn gently to coat with the dressing.

Serve warm or cold for lunch or with barbecued food.

Pin It

Sunday 4 June 2017

Pinto Bean & Chickpea Falafels - Suma Blogger's Network

After recently making refried beans, I wanted to create another recipe which used dried pinto beans, for my latest Suma Bloggers post; pinto beans are great as a cheap, vegetarian source of protein because they don't require pre-soaking.

Although I've always used canned, cooked chick peas for falafels, it turns out that traditional recipes use soaked, raw chickpeas. I didn't have the time or inclination to soak my pulses for 12 hours, so I decided to boil them along with the pinto beans, without pre-soaking. This actually worked really well and I was pleased with the end result, which not only tasted good freshly cooked, but also worked well cold in wraps for my packed lunches.
  • 1 cup dried chickpeas
  • 1 cup dried pinto beans (from Suma)
  • 2 tbsp. olive oil, plus extra for frying
  • 1 onion, very finely chopped
  • 2 cloves of garlic, crushed
  • 1 tbsp. chickpea/gram flour (from Suma)
  • 1 chilli, chopped (optional)
  • 1 tsp cumin
  • 1 tsp ground coriander
  • 1 tsp sweet paprika
  • salt and pepper to taste
Rapidly boil the pulses for 10 minutes. Then cover and simmer for a further hour.
When cooked, drain.

Fry the onion and garlic in the olive oil for a few minutes, until softened.
Add the spices and cook for a further minute.

Blend the chickpeas with the cooked onion and spices, plus the gram flour, until you have a fairly firm, dough-like mixture.

Roll into 20-24 small balls, using your hands.
Refrigerate for 30 minutes to firm up.

Heat a few more tbsp. oil in a large frying pan on a medium-high heat. Cook the falafels for around 5-8 minutes until golden brown (you can deep fry if you prefer).

Serve in wraps, with salad and hummus.

 Suma Blogger's Network
Top Tip: A word of warning - these vegan and gluten-free falafels are quite fragile as they don't contain egg or breadcrumbs to bind them, so you need to turn them carefully when cooking!

Integrity Statement
As a member of the Suma Blogger's Network, I will receive a selection of complimentary products from Suma every two months, to use in recipe development, and will blog an original recipe for the Network. 


Pin It

Tuesday 16 May 2017

Easy Homemade Refried Beans (Frijoles Refritos)

Spicy Refried Beans
I've been meaning to try making my own refried beans for some time now and finally got round to doing so...just in time for National Vegetarian Week!

In case you don't know, the term refried is actually a mis-translation of refritos, which actually means well-fried, not fried twice.

My recipe is for a spicy version, similar in taste to the expensive, small tins you can buy in the UK. Providing you have most of the ingredients to hand, it works out at around £1 to make this recipe, equivalent to around 2-3 large cans. You could, of course, make a larger batch which would be even more economical.

Serves 8-10 as a starter, or side dish
  • 2 cups of dried pinto beans (no need to pre-soak)
  • 6 cups of boiling water
  • 6 tbsp. vegetable or olive oil
  • 1 large onion
  • 2 tbsp. pickled jalapeños
  • 2 tsp chipotle paste (optional)
  • 1 tsp paprika
  • 1 tsp cumin
  • ½ tsp salt
Place the beans and water in a large pan.
Boil rapidly for 10 minutes (uncovered), then reduce the heat and simmer for a further hour (with the lid on).
Drain, reserving some of the cooking liquid, then mash or blend the beans, adding back some of the reserved cooking liquid until you have the texture and consistency you prefer.

Finely chop or blend the onions and chillies.
Heat the oil on a medium heat and add the onion and chillies  Cook for a few minutes until softened.
Add the remaining ingredients and stir well.
National Vegetarian Week
Finally stir in the mashed beans and mix well to combine the ingredients.

Serve warm with tortilla chips, salsa and guacamole or use to stuff burritos.

Top tips: Eat half and freeze half of the mixture. Defrost and heat in the microwave, adding a little extra boiled water if needed.
For a mild, child-friendly version, omit the salt, chillies and chipotle paste from the main mixture. Serve the adult's portion with the above ingredients added to taste.


Pin It

Monday 1 May 2017

Sri Lanka: The Cookbook - Review & Giveaway


Sri Lanka: the Cookbook
I've only recently discovered the joys of Sri Lankan food, so I was delighted to be offered a copy of this book for review. Sri Lanka: the Cookbook gives a comprehensive introduction to Sri Lankan cuisine and explains the ingredients and cooking techniques.

Written by husband and wife team Prakash Sivanathan and Niranjala Ellawala, the book shows their knowledge of and passion for the cuisine of their former homeland:

“My wife and I have lived in London for many years, but I was born a Tamil in the Jaffna peninsula in the north of Sri Lanka, and Niranjala is a Sinhalese from the south. Between us, we have a deep understanding and love of the unique styles of cooking that together make up our island’s cuisine. We hope this provides a record of Sri Lankan history and diversity for generations to come.”

One thing I must say is that this probably isn't a book for novice cooks as the ingredients lists tend to be longer/more exotic and some of the recipes are a little more complicated than other books I've reviewed. You also need to be fan of coconut/coconut milk as similar to Thai food, these feature heavily. Having said that, if you already have a well-stocked spice rack and are used to cooking Indian or Thai food, I'm sure you'll love this book.

I also need to point out that this is not an exclusively vegetarian book, but as Sri Lankan food is naturally vegetarian-friendly, many of the recipes are either vegetarian, pescatarian or easy to adapt. All of the recipes are marked as to their suitability for vegetarians, but I did notice a few non-vegetarian (fish-derived) ingredients in some of these. They are easy to omit though, without losing any the authentic flavour of the dishes.

I've only tried out a few of the recipes so far, but I particularly liked the pol roti (spicy, coconut flatbreads) and poosanikai kari (pumpkin curry), both of which were fairly easy to make, but tasted very different to the Indian-style food I often cook.

SRI LANKA: THE COOKBOOK is published by Frances Lincoln, 6th May 2017, RRP £20.00
Also available from Amazon and other book shops.


Pin It

Monday 17 April 2017

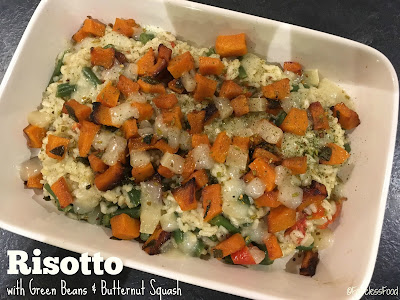
Risotto with Green Beans & Butternut Squash

Risotto with Green Beans & Butternut Squash

I was looking back through my blog the other day and realised that I've not posted any risotto recipes; that's probably because my girls aren't keen on risotto.

Anyway, I recently made this dish to share with friends, which went down very well. It certainly made a change from the ubiquitous mushroom risotto!
  • 1½ cups risotto rice
  • 1 onion, finely diced
  • 1 large clove of garlic, crushed
  • 1 cup dry white wine
  • 3 cups vegetable stock
  • ½ butternut squash, peeled and cubed
  • 150g/6oz green beans, cut into 2.5cm/1" pieces
  • 150g/6oz Manchego cheese; half grated, half cubed (or an alternative strong-flavoured, hard cheese)
  • 75g/3oz semi-dried or sun-dried tomatoes, roughly chopped
  • 1 tbsp. fresh parsley or oregano chopped (or ½-1 tsp dried herbs)
  • 1 tbsp. fresh sage, chopped (or ½-1 tsp dried herbs)
  • olive oil
  • salt and black pepper to season
Heat the oven to 180C Fan/190C/Gas 5/375F

Roast the butternut squash (drizzled with olive oil) for around 25-30 minutes, turning occasionally, until soft and browned. Sprinkle with the sage before the final 5 minutes of cooking time.

Cook the beans in a pan of water for around 8-10 minutes, until just cooked; drain.

Meanwhile, heat 2 tbsp. olive oil in a large pan.
Gently cook the onion and garlic until soft. Add the rice and cook for a further 2 minutes.
Add the white wine and stir well.
Add the stock, a little at a time, stirring occasionally. Cook for a further 15-20 minutes, or until the rice is al dente. Stir in the cooked beans and parsley/oregano.

Gently, mix in the grated cheese and chopped tomatoes. Season to taste.

Spoon into a serving dish and top with the roasted squash and remaining cheese. Return to the oven for a minute or so to allow the cheese to melt slightly.

Vegan version: simply omit the cheese or swap the grated cheese for 2 tbsp. nutritional yeast flakes.

Pin It

Wednesday 5 April 2017

Churro Waffles with Caramel Sauce

Churro Waffles with Caramel Sauce
These churro-style waffles are cooked in a waffle maker rather than being deep fried like traditional churros. I made mine in my trusty Sage Waffle Maker, however there are cheaper gadgets on the market. You could cook these like drop scones on a large non-stick frying pan, if you don't have a waffle maker.

Makes 4-5 large waffles
  • 2 eggs
  • 2 cups SR flour
  • 1⅓ cups milk  
  • ⅓ cup soft brown sugar                   
  • ⅓ cup butter, melted
  • 1 tsp vanilla extract
  • a pinch of bicarbonate of soda/baking soda
  • a pinch of cinnamon
For the cinnamon sugar, mix ingredients together.
  • ½ cup caster sugar
  • 2 tsp cinnamon
For the caramel dipping sauce, heat ingredients together in a pan or in the microwave and stir thoroughly.
  • 1 cup dulche de leche/caramel condensed milk
  • 1 cup evaporated milk or double cream
Beat all of the waffle ingredients together to make a smooth, thick batter.
Heat your waffle maker or frying pan on a medium-high heat.
Cook waffles until golden brown.

Whilst warm, dust on both sides with the cinnamon sugar.

Serve drizzled with the hot caramel sauce.

Top tip: Make a chocolate sauce by melting chocolate and mixing with double cream or evaporated milk. Heat gently until you have a smooth, warm sauce.
Pin It

LinkWithin

Related Posts Plugin for WordPress, Blogger...