Wednesday, 28 December 2016

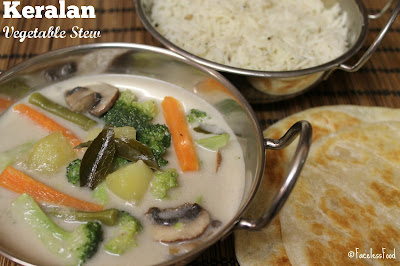
Keralan Vegetable Stew

Keralan Vegetable Stew, Vegan
This South Indian vegetable curry is made with a thin, aromatic, spiced coconut-milk sauce so it's more like a soup or stew than a traditional, British curry. The flavours are also more akin to Thai cuisine than a North Indian-style curry, but this recipe utilises seasonal, British vegetables, so it's very economical.

Although it's not exactly fat-free or low in calories, it makes a delicious, warming and vegan start to the New Year, especially if you're doing Veganuary.

Serves 4
  • 1 onion, chopped 
  • 1 stick of cinnamon
  • 4 green cardamoms, pierced with a knife or lightly crushed with your thumb
  • a sprig of fresh or dried curry leaves
  • 2 large cloves of garlic, crushed
  • 1 tbsp. grated, fresh ginger
  • 2 thin, green chilies, slit in half
  • 2 medium potatoes, peeled and cut into small chunks
  • 2 medium carrots, peeled and cut into batons or slices 
  • 1 cup of green beans, cut into 1"/2.5cm pieces
  • 2 cups of sliced mushrooms
  • 2 cups of broccoli florets or 1 cup of frozen peas
  • 1 tin coconut milk
  • ½ cup boiled water, optional
  • 1 tsp sugar, optional
Heat 1 tbsp. vegetable oil in a large saucepan.
Add the onion and whole spices and cook for a few minutes on a medium heat.
Add the garlic, ginger and chillies and cook for a further 2 minutes.
Throw in the green beans and potatoes along with the coconut milk.
Simmer for 10 minutes with the lid on, until tender.
Add the mushrooms and broccoli/peas and simmer for a further 5 minutes.
Season with salt, black pepper and sugar, to taste.
Add some of the water to thin the sauce if needed.

Serve with rice, appam, roti or paratha.

Pin It

Thursday, 1 December 2016

Ricotta and Amaretti Cake - Suma Bloggers Network

Christmas is just around the corner, so I wanted to create a new, festive recipe for the Suma Bloggers Network.  I decided on a dessert dish, which had to and taste special enough for the festive celebrations, without being too rich or heavy. As I had some amaretti biscuits from Suma, I wanted to use them in something other than a tiramisu and felt that they would add both texture and flavour to a cake.

My Italian-inspired Ricotta and Amaretti Cake is a cross between a cheese cake and a sponge pudding and has quite a  dense texture. It provides a seasonal alternative to the traditional Christmas pudding, which my daughters are not keen on it.

Serves 10
  • 50g/2oz softened butter
  • 1x250g/10oz tub ricotta
  • 150g/6oz soft brown sugar
  • 3 medium eggs
  • 150g/6oz self-raising flour
  • 100g/4oz ground almonds
  • 200g/8oz amaretti biscuits, roughly broken (from Suma)
  • 100g/4oz good quality chocolate (I used Montezumas Dark Chocolate, Bean Machine, from Suma), chopped into chunks
  • 2 tbsp very strong, cold coffee (2 tsp coffee granules to 2 tbsp. boiling water)
Preheat the oven to 150C/140C Fan/Gas 2/300F.
Grease and line a loose-bottomed 20cm round cake tin.

Put the butter, ricotta, sugar and eggs into a large bowl. Whisk for 5 minutes until thick, smooth and creamy. Then gently stir the coffee, flour and ground almonds.

Fold in most of the chocolate and biscuit pieces, but retain and handful of each.
Pour the cake mixture into the lined tin. Scatter with the remaining biscuits and chocolate and press lightly into the cake mixture.

Bake for around 45 minutes or until golden brown, firm to the touch and a skewer inserted into the centre comes out clean.
Cool in the tin for 10 minutes, before turning out.
Dust with cocoa powder or icing sugar before serving.

Serve warm with cream, ice cream or custard.

http://www.suma.coop/suma-bloggers-network/Top tips: Swap the coffee for 2 tbsp of  Tia Maria or Amaretto liqueur. For a more traditional Christmas flavour, omit the chocolate and add the equivalent weight of dried fruit, pre-soaked in the liqueur.
Gluten free option: Check that your amaretti biscuits are GF. Swap the flour for GF flour and add some GF baking powder if needed.

Integrity Statement As a member of the Suma Blogger's Network, I will receive a selection of complimentary products from Suma every two months, to use in recipe development, and will blog an original recipe for the Network.   

Pin It

Tuesday, 29 November 2016

Pizza with Aubergine and Two Cheeses

This is a really simple dish which I have tried to recreate, after eating it at a local pizzeria. My version cost a fraction of the restaurant version and almost tasted as good...I just need a pizza oven for Christmas!

Make 2 large pizzas
  • 1 quantity basic pizza dough
  • 2 medium aubergines/eggplants, thinly sliced
  • tomato sauce (or tomato puree)
  • fresh basil and dried oregano
  • 2 balls of mozzarella, drained and chopped
  • 100g/4oz parmesan style cheese, thinly sliced or shaved
  • olive oil
Make the dough and tomato sauce.

Heat 1 tbsp. of olive oil in a large frying pan.
Fry the aubergines in batches on a medium-high heat, adding more oil as needed. The aubergine slices need to be soft and golden brown.

Preheat the oven to its hottest setting.

Roll or stretch the dough to make 2 large pizza bases. Place on greased baking sheets.

Top each base with several tbsp. of tomato sauce, then scatter with the chopped mozzarella and herbs.
Arrange the slices of aubergine and parmesan-style cheese over the top.

Bake in a hot oven for 8-12 minutes, or until the cheese is bubbling and the base is golden brown.

Vegan version: Omit the mozzarella, sprinkle the tomato sauce on each pizza with 2 tbsp. of nutritional yeast flakes. Top with the aubergine and drizzle with a little more olive oil before baking.


Pin It

Sunday, 30 October 2016

Spicy Paneer & Vegetable Spring Rolls

Although spring rolls are normally considered a Chinese delicacy, these Indian-inspired creations are quite different in taste. After eating some of these crispy morsels at a local cafe, I thought I'd have a go at making them myself, whilst watching the Diwali fireworks going off in my neighbourhood.

So long as you can buy ready-made spring roll pastry, they're simple enough for kids or any novice cook to prepare, but look quite impressive.
  • 2 cups (around 225g/9oz) paneer, crumbled or grated
  • 1 cup each of frozen or tinned petits pois and sweetcorn
  • 1 tsp freshly-grated ginger
  • 1 crushed clove of garlic 
  • 1 green chilli, finely chopped
  • 1 tbsp fresh, chopped coriander
  • 1 tsp garam masala
  • ½ tsp cumin seeds
  • ½ tsp fennel seeds
  • ½ tsp chat masala (optional, but worth using if you can find it)
  • 10 sheets of spring roll pastry
  • vegetable oil, for frying
First make a flour/water paste using 1 tsp flour to 1 tbsp water (this is your 'glue' for the pastry).

Mix all of the filling ingredients together in a large bowl.
Take one spring roll sheet and place a heaped tablespoon of mixture by one corner (see photos above).
Spread a little of the paste along the opposite two edges.
Fold the bottom corner of pastry over the filling and roll once.
Fold in each side of the wrapper and roll towards the far corner (like a burrito).
Repeat until all of the filling has been used up.

Heat a good glug of vegetable oil in a large frying pan, on a medium-high heat. Shallow fry the spring rolls in two batches, cooking for 2-3 minutes on each side. Drain well on kitchen roll and keep warm in the oven.
Alternatively, brush generously with vegetable oil and bake in the oven at 190C/180C Fan/Gas 5/375F for 10 to 15 minutes, turning once.

Serve hot or warm with salad and your favourite chutneys/pickles, or try my Indian restaurant style mint sauce and onion salad.
To make this into a main meal, simply serve with rice and dhal.
Meat Free Mondays

Vegan variation: swap the paneer for 2 cups of mashed potato.
Filling variations: to make the paneer filling go further, add two cups of mashed potato and double the spice quantities.
Swap the peas and sweetcorn for cooked chickpeas (chana) if you prefer.  

Suitable for freezing. Batch cook in advance and freeze if you are cooking for large numbers over Diwali, Eid, Christmas or any other celebrations!

I'm adding this post to the Meat Free Mondays linky at Tinned Tomatoes.

Pin It

Mulled Cider with Pumpkin Pie Spiced Biscuits - Suma Bloggers Network

Mulled Cider with Pumpkin Pie Spiced Biscuits (vegan)
As I've just been given a jar of pumpkin pie spice by a friend, I though I'd better put it to good use and create an autumnal recipe for the Suma Bloggers Network. I've paired the (vegan) spiced cookies with some warming, mulled cider, both of which would be great for Bonfire Night.

For the mulled cider
Serves 2-4
  • 1 litre of good quality vegan cider (I used Aspall cyder from Suma)
  • 2 pouches of mulled cider spice (from Suma)
  • 2 tbsp soft, brown sugar, or a little more to taste
Put the spice pouches into a pan, along with the cider and sugar.
Warm the cider gently on a low heat until the sugar has dissolved and the cider is just starting to simmer (don't boil it!). Turn the heat off and allow to infuse for 10 minutes.
Serve warm.

For the biscuits
Makes 20
  • 200g/8oz SR flour
  • 100g/4oz dairy free spread/margarine
  • 100g/4oz soft brown sugar
  • 3 tbsp black treacle/molasses
  • 2-3 tsp pumpkin pie spice
  • ½ tsp bicarbonate of soda
Pre-heat the oven to 180C/170C Fan/Gas 4/350F
 Blend the spread and flour together using a food processor.
Add all of the remaining ingredients and mix well to form a firm, smooth dough.
Roll the dough into around 20 small balls.
Place, well spaced apart, on greased baking trays.
http://www.suma.coop/suma-bloggers-network/
Bake for 12-15 minutes.
Remove from the oven and allow to cool for a few minutes, before removing onto a wire rack to cool fully.

Suitable for freezing. 

Top tips: For any North American readers, this recipe uses alcoholic (hard) cider.

Integrity Statement As a member of the Suma Blogger's Network, I will receive a selection of complimentary products from Suma every two months, to use in recipe development, and will blog an original recipe for the Network.   


Pin It

Sunday, 2 October 2016

Super-Quick Microwave Chocolate Traybake

Super-Quick Microwave Chocolate Traybake
My microwave mug cake recipe has always been popular with my kids. Now they're teenagers, they can whip up a pudding themselves in record time and have adapted it to their own particular tastes. As they often want to entertain friends and there's a boyfriend on the scene, I thought I'd better come up with a recipe which can me made just as quickly, but can feed several hungry teenagers!

Serves 4+
  • 50g/2oz peanut butter (or other nut butter)
  • 50g/2oz butter or dairy-free spread
  • 1 egg or equivalent vegan egg replacer
  • 2 tbsp date, agave or golden syrup
  • 25g/1oz unsweetened cocoa powder
  • 75g/3oz SR flour
  • 50g/2oz soft, brown sugar or coconut sugar
  • ½ tsp vanilla extract
  • Toppings: your choice of chopped (dairy-free) chocolate, vegetarian sweets, dried fruit/chopped nuts, chocolate-hazelnut spread, jam, nut butter or a combination of any of these.
Put the butter and nut butter into a microwave-safe bowl and cook on high for 20-30 seconds to melt.
Stir well and mix in the sugar, syrup and vanilla.
Beat in the egg or egg equivalent and finally stir in the flour and cocoa powder.

Grease and line the base of a microwave-safe dish (around 15cm round or square).
Spoon in the mixture and spread out evenly with the back of a spoon.
Spoon or sprinkle your topping/s over the surface of the mixture.

Cook for 3-4 minutes on high in the microwave, or until the edges are cooked and firm and the middle still looks just slightly undercooked. Check after 2½-3 minutes, to ensure it doesn't over cook.

Leave in the dish and allow to cool for 10-15 mins.
Cut into 4-9 pieces.
Remove from the dish and serve warm or cold with custard or ice cream, if so desired.

Suitable for freezing.

Pin It

Monday, 15 August 2016

Very Green Salad with Rocket & Watercress

Salad with Rocket & Watercress
As you may have noticed from my previous post, I've been growing my own fruit and vegetables in raised beds this year, in an attempt to avoid the destructive deluge of slugs and snails. I must say, it's been pretty successful and I haven't had to buy any salad leaves for quite a while. As I'm now over run with rocket (arugula), I've been adding it to every salad I make, but haven't really allowed it to be the star of the show.

This very green salad is a great way to use up a glut of rocket and is a good source of vitamins, iron and calcium. The quantities are deliberately quite fluid, as you can use a mix of any salad leaves you have to hand, or need to use up.

Serves 4 as a side salad
  • 2 handfuls/cups of bitter salad leaves (rocket, watercress etc.)
  • 1 handful/cup of sweet salad leaves (lettuce, spinach etc.)
  • ⅓ cucumber, sliced
  • ½ green pepper, sliced
  • 50g/2oz green olives
  • 50g/2oz walnut pieces or pine nuts
For the dressing - mix these ingredients together in a cup or small bowl.
  • 1 tbsp. extra virgin olive oil (I used my Cretan Olive Oil from Arnaud Gillet)
  • 1 tbsp. lemon juice
  • Salt and pepper to taste
 NCRWash the salad leaves and blot dry.
Toss all of the salad ingredients together in a bowl.
Pour over the dressing and turn lightly to coat the ingredients.

Chill until needed. 

Keeps for 1-2 days in an airtight container in the fridge.


I'm entering this recipe to this month's No Croutons Required Challenge, co-hosted by Jacqui at Tinned Tomatoes and Lisa at Lisa's Kitchen

Pin It

Friday, 5 August 2016

My Kitchen Garden

This summer I've created my own kitchen garden in raised beds. I bought the raised bed kits from Wickes and built them myself; OK, with a little help from Mr.O! I filled the beds with a lasagne (layers) of peat-free bought compost, soil from the garden, garden compost and barbecue and bonfire ashes.

In an attempt to thwart the millions of rampaging slugs and snails which inhabit my garden, I surrounded each bed with about 20-30 cm of gravel. This does seem to be doing the trick, but I still need to pick out the little blighters which do make it across.

I'll admit that I've rather overcrowded the beds this year, but everything still seems to be growing well. I've planted just a few plants each of: runner beans, green beans, broad beans, courgettes, butternut squash (grown from seeds which I dried and saved from a shop-bought squash), tomatoes, herbs and chillies.

I've also been growing mixed salad leaves including lettuce, rocket and watercress.
As we eat a lot of salad and I like a bargain, I've come up with a thrifty way to grow salad leaves for the price of a couple of bags of shop-bought leaves.
  • Lettuce: Buy a 'growing' pack of mixed lettuce for £1-2 from your local supermarket, split them up and plant them out, you can start picking the leaves within 7-14 days and can be harvested for over a month if you keep them well watered.
  • Watercress: Just plant a few odd sprigs of left over watercress from a bag of salad. Look out for the pieces which have little roots attached to the base of the stems. Again, with a few weeks, they'll have spread and will be ready to start harvesting. I was quite amazed that watercress doesn't need to be grown in water!
  • Rocket: This is really quick and easy to grow from seed. Just sprinkle a row of seeds every couple of weeks and pick the larger leaves off as soon as they're ready.
My courgettes have just started fruiting and my runner beans won't be far behind, so look out for more recipes featuring my kitchen garden harvest.

Pin It

Wednesday, 27 July 2016

Baklava (Vegan) - Suma Blogger's Network

For this month's Suma Blogger's Network post, I thought I'd make something sweet. As we're off to Greece for our holidays soon, I decided to make some baklava.

Baklava is a very indulgent Greek and Middle-Eastern treat, which usually contains copious quantities of butter and honey, but I've found that it's simple to veganise without losing any flavour.
  • 150g/6oz almonds
  • 150g/6oz walnuts
  • 150g/6oz hazelnuts or cashews 
  • 1 tsp ground cinnamon
  • 1 pack filo pastry
  • 75g/3oz dairy-free spread/butter
For the syrup
Roughly grind all of the nuts in a food processor and mix in the ground cinnamon.

Grease a baking tin with some of the melted butter.
Line the tin with a sheet of filo, letting it drape over the sides of the tin. Baste with more butter and repeat several times until you have used half of the pastry.

Tip in half of the nuts and spread out over the pastry. 
Fold a couple more sheets of pastry and place them over the layer of nuts so they fit snugly in the tin. Baste with more butter.

Cover with the remaining half of the nuts.
Layer the remaining sheets of pastry over, basting with butter each time.
Finally fold the over-lapping sheets in to fully enclose the nuts.
Baste the top with the remaining butter.

Cut the 'pie' into small squares or diamonds, using a sharp knife, cutting through all of the layers carefully.
Bake in a pre-heated oven  at 180C/170C Fan/350F/Gas 4 for approximately 45 mins, or until the surface is crisp and golden brown.

Meanwhile make the syrup.
Mix all the syrup ingredients together in a pan and allow the sugar to dissolve on a low heat, stirring occasionally.
Suma Blogger's NetworkBring to a simmer and simmer for 5 minutes. Take off the heat and allow to cool.

When the baklava is cooked, remove from the oven and poor the cool syrup all over the hot baklava.
Allow to cool in the tin at room temperature. Leave to soak in the syrup for several hours, before serving.


Integrity Statement As a member of the Suma Blogger's Network, I will receive a selection of complimentary products from Suma every two months, to use in recipe development, and will blog an original recipe for the Network.   
Pin It

Saturday, 2 July 2016

The Vegetarian Italian Kitchen - Review & Give-Away

New Holland Publishers
I don't actually blog many Italian-inspired dishes, but I do cook quite a few simple and rustic Italian dishes at home. That's why I was quite excited to receive a copy of The Vegetarian Italian Kitchen by Italian born author and journalist, Veronica Lavenia. This book isn't full of fancy ingredients and celeb-chef anecdotes. It's a book written with a passion for simple, healthy and easy-to-prepare vegetarian food.
"The Vegetarian Italian Kitchen represents the true contemporary culture of Italian homemade cooking that is both healthy and affordable for everyone."
The book is arranged in seasons, so is great for anyone who receives an organic vegetable box or has a kitchen garden or allotment. Not every recipe is illustrated, but each recipe is made from wholesome, fresh ingredients. Some of the specialist pasta shapes might be hard to come by in the UK, but I don't see why they can't be swapped for a penne, spaghetti or macaroni, if that's what you have in the cupboard!

Some recipes are vegan (or can easily be adapted by omitting the cheese!) and gluten free too, although, unfortunately, the recipes don't indicate this. Another small gripe, is the inclusion of non-vegetarian cheeses, such as Parmesan, but again, these are easy to substitute.

As usual, I had to try out several recipes, before posting my review. I really enjoyed eating the carrot and dried fruit salad as a side with the baked oven anellini. Both really easy to prepare using seasonal ingredients, but very tasty too.

If that's whet your appetite, I have a copy of The Vegetarian Italian Kitchen, published by New Holland Publishers, to give away.

Just enter your details on the Rafflecopter widget below and leave me a comment, telling me your favourite Italian dish. Competition closes at 12.00 am on Sun 10th July. UK ONLY.

a Rafflecopter giveaway Pin It

Tuesday, 28 June 2016

Tear 'n' Share Garlic Bread

Tear 'n' Share Garlic Bread
This garlic flat bread is really cheap and easy to make. It's great to share at buffets, parties and barbecues and can be easily adapted include your favourite toppings. I've included a vegan version, for anyone who prefers a dairy-free option.

For the dough
  • 1 cup cold water
  • 3 cups strong white bread flour
  • 1 sachet fast action dried yeast
  • 1 tsp salt
  • 2 tbsp olive oil, plus extra for drizzling
For the topping
  •  4 tbsp butter or dairy-free spread, softened
  • 1 tbsp fresh, chopped herbs (I used rosemary, oregano and parsley) 
  • 2 cloves of garlic, crushed
  • 4 tbsp grated Parmesan-style hard cheese (omit for vegan version)
  • A little coarse sea salt (optional)
If you have a bread maker add all of the dough ingredients to the pan and set on the dough setting.
If you don't have a bread maker, mix all the ingredients (except the oil and water) in a large bowl. Add the water gradually until you have a soft but not sticky dough. Cover and leave to rise in a warm place for 45-60 minutes, until doubled in size.
After the dough has risen, divide into 2.
Stretch or roll the dough into two large, flat ovals and place on greased baking trays.
Brush a little more oil over the dough and sprinkle with a good pinch of coarse sea salt.
Using a pizza wheel, cut parallel lines across the dough, leaving a 1-2 cm border to hold the dough together (see picture)
Leave to rise for a further 20-30 minutes.

Meanwhile, make the garlic butter by mixing the butter, garlic and herbs together - reserve this for later.
Bake in a preheated oven at 220C/200C fan/Gas 7/425F for 10 minutes, or until golden brown.
Removed from the oven and spread half of the softened garlic butter across each flat bread. Sprinkle with the cheese, if using.
Return to the oven for a further 2-3 minutes.
Allow to cool for 5 minutes before removing from the tray and serving.
If freezing or re-heating later in the day, remove from the tray and cool on a wire rack.

Best served warm.

Suitable for freezing. 

Top tip: If you prefer to use fresh yeast, swap the dried yeast for around 15g/½ oz fresh yeast . Increase the flour to 3½ cups.

credit crunch munch
I'm entering this recipe to this month's Credit Crunch Munch , hosted by Tasty Appetite and founded by Fab Food 4 All and Fuss Free Flavours.


Pin It

Tuesday, 7 June 2016

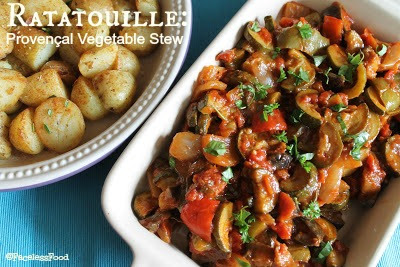
Ratatouille with Sautéed New Potatoes

Ratatouille: Provençal Vegetable Stew
I've only just planted out my courgette plants, but I'm already trying out some new recipes to use up the inevitable glut which will soon be on its way!

I've got to admit that I'm, generally not a big fan of ratatouille. Mainly because the vegetables are often stewed together, so some get over cooked and mushy, whilst others are still al dente. My version, takes longer to cook than most British versions of the recipe, but this more traditional way of cooking the dish gives it a better texture and taste.

Serves 4
  • 1 medium/large aubergine, quartered lengthwise and sliced
  • 2 medium courgettes, halved lengthwise and sliced
  • 2 bell peppers, de-seeded and cut into chunks
  • 1 large onion, cut into chunks
  • 6 tbsp olive oil
  • 2 bay leaves
  • 1 tin chopped tomatoes
  • 1 large clove of garlic, chopped or crushed
  • ½ tsp dried or 1 tsp fresh, chopped thyme
  • ½ tsp dried oregano
  • 1 tbsp fresh, chopped fresh parsley
  • black pepper, to taste
Heat 3 tbsp of olive oil in a large frying pan on a medium-high heat.
Cook the aubergine for around 10 minutes, turning regularly. When the aubergine is soft, golden brown and releases its juices when pressed, it's done! 
Remove from the pan and drain on kitchen towel.

Add a further 1 tbsp of oil to the pan and repeat the process with the courgettes. They should take around 5 minutes to soften and brown slightly. Remove from the pan, as before.

Heat a further 1 tbsp of oil in the pan and repeat with the peppers. Cook for around 5 minutes, then reduce the heat to medium. Add the onions and garlic along with another 1 tbsp oil. Sauté for a further 2-3 minutes.

Now add all of the remaining ingredients and bring to a simmer.
Throw the aubergine and courgettes back in and stir to combine.

*At this point, you can remove from the heat and chill until needed.

Continue to simmer, with the lid on for 15 minutes. 
Remove the lid and simmer for a further 5-10 minutes until most of the tomato juice has evaporated and the vegetables are tender, but not mushy. 

*If reheating from cold, place in a baking dish and cover with foil. Bake for 30-40 minutes in a medium oven 160C/150C Fan/Gas 3/320F, until piping hot.
 meat free Mondays
Serve warm or hot with sautéed or boiled new potatoes. 

Top tip:  This makes a great vegetarian lasagne filling too.

I'm linking this post to the Meat Free Mondays round-up over at Tinned Tomatoes.

Take a look at these recipes from some of my fellow food bloggers, for more delicious courgette (zucchini) based dishes:

Pin It

Sunday, 15 May 2016

Spinach and Cheese Stuffed Mushrooms

Spinach and Cheese Stuffed Mushrooms
It's National Vegetarian Week once again, so here's a quick and easy recipe to show you that being veggie isn't all about lentils, and that life certainly is not too short to stuff a mushroom!

These stuffed mushrooms can be eaten as a starter, lunch or main meal, depending on the portion size and what you serve with them.

Serves 3-4 as a starter or lunch (2-3 mushrooms each, depending on size).
  • 8 or 9 large flat mushrooms (Portabello type)
  • 200g/8oz fresh spinach, washed
  • 1 small onion, finely diced
  • 1 clove of garlic, crushed
  • 1 tbsp chopped fresh parsley
  •  a little fresh nutmeg
  • 50g/2oz vegetarian Brie (rind removed), roughly chopped
  • 50g/2oz grated Parmesan-style hard cheese 
Put the spinach into a large bowl. Do not add any water!
Cover with cling film and microwave for 2-3 minutes on high, or until cooked. Allow to cool, then squeeze as much moisture out as possible, and chop or blend roughly.

Meanwhile, heat a large frying pan or griddle and preheat the oven to 180C/170C Fan/Gas 4/350F.
  
Peel the outer skin from the mushrooms and remove the stalks.
Drizzle the mushrooms with a little olive oil and cook for around 5 minutes on a medium-high heat, turning occasionally. Remove from the pan and place in a dish or on a baking tray.

Chop the mushroom stalks finely.
Gently fry the onion and mushroom stalks in a drop of olive oil for a few minutes, then add the garlic, nutmeg and parsley. Cook for a further 2 minutes.
Then add the cooked spinach and cheeses and stir well to combine all of the ingredients.

Top each mushroom with a tablespoon of the spinach mixture (at this point you could chill the mushrooms and re-heat later).

Pop into the oven for 5-10 minutes to heat through.


 meat free Mondays
Serve with salad and bread. Not suitable for freezing.

Top tips: Cook the mushrooms on a barbecue. Top with the pre-made spinach mixture and warm through. These mushrooms would also make a tasty main course served pasta.

Vegan version: Swap the dairy cheeses for your preferred vegan cheese alternatives.

I'm linking this post to the Meat Free Mondays round-up over at Tinned Tomatoes.

 NVWVisit the Kitchen Table!
Celebrate your food, stories and traditions.
National Vegetarian Week 16 - 22 May 2016

Pin It

Sunday, 8 May 2016

Freekeh Salad with Pomegranate Molasses Dressing - Suma Blogger's Network

Superfood Salad
This is my first attempt at a superfood salad, and I'm pretty pleased at how well it turned out... It's packed full of protein, fibre and vitamins, but still tastes great!

Thanks to the Suma Blogger's Network, I get to try out lots of weird and wonderful, new vegetarian products. This time, freekeh and pomegranate molasses were amongst my picks. For those of you who don't know, freekeh, pronounced free-ka (young, green wheat which is cracked and roasted), is considered both an ancient grain and a super-grain. It has a high fibre and protein content and is very versatile as it can be served hot or cold in place of other grains such as rice or quinoa.
Pomegranate molasses was a revelation to me, as it was far more tangy and flavoursome than I anticipated (I thought it would be sweet!), and gives a great sweet and sour flavour to a dressing.

Serves 4 as a lunch or side salad; 2 as a main meal

For the salad

  • 1 cup freekeh from Suma
  • 2 cups veg stock
  • 2 tbsp olive oil
  • ½ can chickpeas, drained and rinsed
  • ½ teaspoon lightly toasted cumin seeds, ground, more to taste
  • 2 bell peppers,deseeded and cut into chunks
  • 2 cups of butternut squash or sweet potato, peeled and cubed
  • 1 cup of button mushrooms, halved
  • 4 tbsp pine nuts
  • 1 garlic clove, crushed
  • a small bunch of chopped, fresh mint
  • ½ cup crumbled feta (optional)

For the dressing

  • 1 tbsp lemon juice
  • 2 tbsp pomegranate molasses from Suma
  • 1 tbsp extra-virgin olive oil 

Preheat the oven to 200C/180C Fan/Gas 6/400F

Put the peppers and squash into a roasting pan and drizzle with 2 tbsp olive oil.
Roast for 20-30 minutes until softened and starting to brown.
Add the mushrooms, chickpeas, pine nuts, cumin seeds and crushed garlic and return to the oven for a further 5 minutes.
Remove from the oven and allow to cool for around 15 minutes.

Meanwhile, put the freekeh and stock into a large pan. Bring to the boil, then reduce the heat to a simmer.
Simmer, with the lid on, for 20-25 minutes, or until the grain is soft and just starting to break up.
Drain well and allow to cool for around 15 minutes.

Mix the dressing ingredients together and stir into the warm freekeh.

When the freekeh and vegetables are still just warm (but not hot!), mix together to combine.
Add the mint and feta, if using.


Suma Bloggers' Network
Serve warm or cold.

Keeps for up to 3 days in the fridge; not suitable for freezing.

Vegan option: Omit the feta or swap for vegan feta or halved olives.

Integrity Statement
As a member of the Suma Blogger's Network, I will receive a selection of complimentary products from Suma every two months, to use in recipe development, and will blog an original recipe for the Network. 


Pin It

Sunday, 24 April 2016

Fattoush Salad

Fattoush Salad
I've been cooking a lot of Greek and Middle-Eastern food lately, and after a delicious meal out at a Lebanese restaurant, I thought make a maza (a selection dishes to share). This was one of the dishes I prepared, which makes a nice change to a traditional salad.

Serves 4
  • 1 cos or 2 little gem lettuce, shredded
  • a good handful of rocket
  • ½ cucumber, de-seeded and sliced
  • 2-3 ripe tomatoes de-seeded and diced
  • a handful of radishes, thinly sliced
  • 3-4 spring onions (or ½ red onion), sliced
  • 1 large bell pepper, diced
  • a small bunch each of fresh parsley and mint, roughly chopped
  • 1 large or 2 small pittas
  • sumac
dressing
  • juice of 1 lemon
  • 2 tbsp extra-virgin olive oil
  • ½ tsp sumac
  • 1 small clove of garlic, crushed
Brush the pittas with olive oil; and sprinkle with sumac.
Grill or bake until crispy and golden, then set aside to cool. Break into pieces when cold.

 NCRMix the dressing ingredients together in a bowl. Add in the prepared tomatoes, cucumber, radishes, spring onions and herbs. Stir well to coat. These ingredients can be set aside and chilled until needed.

Before serving, mix in the salad leaves and the roughly crushed, toasted pittas.

Top tip: To make this into a delicious, healthy lunch, simply mix in a tin of drained chickpeas and serve with pitta and your favourite dip.

I'm entering this recipe to this month's No Croutons Required Challenge, co-hosted by Jacqui at Tinned Tomatoes and Lisa at Lisa's Kitchen


Pin It

Sunday, 20 March 2016

Hummus - Middle-Eastern Chickpea Dip

I am a little ashamed to admit that I've never made traditional hummus, using dried chickpeas before. Having made this version for my blog, I've been converted! It really does taste better (and is far cheaper) than making it with tinned pulses. Yes, it takes longer to make,but you can make a large batch and freeze in small portions to make it even more economical.

Serves 8 as a starter or meze dish
  • 1 cup dried chickpeas (garbanzo beans), soaked over night with a good pinch of bicarbonate of soda
  • a large pinch of salt
  • juice of 1 lemon (plus the zest for a more lemony flavour)
  • 4 tbsp tahini
  • 2-4 cloves of garlic, crushed
  • 1 tsp ground cumin
  • 2 tbsp olive oil
  • 6-8 tbsp cooking liquid, or more if needed
  • paprika and a glug of extra virgin olive oil to garnish
Drain the soaked chickpeas and put in large pan. Cover with boiled water and a pinch of bicarbonate of soda and bring to a simmer. Simmer, in a covered pan, for 1 hour on a low heat.
When tender, drain the pulses, reserving the cooking liquid.

Whilst still warm, place the chickpeas in a blender with all of the remaining ingredients and blend until smooth. Add enough of the reserved cooking liquid to make a smooth, spreadable paste. 
Taste and add more seasoning and/or garlic, if needed.
Spoon into a bowl and chill until needed.
Before serving, drizzle with olive oil and sprinkle with paprika.

Serve with fresh bread, olives and salad.

Suitable for freezing; keeps in the fridge for 2-3 days.

Top tips: Double this recipe to make enough to batch freeze. 
If you don't have the time to make hummus using dried pulses, try my quick and easy recipe instead. You might also like my mixed bean and basil hummus.

Flavour options: Omit the cumin and add some extra ingredients into the blender, along with the chickpeas to make these different variations...
 NCR
  • Red pepper and sweet chilli: Add ½ cup of chopped, roasted red peppers (from a jar) and 1-2 tbsp sweet chilli sauce.
  • Piri piri: Add 1-2 tbsp of your favourite piri piri sauce. 
  • Caramelised onion: Add 2 tbsp of caramelised onion chutney.

I'm entering this recipe to this month's No Croutons Required Challenge, co-hosted by Jacqui at Tinned Tomatoes and Lisa at Lisa's Kitchen

Pin It

LinkWithin

Related Posts Plugin for WordPress, Blogger...